Blog

+91-8171144903

1-855-257-5251

Products

×

Guide to Create Connection With the Various Email Platforms Using Shoviv Migrator

Microsoft 365

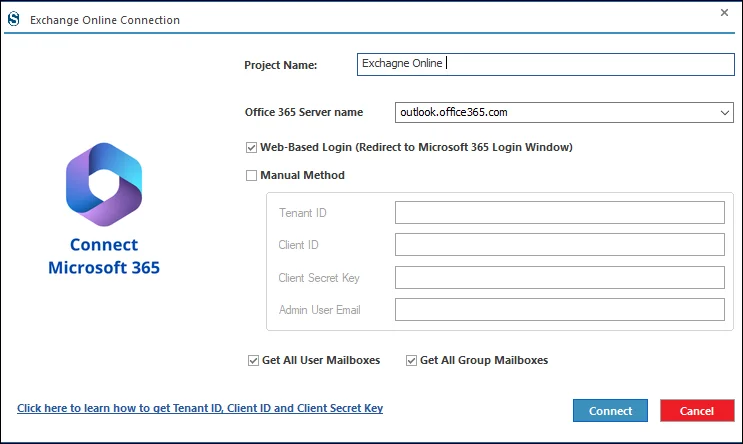
Step 1: Clicking "Add Project" will display two methods to connect to Microsoft 365: Web-Based Login (Redirect to Microsoft Login Window) and a Manual Method.

  • Project Name: Specify a project name to ensure proper identification
  • Select the appropriate Office 365 Server Name to connect your Microsoft tenant correctly.

Web-Based Login (Redirect to Microsoft Login Window):

  • Click Connect to start.
app registration

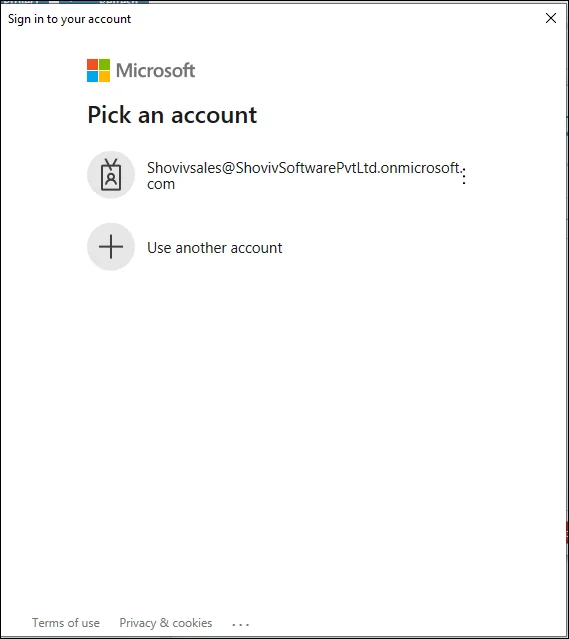
2- On the Microsoft sign-in page, enter the admin ID and click Next.

app registration

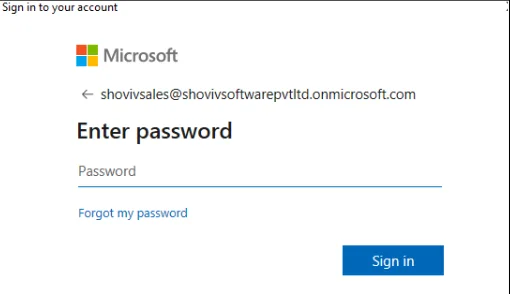
3- Enter the password and click Sign in.

app registration

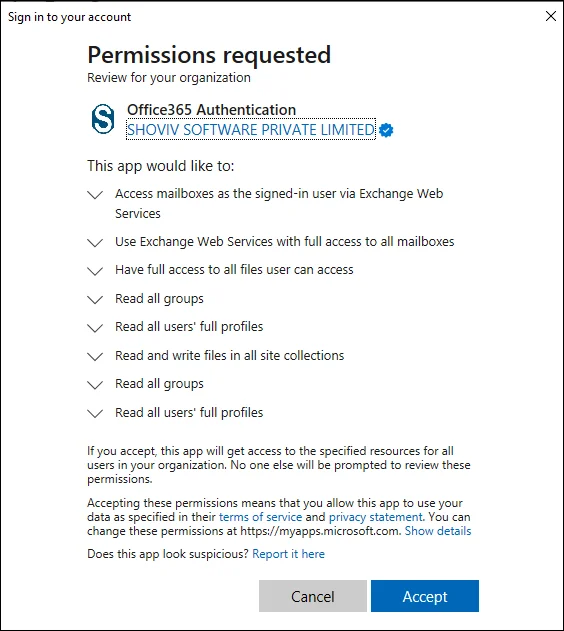
4- Review permissions and click Accept to finish authentication.

app registration

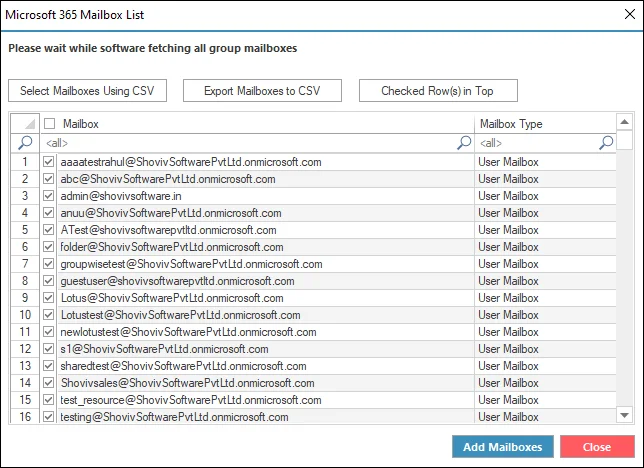
5- You can then choose mailboxes using these options:

  • Select Mailbox Using CSV: Import a CSV file to select specific mailboxes, especially for large lists, quickly.
  • Export Mailbox in CSV: Exports the mailboxes list for records or further use.
  • Checked Row(s) in Top: Move selected mailboxes to the top for easier review.

After selecting the required mailboxes, click Add Mailboxes to continue.

app registration

Step 2: Manual Method:

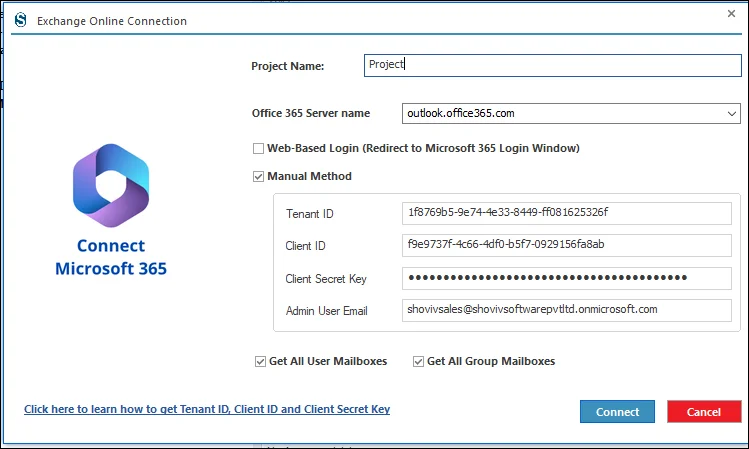
6. Manual Method: Enter the Tenant ID, Client ID, Client Secret Key, and Admin User Email.

  • Tenant ID: Unique identifier representing your Microsoft 365 organization’s directory environment.
  • Client ID: Identifies the registered application requesting access to Microsoft services securely.
  • Client Secret Key: Confidential key acting like a password to authenticate the application securely.
  • Admin User Email: Administrator account email with permission to access and manage organization data.
    For a step-by-step guide on how to obtain the Tenant ID, Client ID, Client Secret Key, and Admin User Email, refer to the following resource:
https://www.shoviv.com/technical-guide/connect-exchange-server.html

  • Get All User(s): Retrieves all user mailboxes from Microsoft 365.
  • Get All Groups: Fetches all group mailboxes from Microsoft 365
app registration

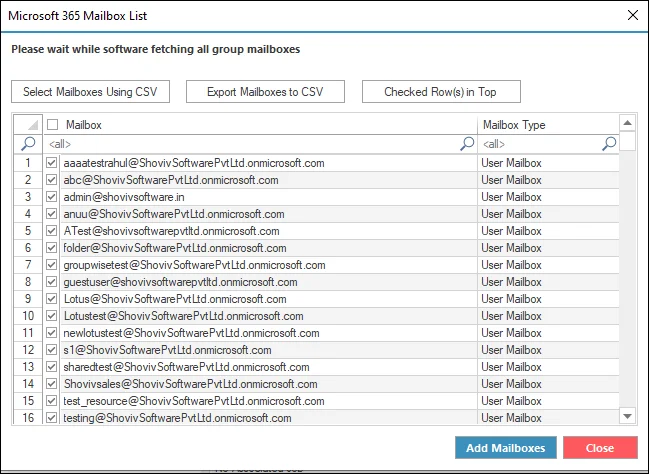
7- After clicking the Connect button, the software will display a list of available mailboxes. From here, you can choose the specific mailboxes you want to work with using the following options:

  • Select Mailbox Using CSV: This option allows you to import a CSV file containing a list of specific users.
  • Export Mailbox in CSV: Use this option to export the list of users in CSV format.
  • Check Row(s) in Top: This feature moves the selected user to the top of the list.
  • Once you have selected the desired mailboxes, click on Add Mailboxes to proceed with the next step.
app registration
Exchange On-Premises

Step 1: After clicking on that button, another window opens where you need to enter the credentials in the given fields.

  • Project Name: Enter a meaningful Name to identify and manage easily
  • Exchange Version: Select the appropriate Exchange Server version from the dropdown list.
  • Active Directory ID Address: Provide the IP address of the Active Directory server.
  • Exchange Name/IP Address: Enter the IP address of the Exchange server.
  • Admin User Email Address: Input the email address of an administrator account that has sufficient permission to access mailboxes.
  • Password: Enter the password for the admin account.
  • Get All User Mailboxes: Enable this option if you want to fetch all user mailboxes from the Exchange server automatically.
  1. If connecting with an admin account that has impersonation rights, this option allows access to multiple mailboxes.
  2. For a single mailbox connection, keep this option unchecked.
    Note: To connect multiple mailboxes using an admin account, ensure that the account has the necessary impersonation rights. Without these permissions, the software may not be able to access all user mailboxes.

After entering all required details, click on Connect to proceed.

service account

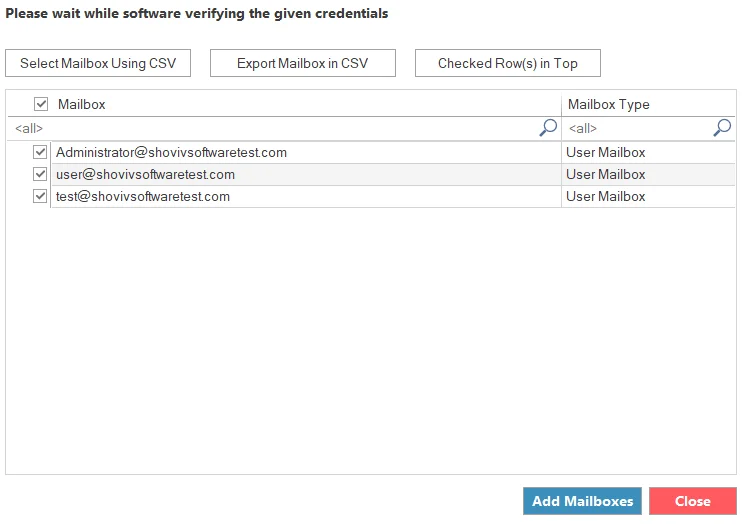
Step 2: After clicking the Connect button, the software will display all available mailboxes. From this list, you can choose the mailboxes you want to work with using these options:

  • Select Mailbox Using CSV: Import a CSV file that contains a list of specific mailboxes.
  • Export Mailbox in CSV: Export the current mailboxes into a CSV file.
  • Check Row(s) in Top: Move the selected mailboxes to the top of the list.

After selecting the required mailboxes, click Add Mailboxes to continue to the next step.

service account
Google Workspace

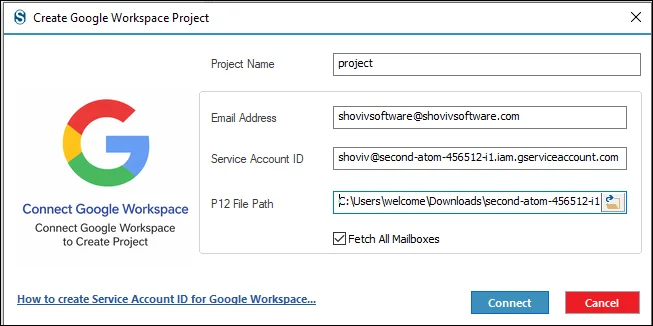
Step 1: Connect the project to Google Workspace by clicking “Add Project” and providing the required credentials.

  • Project Name: Enter a name for your Google Workspace project to identify and manage it easily.
  • Email Address: Provide the primary Google Workspace user email used to access and manage mailbox data or perform operations through the connected project.
  • Service Account ID: Enter the Google Cloud Service Account email, which enables secure server-to-server authentication for accessing Google Workspace data without user interaction.
  • P12 File Path: Specify the local path of the private key (.p12) associated with the service account, used for secure authentication and API authorization.
  • Fetch All Mailboxes: Enable this option to retrieve all mailboxes associated with the Google Workspace automatically.
  • After entering all details, click Connect to proceed.
For instructions on creating a Service Account ID in Google Workspace, refer to: https://www.shoviv.com/technical-guide/add-service-account-id-and-p12-file-path-for-google-drive.html

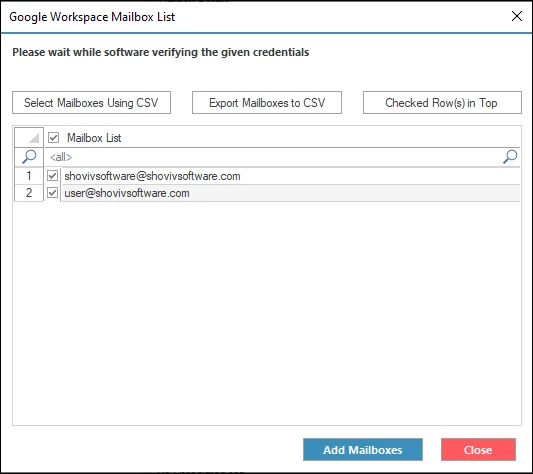
Step 2: After clicking the Connect button, the software will display a list of available accounts. From here, you can choose the specific accounts you want to work with using the following options.

  • Select Mailbox Using CSV: This option allows you to import a CSV file containing a list of specific accounts.
  • Export Mailbox to CSV: Use this option to export the accounts into a CSV file.
  • Check Row(s) in Top: This feature moves selected accounts to the top of the list.
Amazon WorkMail

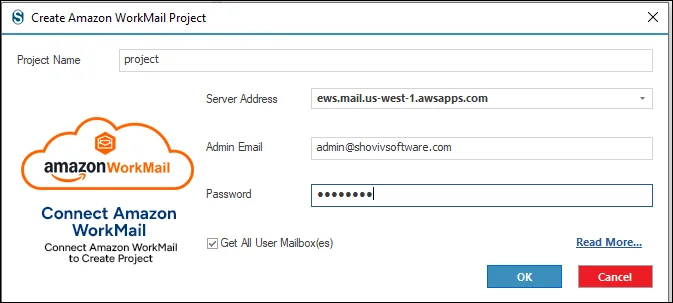
Step 1: To connect with a project, click on the Add Project button. After that, the Project Creation window opens, and you enter all the required credentials that are asked for.

  • Server Address: The regional Amazon WorkMail endpoint (for example, US East or West) used by your client to connect to the correct mail service center.
  • Admin Email: The administrator’s email account with permission to access and manage mailboxes.
  • Password: Enter account password.
Get All User Mailbox(es): When enabled, the tool retrieves every mailbox in the organization automatically, instead of selecting or connecting to individual users' accounts manually. Click here to learn how to obtain the Migration Permission for Amazon WorkMail.
  • After clicking the Connect button, the software will show a list of available accounts. From there, you can select the accounts you want to work with using these options:
  1. Select Mailbox Using CSV: Import a CSV file that contains the list of accounts you wish to use.
  2. Export Mailbox to CSV: Export the available accounts into a CSV file.
  3. Checked Row(s) in Top: Move the selected accounts to the top of the list.
IMAP Connection

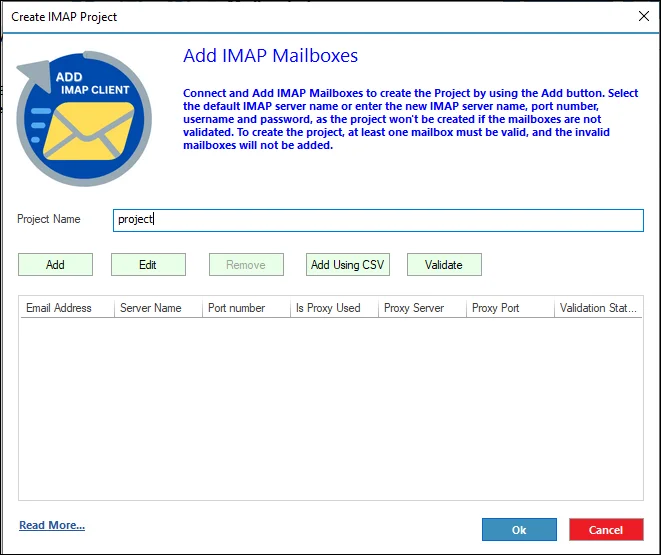
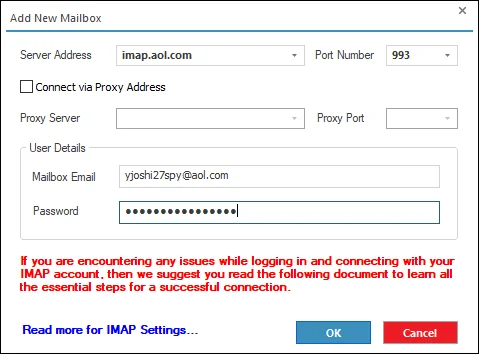
Step 1: Click on the Add Project option to connect with the project. The project creation window opens. Enter the Project Name and credentials that are asked for:

  • Add: Select this button to set up a mailbox using your email address and password.
  • Add Using CSV: To add multiple mailboxes simultaneously, use the Add Using CSV option. While adding the mailboxes, ensure the details are entered in the following format: Email Address, Password, Server Address, and Port Number.

Step 2: Email Address: Full email address of the mailbox you want to connect.

  • IMAP Server Name: Incoming mail server address used to access emails via IMAP protocol.
  • Port Number: Port number for IMAP connection, usually 993 for secure SSL connections.
  • Username: Login name for the email account, often the same as the full email address.
  • Password: The password for the email account used to authenticate and access the mailbox.
  • Is Proxy Used: If you are using a proxy server, then check the Connect via Proxy Address option.
  • Proxy Server: Hostname or IP address of the proxy server, if a connection requires one.
  • Proxy Port: The Port number used by the proxy server to route the IMAP connection.
  • Some IMAP email clients require you to sign in with an app password. To find out how to generate an app password, click here.
Box Personal
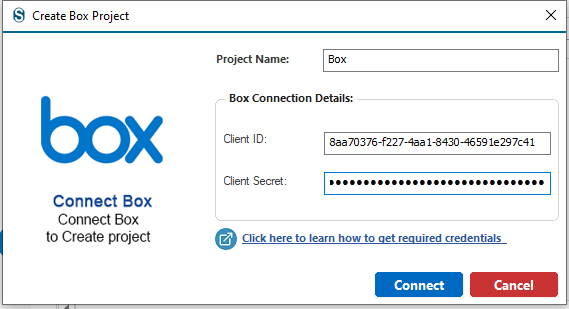
  • The initial step in migrating Box Personal is to create a connection between SharePoint and the migration software. Start by clicking the Add Project button. After doing so, the Project Creation window will appear, displaying several required fields that need to be filled out before moving forward with the migration process.
  • Project Name: Provide a project name
  • Client ID: You can locate the Client ID, also referred to as the Application ID, in the Overview page of Azure Active Directory.
  • Client Secret: In this field, enter the Client Secret that you created in the Certificates & Secrets area of the application registration.
  • Click here to learn how to get required credentials:
    https://www.shoviv.com/technical-guide/learn-to-connect-box.html
Box for Business
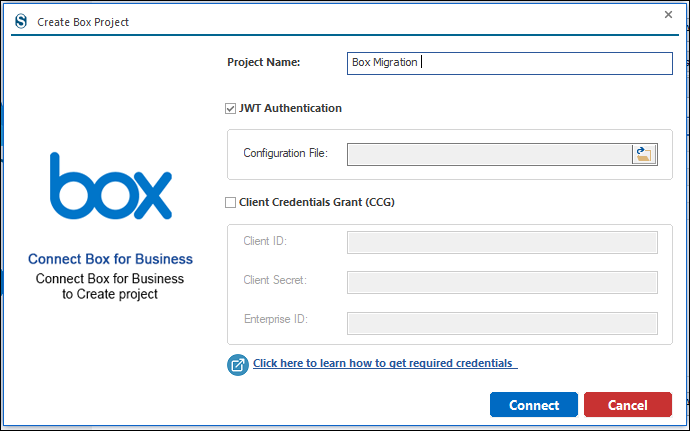
  • The first step in the Box Business migration process is to connect the migration tool to SharePoint. To begin, select the Add Project button. Once you click this option, the Project Creation dialogue window will open. This window contains several fields that must be completed before you can proceed with the migration.
  • Project Name: Enter the name of the Project.
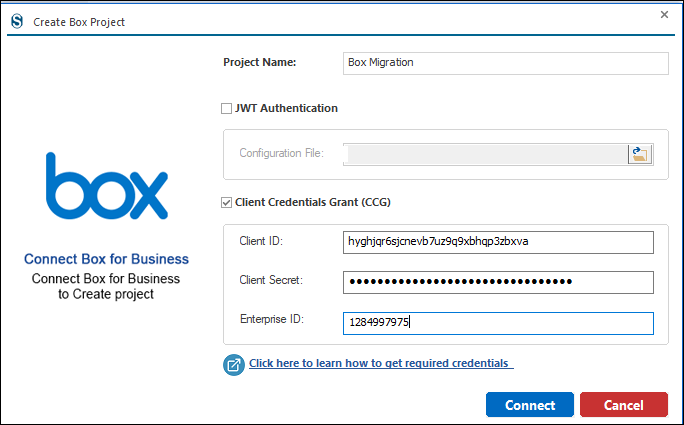
  • Business Box Account: You have the option to use either JWT Authentication or the Client Credentials Grant (CCG) approach.
  • JWT Authentication needs the JSON file for the authentication.

Client Credentials Grant:

  • Client ID: Enter the Client ID, also known as the Application ID, of the registered application in Azure Active Directory. This unique identifier allows the migration tool to connect to Box Business.
  • Client Secret: Enter the Client Secret value generated in the Certificates & Secrets section of the Azure application registration. This secret is used to authenticate the application when connecting to Box Business.
  • Enterprise ID: Enter the Enterprise ID, also called the Tenant ID, of your Azure Active Directory. This ID identifies the organization’s Azure environment where the Box Business resources are hosted.
  • For a better understanding of these credentials, you can refer to Shoviv’s Technical Guide:
    https://www.shoviv.com/technical-guide/learn-to-connect-box.html
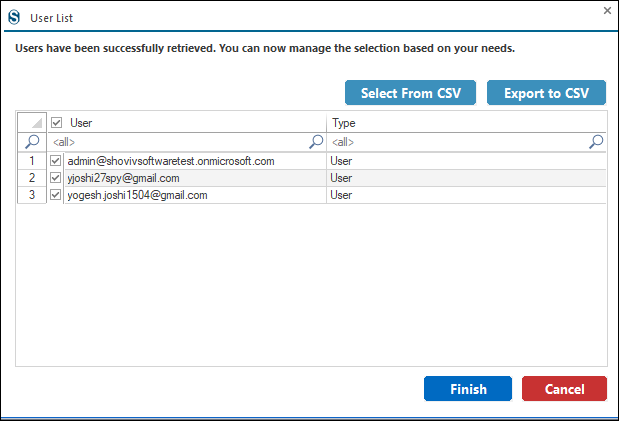
  • Now you need to select the users from the list, and if you have a larger list of selections, then you can select the specific users by clicking on the Select Users From CSV button.
S3-Compatible Storage
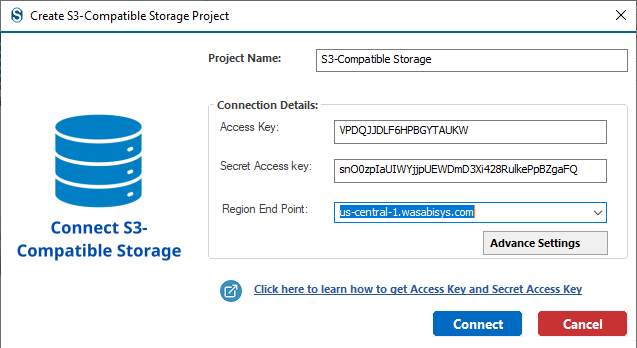
  • The first step in migrating S3-Compatible Storage is to establish a connection between the migration tool and the S3 storage system. To begin, click the Add Project button. After selecting this option, the Project Creation window will appear. This window contains several fields that must be completed before continuing with the migration process.
  • Project Name: Enter the name of the project in the field of the Project Name.
  • Access Key: Enter the Access Key provided by your S3-compatible storage service. This key acts as a public identifier used to authenticate and connect the migration tool to the storage account.
  • Access Secret Key: Enter the Secret Access Key associated with the Access Key. This key works like a password and is used together with the Access Key to authenticate access to the S3 storage securely.
  • Region End Point: Enter the Region Endpoint of your S3-compatible storage service. This specifies the server location or endpoint URL where the storage service is hosted and allows the migration tool to connect to the correct region.
  • Click here to learn how to get Access Key and Access Secret Key:
    https://www.shoviv.com//technical-guide/credential-setup-for-shoviv-S3-compatible-storage.html

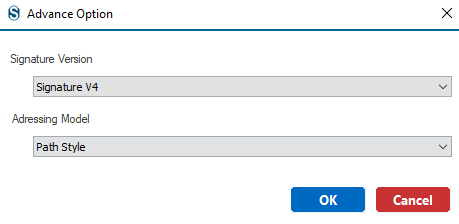
  • Click on the Advance Settings to adjust according to the bucket present in your S3 -Compatible Storage, Signature Version and Path Style with the help of the dropdown list. Click on the Ok button.
  • After entering the Connection Details, click on the Connect button.
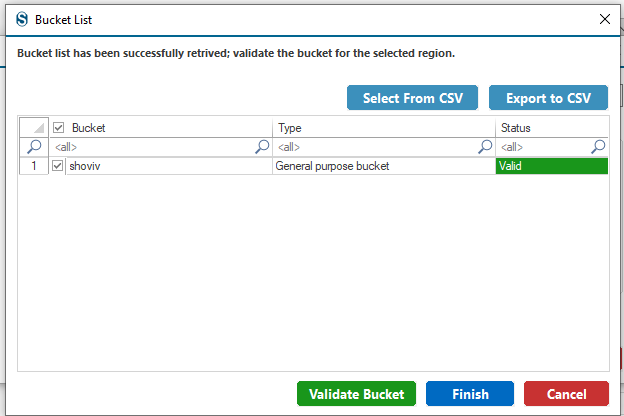
  • Next, select the buckets from the Bucket List and then click on the Finish button after Validate Bucket. In case you have a larger Bucket List for the selection, then you can select the specific bucket with the help of the Select From CSV button.
SharePoint On-Premises
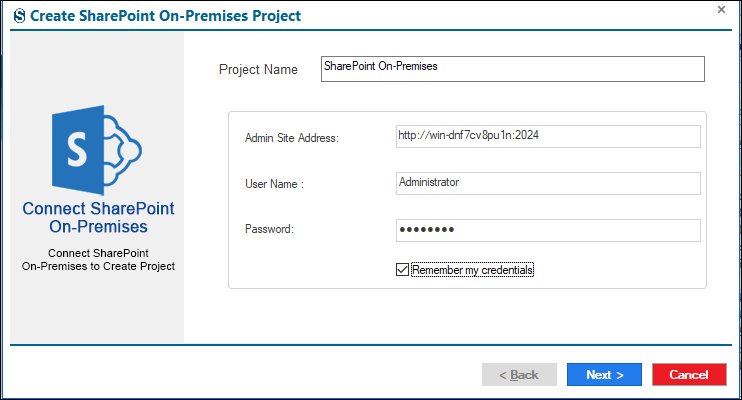
  • To begin migrating SharePoint On-Premises, first create a connection between the migration tool and the SharePoint environment. Click the Add Project button to start. The Project Creation window will then appear, where you must enter the required information before moving forward with the migration.
  • Project Name: Enter the name of the project in the field of the Project Name.
  • Admin Site Address: Enter the URL of the SharePoint On-Premises admin site. This address allows the migration tool to connect to the SharePoint server and manage the migration process.
  • User Name: Enter the username of the SharePoint administrator account that has permission to access and manage the SharePoint environment.
  • Password: Enter the password associated with the administrator username. This is required to authenticate and securely connect to the SharePoint server.

Remember my credentials: Select this option to save your login credentials, so you do not need to enter the username and password again when accessing the migration project later.

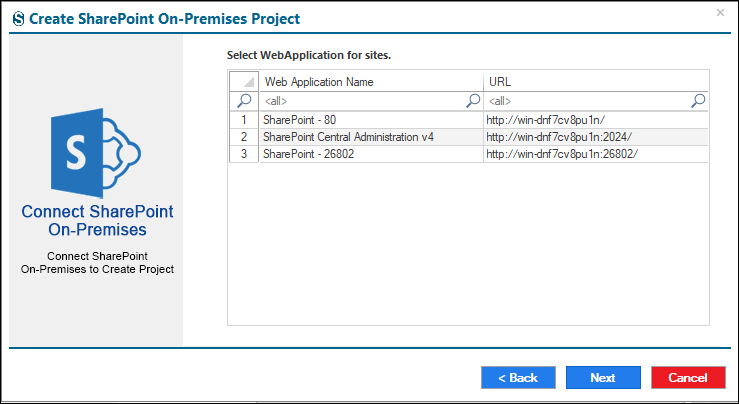
  • Now, you need to select the Web Application Name.
  • Select the Site URL and then click on the Next button.
Amazon S3
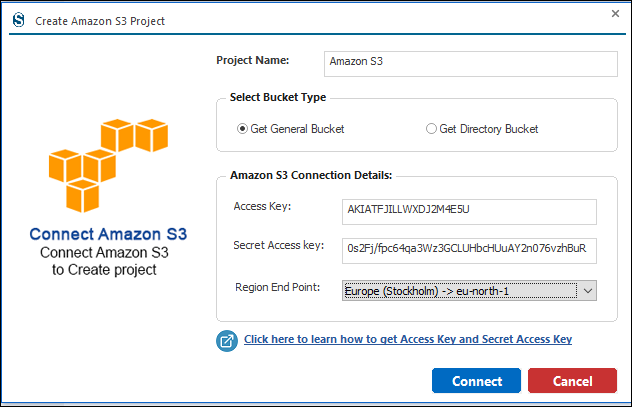
  • The first step in migrating data from Amazon S3 storage is to establish a connection between the migration tool and your S3 storage account. To begin, click the Add Project button. After selecting this option, the Project Creation window will appear. This window includes several fields that must be completed before proceeding with the migration process.
  • Project Name: Enter a name for your migration project in the Project Name field. This name helps you identify and manage the migration task.
  • Choose between the Directory and General Bucket. Choose General Bucket if you need the version history.
  • Access Key: Enter the Access Key ID provided by your Amazon S3 account. The Access Key ID acts as a public identifier that allows the migration tool to connect and authenticate with your S3 storage.
  • Secret Access Key: Enter the Secret Access Key associated with the Access Key ID. This key functions like a password and is used together with the Access Key ID to authenticate access to your Amazon S3 storage securely.
  • Region Endpoint: Enter the Amazon S3 Region Endpoint where your S3 bucket is hosted. This specifies the geographic server location (for example, us-east-1, ap-south-1, etc.) and allows the migration tool to connect to the correct Amazon S3 region.
  • Click here to learn how to obtain your Amazon S3 Access Key ID and Secret Access Key:
    https://www.shoviv.com/technical-guide/access-key-for-amazon-s3-connection.html
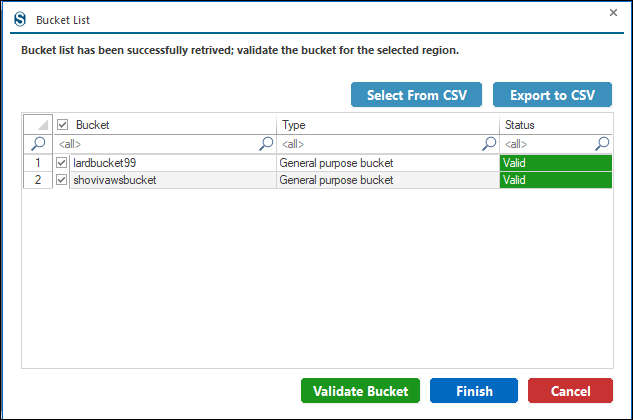
  • Next, select the buckets from the Bucket List and then click the Finish button after completing Validate Bucket. If you have a large Bucket List and want to select specific buckets quickly, you can use the Select From CSV button to import and choose the required buckets from a CSV file.

Note: If you have selected a Directory Bucket, bucket validation is not required, and you can proceed directly without performing the validation step.

Dropbox Personal
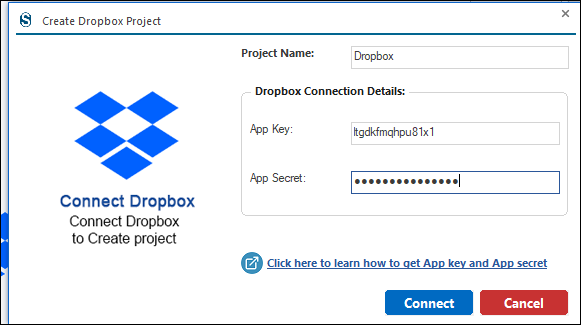
  • The first step in migrating data from Dropbox Personal is to establish a connection between the migration tool and your Dropbox account. To begin, click the Add Project button. After selecting this option, the Project Creation window will appear. This window includes several fields that must be completed before proceeding with the migration process.
  • Project Name: Enter a name for the migration project in the Project Name field. This helps you easily identify and manage the migration task.
  • App Key: The App Key is a unique public identifier generated when you create an application in the Dropbox developer console. It is used by the migration tool to identify the application that is requesting access to your Dropbox Personal account.
  • App Secret: The App Secret is a confidential key associated with the App Key. It acts like a secure password and is used together with the App Key to authenticate the application and establish a secure connection with the Dropbox API. This ensures that only authorized applications can access your Dropbox account data.

Click here to learn how to get App Key and App Secret:
https://www.shoviv.com/technical-guide/create-app-key-and-app-secret-for-dropbox-connection.html

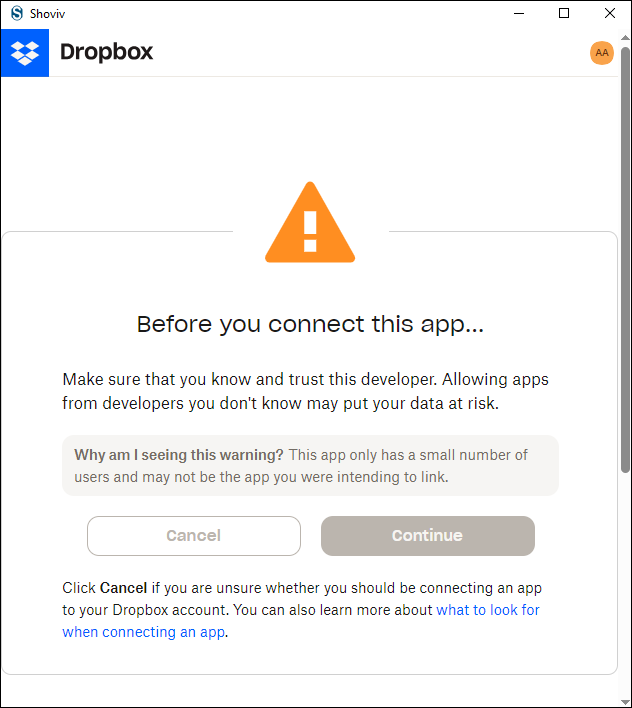
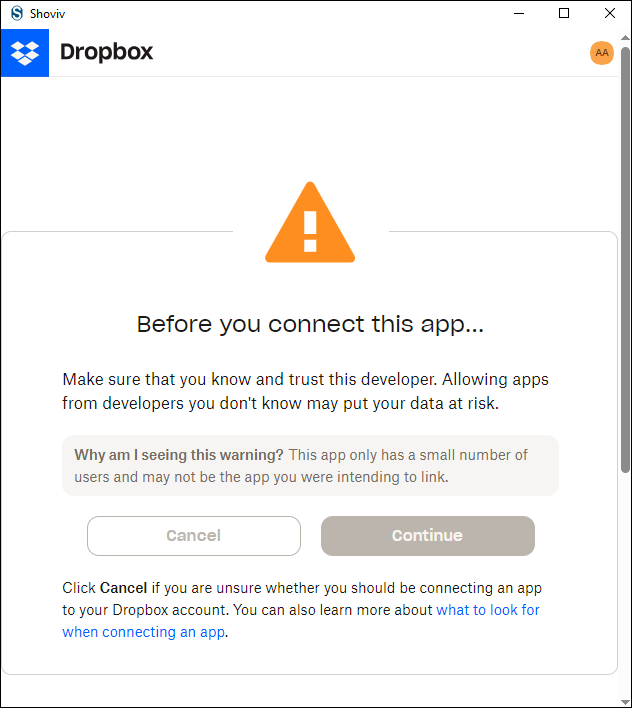
  • Another page opens where you need to enter your email Id and password, and then click on the Continue button.
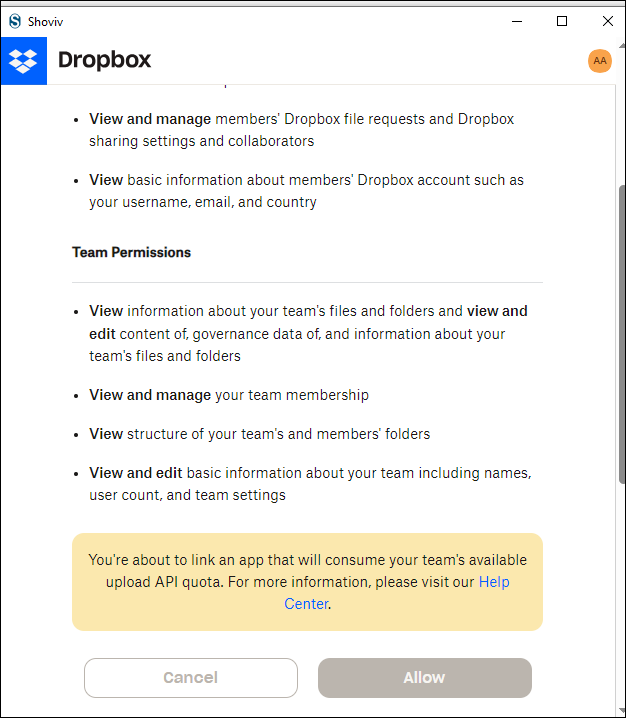
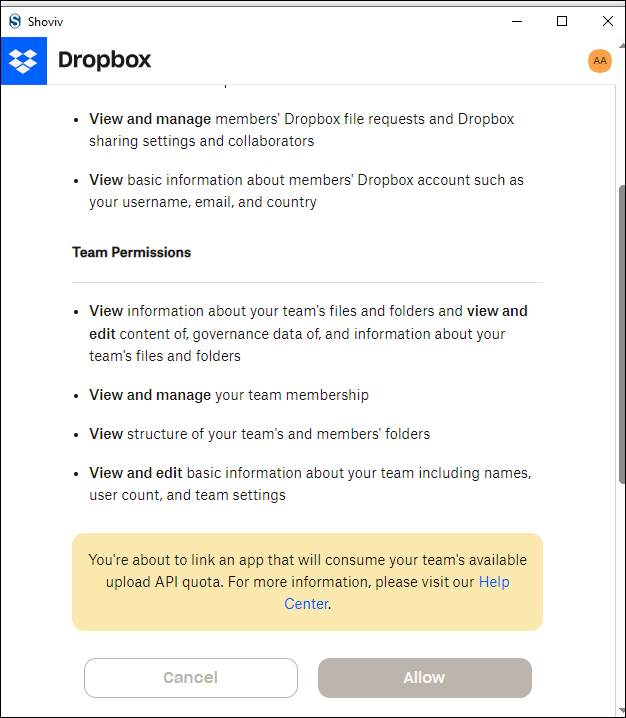
  • After clicking on the button, another page opens where you need to click on the Allow button.
Dropbox Business
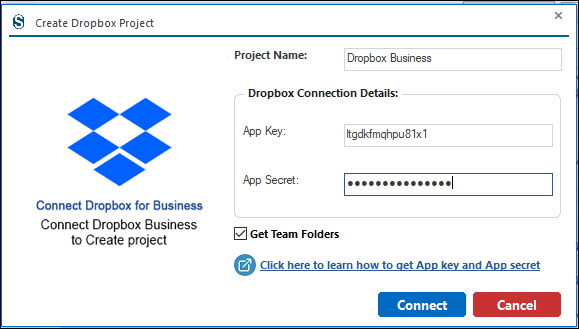
  • The first step in migrating data from Dropbox Business is to establish a connection between the migration tool and your Dropbox Business account. To begin, click the Add Project button. After selecting this option, the Project Creation window will appear. This window includes several fields that must be completed before proceeding with the migration process.
  • Project Name: Enter a name for the migration project in the Project Name field. This name helps you easily identify and manage the migration task.
  • App Key: Enter the App Key generated from your Dropbox Business app in the Dropbox Developer Console. This key is used to identify the application that is requesting access to your Dropbox Business account.
  • App Secret: Enter the App Secret associated with the App Key. This secret key works together with the App Key to securely authenticate the application and establish a connection with the Dropbox Business API.
  • Get Team Folder: Migrate the team folder by checking this option.

Click here to learn how to get App Key and App Secret:
https://www.shoviv.com/technical-guide/create-app-key-and-app-secret-for-dropbox-connection.html

  • Another page opens where you need to enter your email Id and password, and then click on the Continue button.
  • After clicking on the button, another page opens where you need to click on the Allow button.
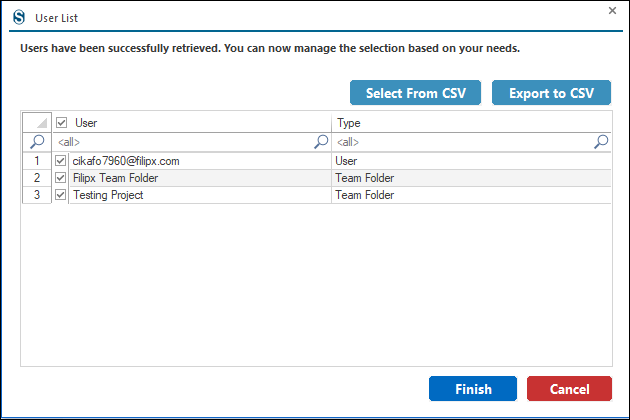
  • You need to select the users from the list, and if you want to add a larger list of users, you can add them with the help of the Import From CSV button.
Yandex Disk
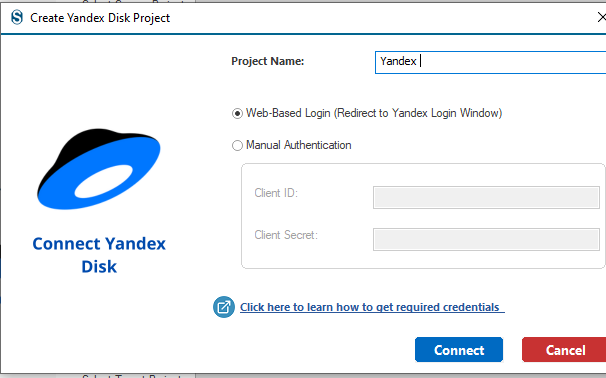
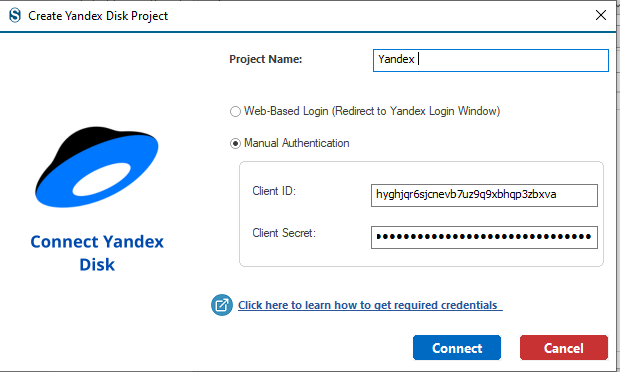
  • The first step in migrating data from Yandex Disk is to establish a connection between the migration tool and your Yandex Disk account. To begin, click the Add Project button. After selecting this option, the Project Creation window will appear. This window includes several fields that must be completed before proceeding with the migration process.
  • Project Name: Enter a name for the migration project in the Project Name field.
    This name helps you easily identify and manage the migration task.
  • Choose between the Web-Based Login or Manual source authentication method.

Web- Based Login (Redirect to Yandex Login Window)

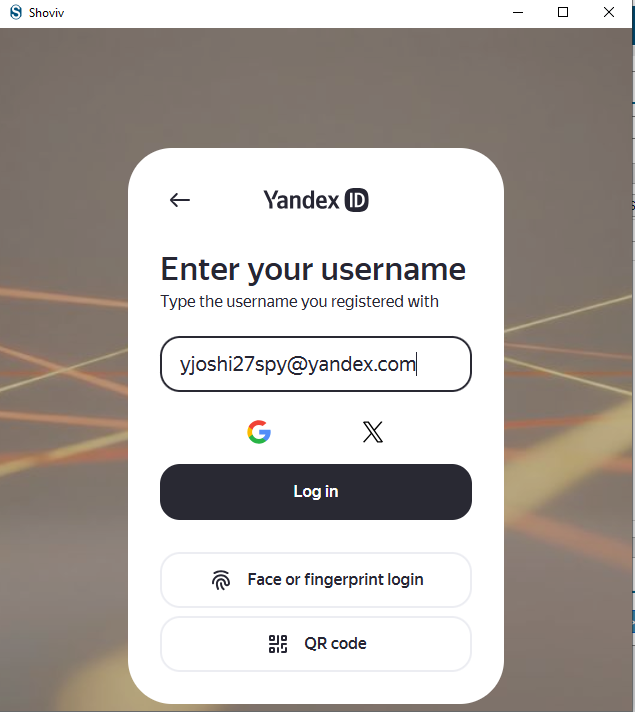
  • Click on the Connect button, and there is another page which is redirected to the Yandex ID login window. In this window, give the username or the address of the email associated with the Yandex Disk Account. Then click on the Log in button and complete the authentication process to connect to the source account successfully.
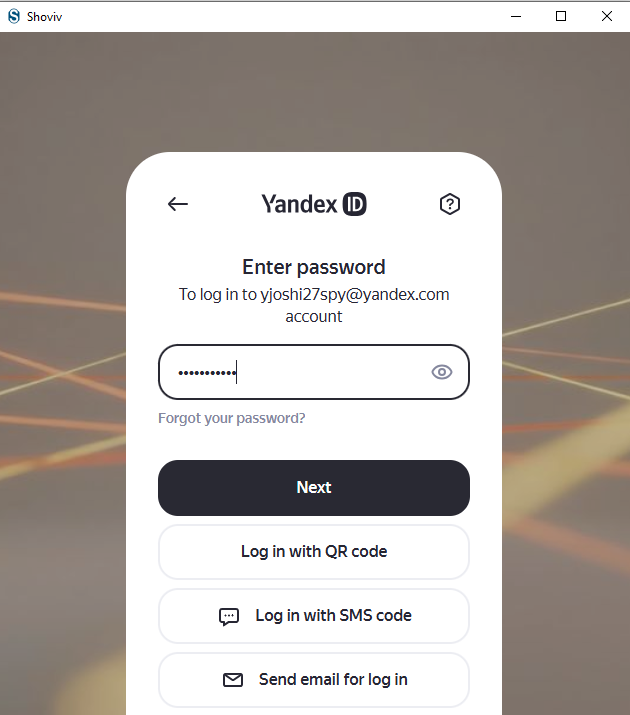
  • On the next screen of Yandex ID, you will be prompted to enter the password for the connected Yandex Disk account.
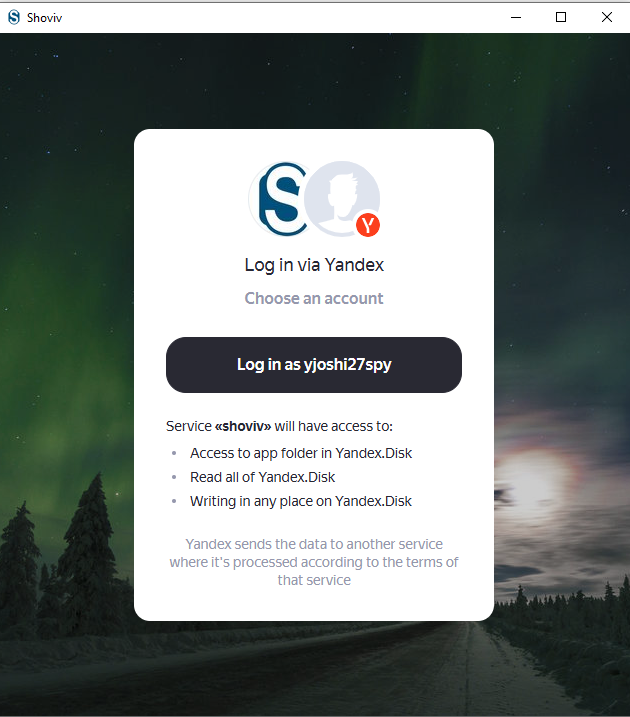
  • After successful authentication, a permission window will appear asking you to log in via Yandex and choose the required account. Click on Log in as [your account name] to grant access.

Manual Authentication

  • Client ID: Enter the Client ID generated from your Yandex application in the Yandex Developer Console. This ID is used to identify the application that is requesting access to your Yandex Disk account.
  • Client Secret: Enter the Client Secret associated with the Client ID. This secret key works like a password and is used together with the Client ID to securely authenticate the application and connect to the Yandex Disk service.
  • For a better understanding of these credentials, you can refer to Shoviv’s Technical Guide:
    https://www.shoviv.com/technical-guide/create-yandex-client-id-and-client-secret.html