Apple Mail remains one of the most popular email clients, known for its clean interface, advanced security, and seamless integration with the Apple ecosystem. Many users have old emails stored in MBOX files — a common format used by clients like Thunderbird, Eudora, Entourage, and others.
If you are switching to Apple Mail or want to access your archived MBOX data, this guide will help you. Here, we’ll walk you through both manual and professional methods to import MBOX to Apple Mail safely and efficiently.
Why do you need to import MBOX to Apple Mail?
Users often choose to import their MBOX files into Apple Mail for the following reasons:
- Email Consolidation: Combine all emails from different clients into one unified mailbox.
- Seamless macOS Integration: Apple Mail syncs perfectly with iCloud, Calendar, and Contacts.
- Better Organization: Maintain folder hierarchy, search quickly, and manage emails efficiently.
- Enhanced Security: Apple Mail provides robust encryption and spam protection features.
- Data Backup: Safely store and manage your archived MBOX messages within Apple’s ecosystem.
These benefits make Apple Mail an ideal choice for users importing from other platforms. Next, we’ll discuss the manual and professional methods to import or export MBOX in Apple Mail.
Manual Methods to Import MBOX to Apple Mail
1. Using Apple Mail’s Built-in Import Feature
Follow the steps below to import MBOX files into Apple Mail manually:
- Launch Apple Mail.
- Open the File menu and select Import Mailboxes from the options.
- Choose Files in MBOX format and click Continue.
- Browse to locate your MBOX file and click Choose.
- Apple Mail will begin the import process.
- Once finished, the imported mailboxes will appear under the Import section in the sidebar.
2. Import via iCloud Drive
If you prefer to store and sync your MBOX data across multiple Apple devices, follow this method:
- Upload your MBOX file to iCloud Drive.
- Open Apple Mail on your Mac.
- Go to the iCloud Drive folder and locate your MBOX file.
- Drag and drop it into Apple Mail.
- Once imported, your emails will be accessible across all services synced with your iCloud account.
3. Import MBOX Files from Google Takeout
If you have downloaded MBOX files from Google Takeout:
- Open Apple Mail.
- Click File > Import Mailboxes > Files in MBOX format.
- Browse and select the downloaded Takeout MBOX file.
- Click Choose, and Apple Mail will import the data.
Drawbacks and shortcomings of these methods:-
Although the manual methods are free and straightforward, they come with several drawbacks:
- Time-consuming if importing multiple or large MBOX files.
- May disrupt the folder hierarchy or email structure.
- High risk of data loss if the process gets interrupted.
- Email attachments may not transfer accurately.
- Requires technical knowledge and careful execution.
- Incompatibility issues may arise with older MBOX versions.
- Handling large attachments may cause import errors.
- Limited control and lack of preview options before import.
Suppose you encounter any issues or data corruption during manual import. In that case, consider using an automated tool to import your MBOX files more securely and efficiently.
Professional Method to Import MBOX Files to Apple Mail
The Shoviv IMAP Email Backup & Restore Tool is a powerful and reliable utility that allows you to import MBOX files directly into Apple Mail with just a few clicks. It’s ideal for users who want to avoid manual complexities and ensure data integrity.
Key Features of Shoviv IMAP Email Backup & Restore Tool
- Bulk Import Support: Import multiple MBOX/PST/OST/EML/MSG files simultaneously into Apple Mail.
- Data Integrity: Preserves folder structure, attachments, and metadata during migration.
- Preview Option: View MBOX file contents before performing the import.
- Selective Import: Filter emails by date range or remove duplicate emails.
- Multi-Platform Support: Compatible with Apple Mail, Thunderbird, Gmail, Outlook, and more.
- Simple Interface: Easy to use for both technical and non-technical users.
Steps to Import MBOX to Apple Mail/iCloud Using the Shoviv Tool
- Install and launch the Shoviv IMAP Email Backup & Restore Tool on your system.
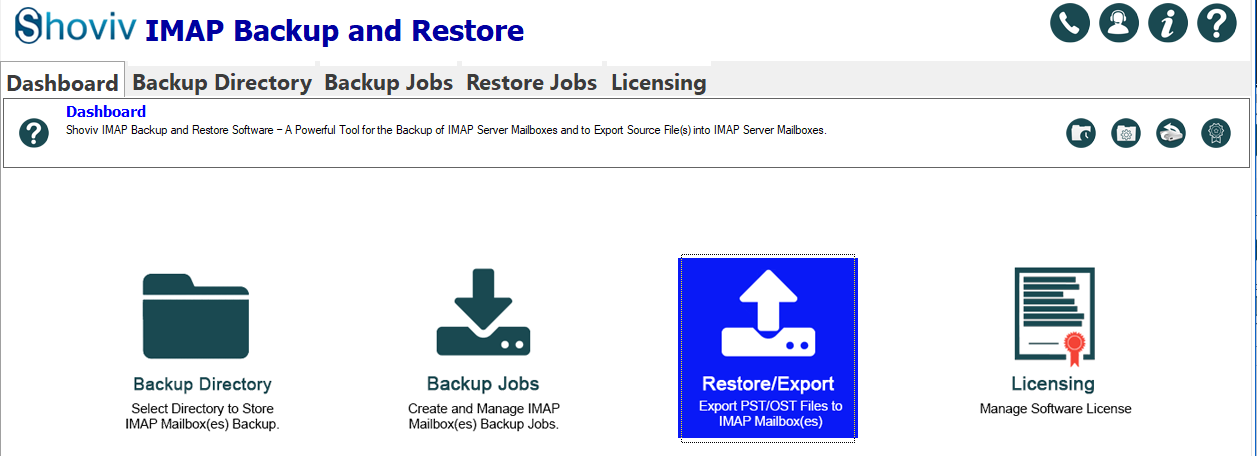
- Go to the Restore/Export.
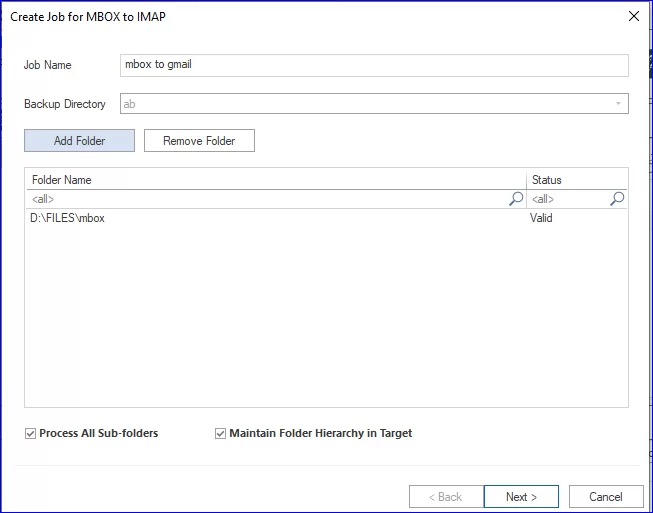
- The next task is to create a restore job and click on Add Folder to upload one or more MBOX files. Firstly, give a name to the job.
- Enter Apple Mail (IMAP) Server Details and verify the connection by entering your Apple Mail account credentials.
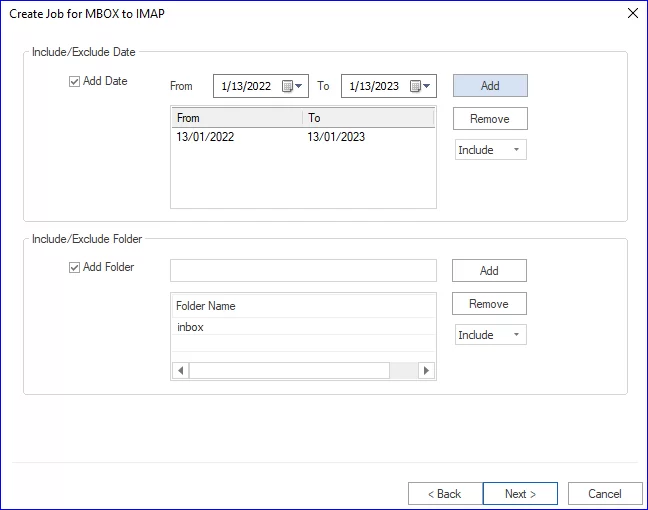
- Apply the filters as per the requirements of the task.
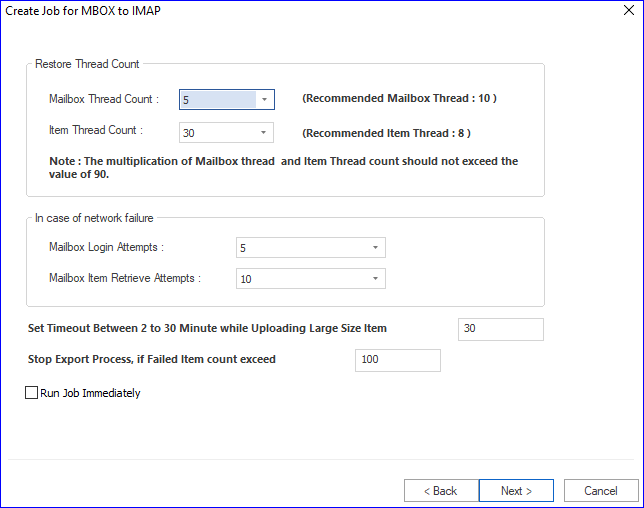
- Now, do the other settings, like the thread count setting and log-in attempts.
- Review the restore job you have created, and if all is okay, then click on the Finish. The job will run as per the job-run action and import MBOX to Apple Mail.
Final Words:
Importing MBOX to Apple Mail shouldn’t be complicated. You can either use the manual method or the professional method. While manual import works fine for limited data, it can be time-consuming and error-prone for large data. In contrast, the professional approach ensures a smooth, quick, and reliable importation with zero data loss. Choose the right method based on your email volume and technical comfort to make your MBOX import seamless. For any assistance, you can contact Shoviv’s 24*7 support team for guidance.
Frequently Asked Questions:
Yes, this utility works for all the MBOX files despite of their origin.
The Shoviv IMAP Backup and Restore allows adding multiple MBOX files in a single go. There are no such limitations.
Yes, but large files may take longer to handle manually. The Shoviv tool efficiently handles large MBOX files without data loss.
Using a professional tool ensures that all attachments, metadata, and formatting remain intact during importation.