Many users try to export Exchange 2010 mailbox to PST format manually, but they get failed. PST file stands for Personal Storage Table and is considered a reliable file format to store data on the local drive. Microsoft Outlook uses PST files to keep your Outlook email, and other data for later use. It stores Outlook data for POP3, IMAP, and web-based mail accounts. It is generated by default as soon as you create your Outlook Profile.
Why Export All Exchange 2010 Mailboxes to PST:
A high trend in Exchange 2010 mailbox export to PST can be seen, and several valid reasons are behind it.
- One of the main reasons for the Export mailbox from Exchange 2010 to PST Files is Data corruption and inaccessible Data. Same as other servers’ mailboxes, Exchange mailboxes are also prone to corruption. For this, having a backup is a good move, and PST is the best option.
- Another unavoidable reason for Exchange 2010 mailbox export is that it reached the end of support on October 13, 2020. Therefore, no one wants to use Exchange without Microsoft’s technical support, as facing an error means you’ve dealt with it yourself.
- EDB files are large, and reducing the size of mailboxes can improve the performance of the Exchange server. By this, you can also save storage space and reduce the expenditure on infrastructure.
Methods to Exporting Exchange 2010 Mailbox to Outlook PST:
There are a few manual methods to export Exchange mailbox to PST, i.e., Exchange Admin Centre and PowerShell commands. It can also be done using third-party tools.
-
Exchange Admin Centre to export Exchange 2010 mailbox
- Firstly, log in to the Exchange admin center as an Administrator
- Go to the Permission tab and make a click on Admin Roles.
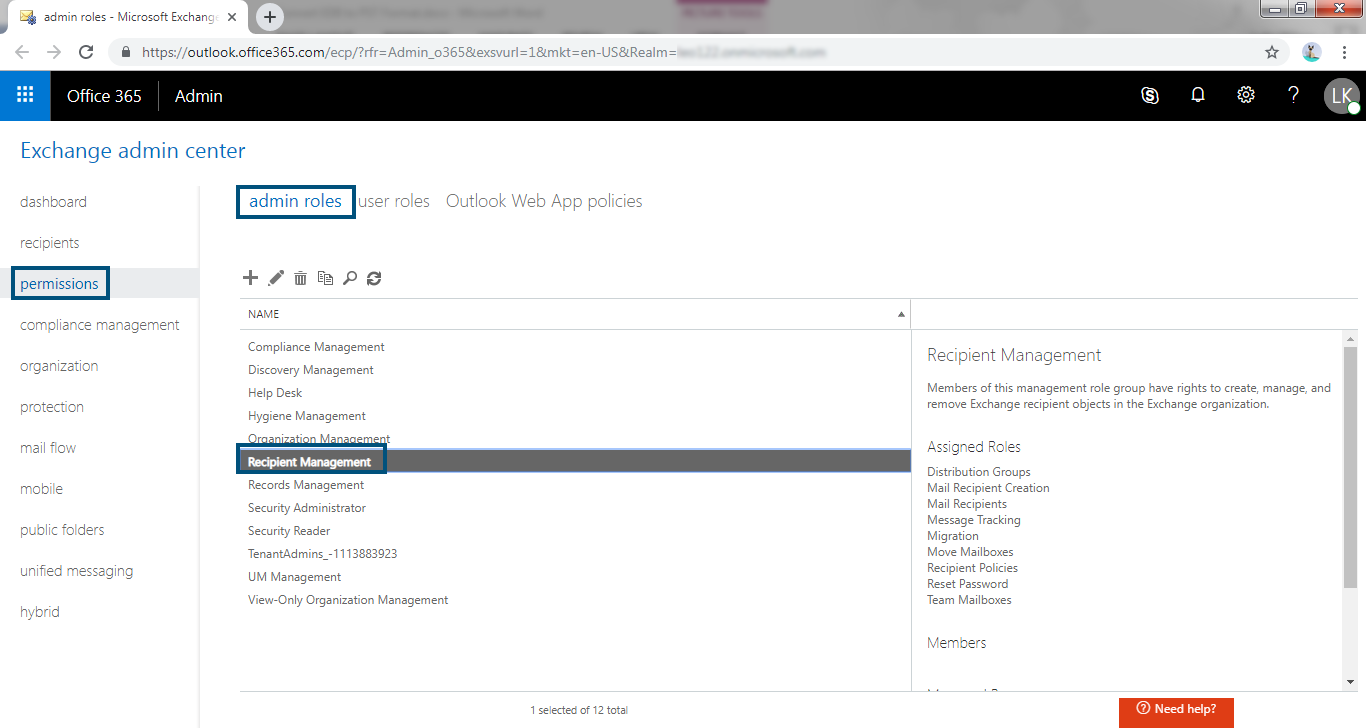
- Under Admin roles, click on Recipient Management and click (+) Add.
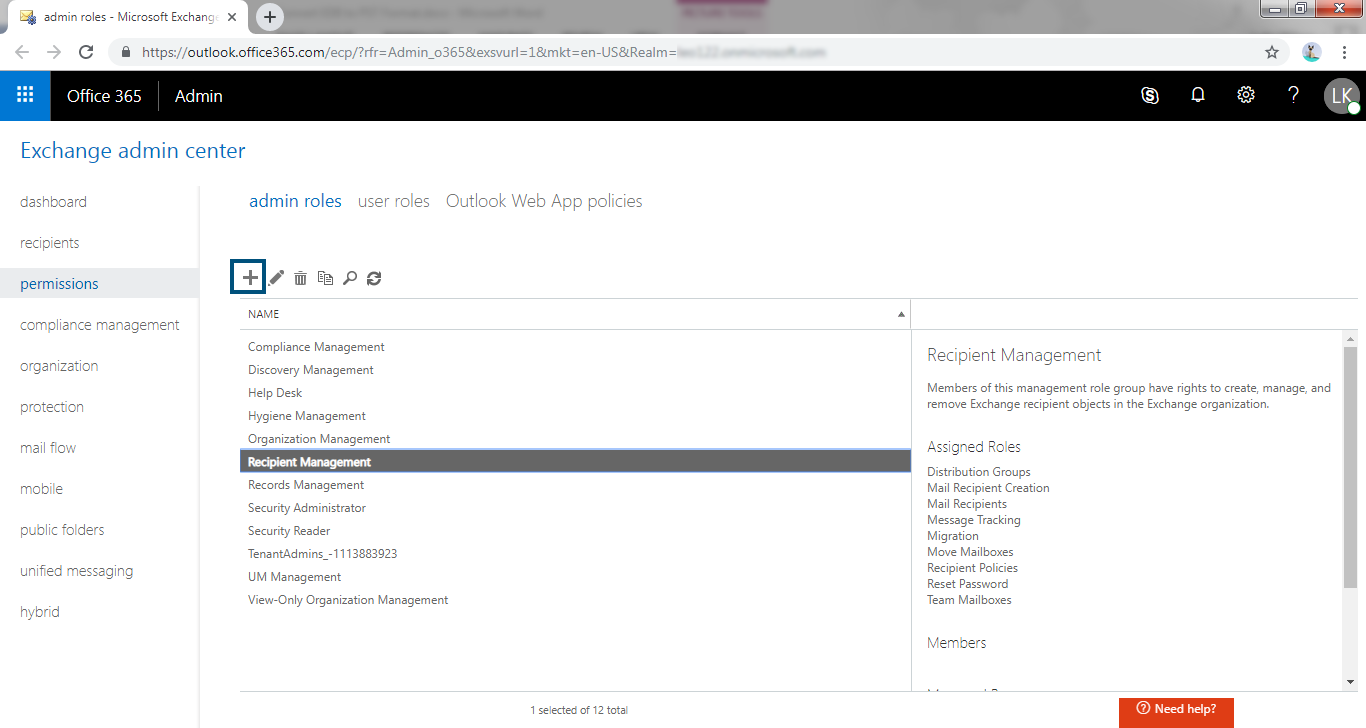
- Now provide a name and description and click on the (+) option under the Role Group wizard.
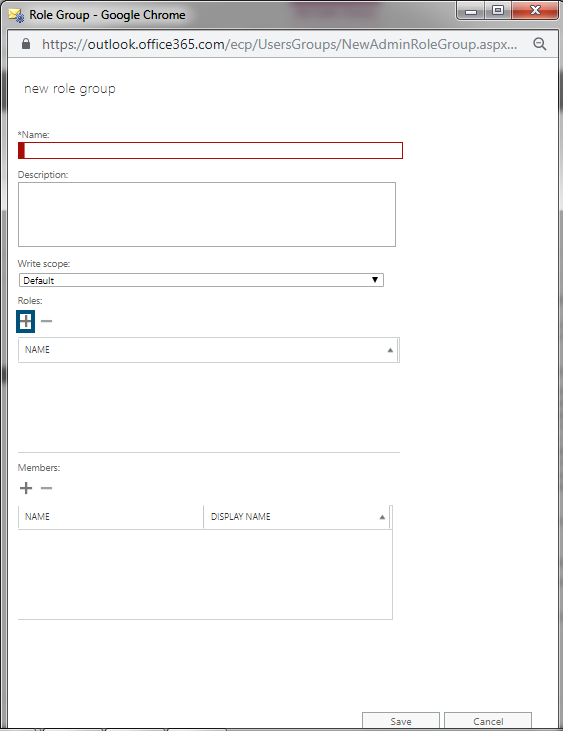
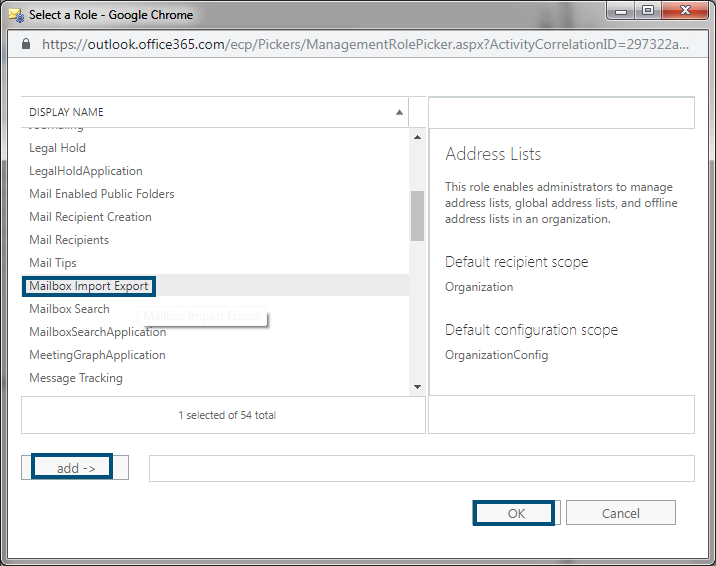
- Select the Mailbox Import Export Role, and then click on Add option. After that, click OK.
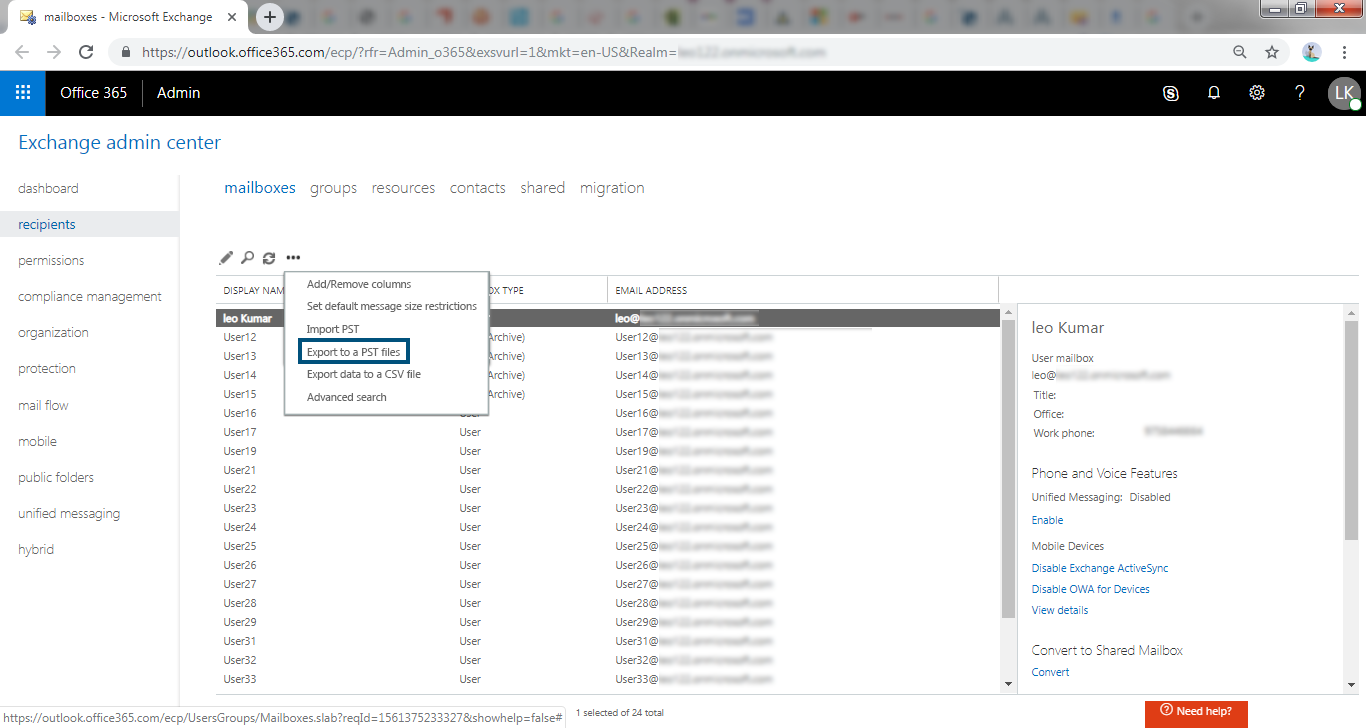
- Now go to Recipients, Click on Mailboxes and choose the Mailbox you want to export. Now click More (…) and select the Export to a PST File option.
- Browse the Mailbox you want to export.

- Enter the path of a shared folder.
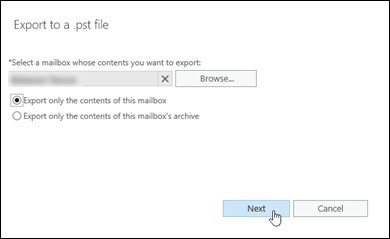
- Select the Mailbox, Which will get an email after a successful process, and then click on Finish. Mailbox content will be converted to a PST file.

-
Exchange 2010 mailbox export using the PowerShell cmd.
PowerShell command helps users to Export Exchange 2010 mailbox to PST files. It is a great utility for maintaining different types of issues in the Exchange Server Database. This utility can back up both single and multiple Exchange mailboxes. So let’s discuss it.
To get the Mailbox import and export permission, users have to enter the command given below:
New-ManagementRoleAssignment -Role “Mailbox Import Export” -User < user name or alias >
New-ManagementRoleAssignment -Role “Mailbox Import Export” -User <jennifer>
To export users primary mailbox data to PST enter the command given below:
New-MailboxExportRequest -Mailbox < user >” -FilePath \\<server FQDN >\ < shared folder name >\ < PST name >.pst
New-MailboxExportRequest -Mailbox jennifer” -FilePath “\\SERVER11\ MyNetworkPST\ jennifer_Recovered.pst
To export mailbox data with filter, use the following command:
New-MailboxExportRequest -Mailbox <user> -ContentFilter {(body -like “*type*”) -and (body -like “*type*”) -and (Received -lt “date”)} -FilePath FilePath \\<server FQDN >\ < shared folder name >\ < PST name >.pst
New-MailboxExportRequest -Mailbox jennifer -ContentFilter {(body -like “*assets*”) -and (body -like “*liabilities*”) -and (Received -lt “05/04/2019”)} -FilePath \\SERVER11\MyNetworkPST\jennifer_MyOrganizationReports.pst
In above command, user is converting the email containing “assets” and “liabilities” report received on April5,2019
To export a particular folder like drafts, and task , use the command given below:
New-MailboxExportRequest -IncludeFolders “#folder name#/*”,”#folder name#” -Mailbox < user > -FilePath \\ < server FQDN >\ < shared folder name >\ < PST name >.pst
New-MailboxExportRequest -IncludeFolders “#drafts#/*”,”#task#” -Mailbox <jennifer> -FilePath \\SERVER11\MyNetworkPST\jennifer_MyOrganizationReports.pst
To Export Exchange 2010 mailbox to PST, use the below mentioned command:
$AllMailboxes|%{$_|New-MailboxExportRequest -FilePath \\ < server FQDN >\< shared folder name >\$($_.Alias).pst}
$AllMailboxes|%{$_|New-MailboxExportRequest -FilePath \\SERVER11\MyNetworkPST \$(jennifer_MyOrganizationReports).pst}
Limitations of Manual methods:
Obviously, manual methods come free of cost, but they can cost you your priceless data. That’s why rare professionals go with these solutions. Below I’ve mentioned a few drawbacks and limitations, read them, and decide whether to use the native solutions; otherwise, you can go with the mentioned automated tool.
- Using manual methods, users cannot migrate EDB files that are more than 2 GB in size. It doesn’t migrate public folders.
- Manual methods are lengthy and time-consuming.
- Due to the complicated commands, it is a bit hard for beginners and non-technical users to use the manual methods.
- A minor misstep can lead you to lose all Exchange server data and make EDB files inaccessible.
Export Exchange 2010 Mailbox to PST | Automated Solution
There are various tools available in the market to export Exchange mailboxes to PST files. But to export your data more efficiently and with easy control, you should use Shoviv Exchange Recover Tool. It is an easy-to-use and user-friendly tool consisting of almost every looked-for feature. Some of its features are as mentioned below:
Key Features of Shoviv Exchange Recovery Manager Tool:
- Export multiple mailboxes: The software is a no-restriction tool which means you can export multiple and any size of mailboxes in a single batch. The number of mailboxes doesn’t affect the software, and it processes all mailboxes with the same accuracy and speed as a single mailbox.
- Supports all Exchange versions: Yes, apart from Exchange 2010 mailboxes, you can also export other variants of Exchange Server, i.e., Exchange 2002, 2003, 2007, 2013, 2016, and 2019. Hence, a picture-perfect Exchange Server export utility.
- Preview facility: The software displays a preview of the added Exchange mailboxes content, so you can choose items to export with assurance. The software displays item preview with the Item body, Item property, Recipient, and Attachments.
- Export with Advanced options: The tool is laced with almost every feature required for an effortless export. Like it offers filter options, Incremental Export, Email Translation, set PST file size, PST password protection, log report.
- DIY utility (Securest approach): Several Microsoft MVPs and Exchange administrators have recognized this tool as the securest approach to export Exchange mailboxes to PST format. Because it doesn’t ask for any additional software installation, doesn’t store data/passwords on the server, and most importantly, you can use the tool by yourself. Hence your data will be restricted to you.
- Free Version: Assurity is a big thing, and everyone wants to be assured about the product before investing. For the same, Shoviv offers a free variant of the tool, so you can get familiar with the software skills and capabilities before investing in it.
Below is the process of the tool to export Exchange mailboxes into PST files. Install the free version and process as follows to examine the software.
Steps to Export all Exchange 2010 mailboxes to PST:
- Step1: Install and open the Exchange export tool in your system.
- Step2: Then, click on the Add Source button from the ribbon bar.
- Step3: Provide Exchange credentials or browse EDB files to Export.
- Step4: Now, click on the Outlook PST option from the ribbon bar.
- Step5: Check/uncheck subfolders/folders you want to export into PST.
- Step6: Select Export in Existing PST file and browse a folder to save PSTs.
- Step7: Use password protection, split PST file, and incremental export option.
- Step8: Wait until the export process gets complete, and click the Finish button.
Final words
In this blog, we have described two Free methods to export Exchange 2010 mailbox to PST files. Both are lengthy and complicated and can’t be used by non-technical and beginners; they are unreliable. Besides this, we have also described a professional Shoviv Exchange Recovery tool that is easy to use, and everyone, non-technical and beginners, can get high-quality results. At last, it depends on you what you choose, a cakewalk (Shoviv Exchange Manager) or a walk on eggshells (manual methods).


[WPSM_AC id=7420]