Exchange Server 2013 reached its end of life on April 11, 2023. It means Microsoft will no longer provide technical support, bug fixes, security updates, or any other after this date. Organizations still using Exchange Server 2013 after this date will be at risk for security vulnerabilities, compatibility issues, and other potential problems. Hence, migration is obvious, and Exchange Server 2013 to Office 365 is in trend.
Nowadays, many organizations are planning to move from Exchange Server 2013 to Microsoft 365. Microsoft 365 is a cloud-based software as a service that provides various things in a single subscription. These services include a hosted Exchange Server, Skype for Business Server, SharePoint, et cetera. Microsoft Office 365 also provides a facility for automatic updates. Migration from Exchange 2013 to Office 365 needs proper planning and execution. Now, start discussing the various methods to migrate Exchange 2013 to Office 365.
Migration to Office 365 ensures they have access to the latest features, security updates, and support from Microsoft. Organizations that upgrade or migrate may also avoid compliance issues, as using no longer supported software can lead to non-compliance with regulations and standards.
Overall, it is important for organizations using Exchange Server 2013 to plan and execute an upgrade or migration.
Instant Solution: Perform a seamless migration from Exchange Server 2013 to Microsoft Office
365 using the Shoviv Exchange Server Migration tool.
Reasons for Migrating Exchange 2013 to Office 365:
Migrating from Exchange 2013 to Office 365 can provide numerous benefits to organizations, some of them are following:
- Cost Savings: With Exchange 2013, organizations must purchase and maintain their hardware and software, which can be costly. Moving to Office 365 eliminates the need for on-premises hardware and software, resulting in organization cost savings.
- Improved Collaboration: Office 365 provides various collaboration tools such as Teams, OneDrive, and SharePoint, making it easier for employees to work together on documents and projects. This can improve productivity and efficiency in the workplace.
- Scalability: As organizations grow, their IT infrastructure also needs to grow. With Exchange 2013, organizations may need to invest in additional hardware and software to accommodate growth. With Office 365, scaling up is much easier, as organizations can simply purchase additional licenses as needed.
- Enhanced Security: Office 365 provides advanced security features such as multi-factor authentication, data encryption, and data loss prevention to help protect sensitive data. Exchange 2013 may not provide the same level of security, and organizations may need to invest in additional security solutions to achieve the same level of protection.
- Remote Access: With Exchange 2013, employees may need to use a VPN to access their email from outside the office. With Office 365, email and other applications can be accessed from anywhere with an internet connection, making it easier for employees to work remotely.
Methods to Migrate Exchange 2013 to Office 365 Mailbox
- Cutover migration.
- Hybrid migration.
- Shoviv Exchange Migration – Easy and Professional Tool.
Now, we will discuss the migration methods sequentially and Migrate Exchange mailboxes to Microsoft 365.
Method 1: Cutover Migration from Exchange Server 2013 to Office 365
This manual method allows the migration of fewer than 2,000 mailboxes. Small organizations follow the Cutover migration. After exceeding the limit, it takes much time and makes the processing slow. Hence, it fails to migrate into Office 365 speedily and in bulk.
- Create a Migration batch online
- In the Exchange Admin Center, Navigate Recipient > Migration. Define migration endpoint; pick Outlook everywhere.
- From the drag-down menu, select Migrate to Exchange Online.
- Activate mailboxes and finalize the migration batch.
- Complete Office 365 setup and Cut-over DNS.
- Change the Active directory and update DNS records.
- Create a new outlook profile and import data and settings.
- Re-configure mobile devices.
Method 2: Exchange Server 2013 to Microsoft 365: Hybrid Migration Step by Step:
Hybrid migration maintains both online premises and online mailboxes. In this method, there is no need to create a new mailbox and import information. The users can transfer the existing mailbox between the Exchange Server and Exchange Online. It is considered a smooth process, but it fails if the user skips any of the steps. The approach mentioned above is very time-consuming.
Before performing the Migration, you need to ensure your Exchange Server 2013 is updated with the latest patch. You also need to set up directory synchronization using Azure Active Directory Connect.
- Step 1: Verify Yourself and Your Domain in Microsoft 365
- Step 2: Start the Migration Process.
- Step 3: Sync Your Directories to Create Users.
- Step 4: Assign Microsoft 365 Licenses to Your Users.
- Step 5: Start Migrating User Data.
Why do Professionals Avoid Manual Exchange to O365 Migration?
Manual migrations have some limitations. This article outlines some common issues with manual Migration to Office 365 from the Exchange server.
Migration of many mailboxes to Office 365 may take a long time because you have to migrate the mailboxes in stages and over a while. For example, if you need to migrate 5,000 mailboxes, you must migrate 300 daily until you have completed the migration. Exchange Online has a retention policy named “Default MRM Policy” to resettle items in the user’s mailbox.
This retention policy is created when Exchange Online is enabled for your organization. Items older than 30 days are moved to the user’s archive mailbox employing MRS Proxy. Items older than 25 days are transferred to the user’s archive mailbox through MRS Web Access.
- In the cut-over Migration, the maximum limit to migrate is 2,000 mailboxes. However, the recommended limit is only 150 mailboxes.
- Some emails might be lost until the DNS record is entirely changed.
- Hybrid mailbox migration consists of complex steps and additional administrative efforts.
- As a part of the migration method, Staged Migration can be considered a slow process as it needs to be done in stages. The initial Migration of mailboxes from the On-Premises Exchange Server is not processed immediately. Because Office 365 will first process the data being migrated and then forward it to the On-Premises server for the following processing stage.
Method 3: Exchange 2013 Migration to Office 365 with Professional Tool:
The Shoviv Exchange Migration Tool is the best option for migrating Exchange 2013 to Microsoft Office 365. It is a fast and easy-to-use automated tool. This tool allows users to migrate single or multiple mailboxes into Office 365. This automated software is highly recommendable as it supports all versions of the Exchange Server. During the exporting process, one can also use the filter option to filter items as needed. An incremental export facility that resumes the process and stops the duplicate items in the target is also present within this tool.
Follow the below Steps to Migrate Exchange 2013 to Office 365:
- Step 1: Run the Shoviv Exchange Server Migrator Tool.
- Step 2: Create a Source connection & Connect to Exchange 2013.
- Step 3: Connect to the Target Office 365 Tenant as Global Admin.
- Step 4: Create Migration jobs & Map Source Mailbox with Target.
- Step 5: Finish Job Setting & Run Migration job to Start Migration.
Do you still need clarification about the working process following the detailed working of the Shoviv Exchange Migration? If yes, here we have got for you!
Detailed Working Process for Migrating Exchange 2013 mailboxes to Microsoft 365:
- First, Download and install the Exchange Migration software on your System. Open the Software.
- Click on the Source Connection and select the Other Exchange Server option. Enter the server name, user name, and password.

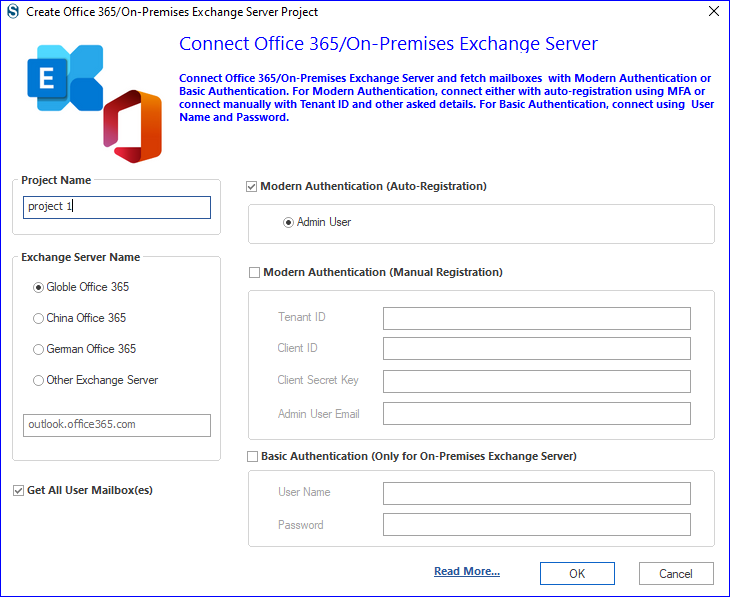
- Click on the Target Connection, select Global Office 365and Modern Authentication(Auto-Registration).
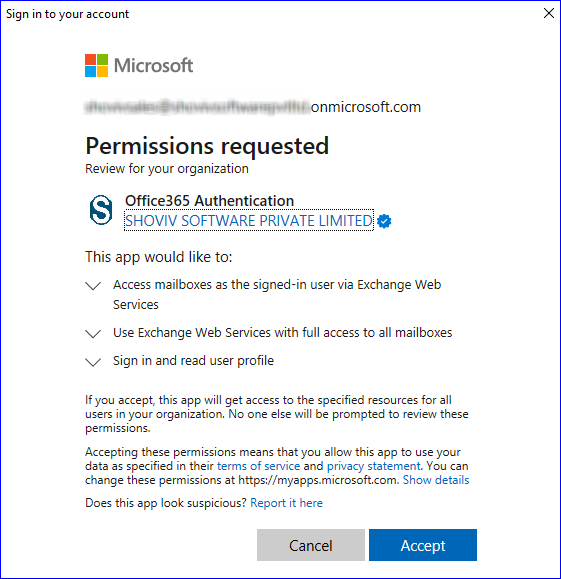
- You will be re-directed to Microsoft’s login page. Enter your credentials and verify your identity. Accept the permissions requested.
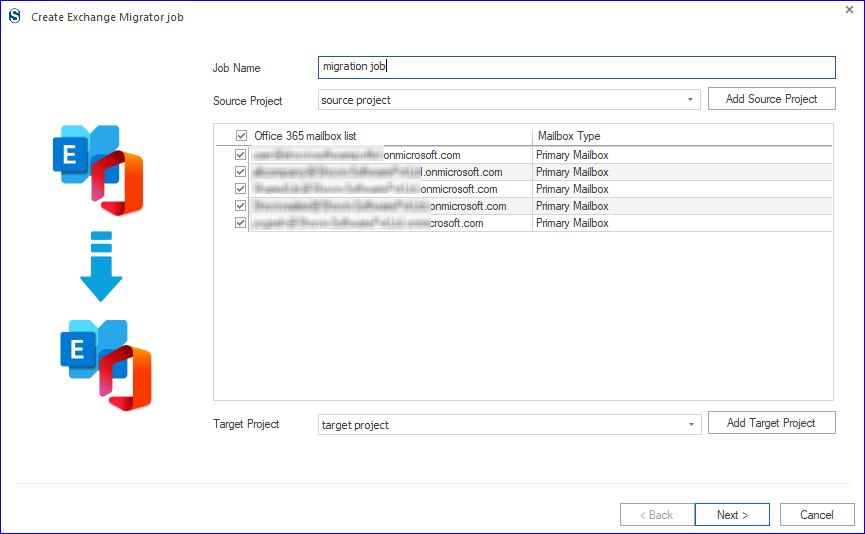
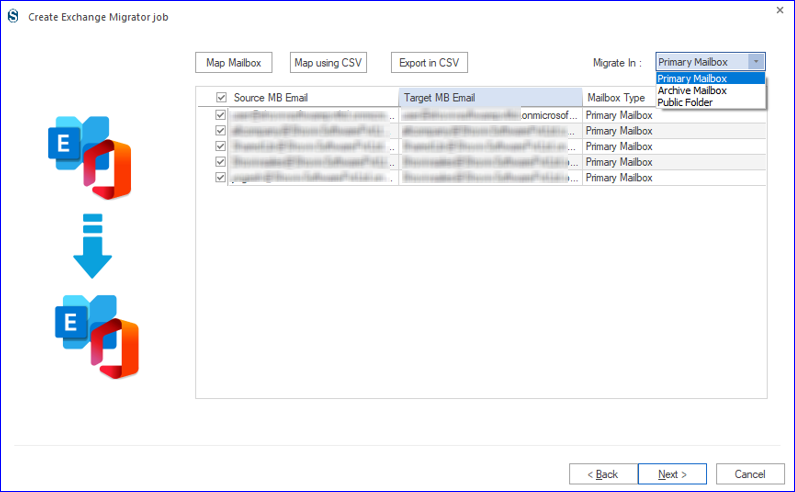
- Click on the Migration Job and select the mailbox type (Primary/Archive/Public Folder).

- Provide a job name, add a source project (Connected Exchange), and check the mailboxes. Now, add the target project (Connected Office 365). Click Next.
- Now, map the source mailboxes with the target. You can also map the user list using the CSV file. Click Next.
- Here, you are prompted to the filter page, where you can apply the filter based on the date range and folder. Check to include emails/contacts/calendar as needed and click Next.

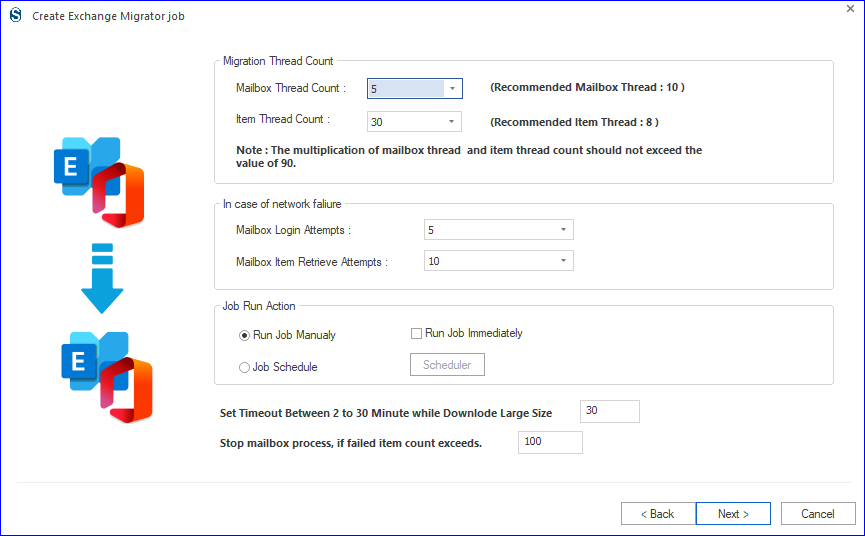
- Now, you are prompted to the settings page. Apply the setting as per the requirement. You also get an option to schedule the migration after creating a job or immediately run.
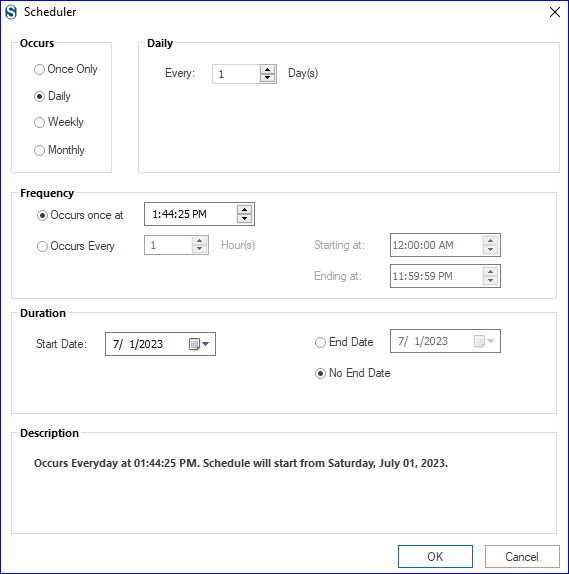
- If you go with schedule, then you can set frequency, occurrence, and duration for the same. Click Ok.
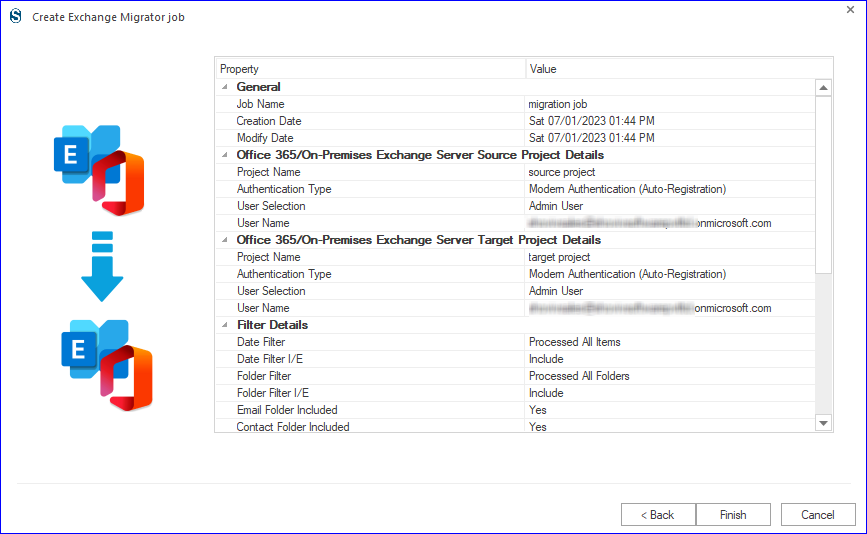
- Finally, you will get a preview of the migration job. If all meets your needs, click Finish to start migration if immediate running is selected. If you want to edit the job, then click Back and make changes.
Common Pain Points with Exchange 2013: How Migrating to Office 365 Can Help?
Some specific scenarios where users may experience pain points with Exchange 2013 and could benefit from migrating to Office 365 include:
- Aging Infrastructure: If an organization’s Exchange 2013 infrastructure is old and outdated, it may become difficult and costly to maintain. Migrating to Office 365 can provide a more modern and scalable solution without significant hardware upgrades.
- Limited Storage: Exchange 2013 has a finite amount of storage space, which can become a pain point for organizations that need to store large amounts of email and other data. Office 365 provides much more storage space, making it easier for organizations to manage their data.
- Compliance Requirements: Some organizations may have compliance requirements that are difficult to meet with Exchange 2013. For example, if an organization needs to store data in a specific geographic location, it may be difficult to achieve with Exchange 2013. Office 365 provides options for meeting compliance requirements, such as storing data in specific regions.
- Mobile Device Management: With Exchange 2013, managing mobile devices such as smartphones and tablets can be a challenge. Office 365 provides better mobile device management capabilities, making it easier for organizations to manage and secure mobile devices.
Related blog: How to Migrate Exchange 2016 to Office 365?
Wrapping up:
Office 365 offers a wide variety of features to manage your email, calendar, contacts, and documents anywhere. You can access these services from almost any device, whether a smartphone, tablet, laptop, or desktop computer. For the seamless Exchange 2013 to Office 365 Migration, use Shoviv Exchange Migrator and execute your task in a few steps. A free demo version of this utility is also available to download, which permits migrating the first fifty items per folder. There are no such limitations with the licensed version.