Summary: Users exploring a shift to Microsoft 365 and unsure how to move their Fastmail data smoothly will find this guide useful. It explains simple steps to complete the Fastmail to Microsoft 365 migration without losing emails, attachments, or folder structure.
Fastmail is a well-known email service used by individuals and businesses for secure communication. On the other hand, Microsoft 365 is a powerful cloud-based software-as-a-service offering advanced email management and productivity tools, including Teams, OneDrive, and Outlook.
As users and organisations grow, they often need better collaboration, storage, and security features, which leads them to switch from Fastmail to Microsoft 365 for a more integrated work experience.
Why Do Users Need to Migrate Fastmail to Microsoft 365?
- Growing Business Needs – As communication and workload increase, users need a more advanced, unified platform for email and collaboration.
- Better Collaboration Tools – Microsoft 365 provides built-in apps like Teams, OneDrive, and Outlook that help teams work together more efficiently.
- Scalability – It enables the easy addition of users, storage, and services as the organisation expands.
- Stronger Security & Control – It offers advanced security features and centralised admin control for better data management.
- Cross-Device Accessibility – Users can access emails and files seamlessly across laptops, mobile devices, and tablets without interruption.
Professional Method to Migrate Fastmail to Microsoft 365
When dealing with large mailboxes or multiple user accounts, the manual approach can become slow, repetitive, and error-prone. To overcome these challenges, a professional migration approach is preferred, as it provides a more controlled, faster, and structured way to move complete mailbox data without affecting its original integrity.
A dedicated IMAP-based migration solution, such as the Shoviv IMAP to Office 365 Migration Tool, provides a reliable way to ensure a smooth, secure data transfer from Fastmail to Microsoft 365, helping your audience feel confident in the process.
Simple Steps to Migrate Fastmail to Microsoft 365
- Install and launch the Shoviv IMAP to Office 365 Migration Tool.
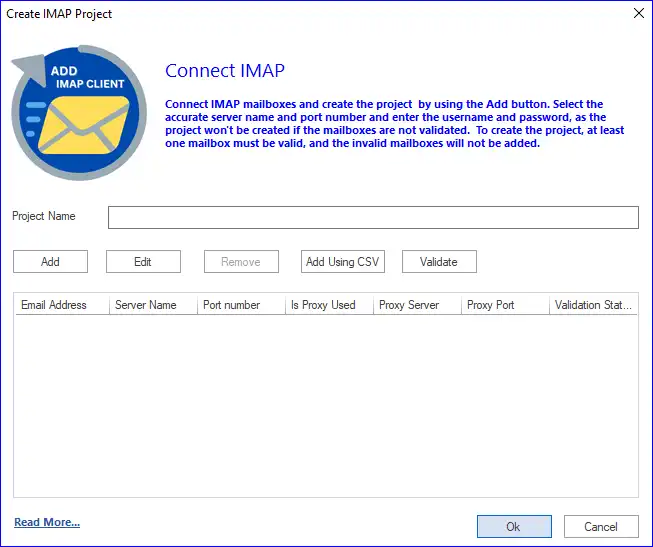
- Click the Source IMAP tab, then connect your Fastmail account.
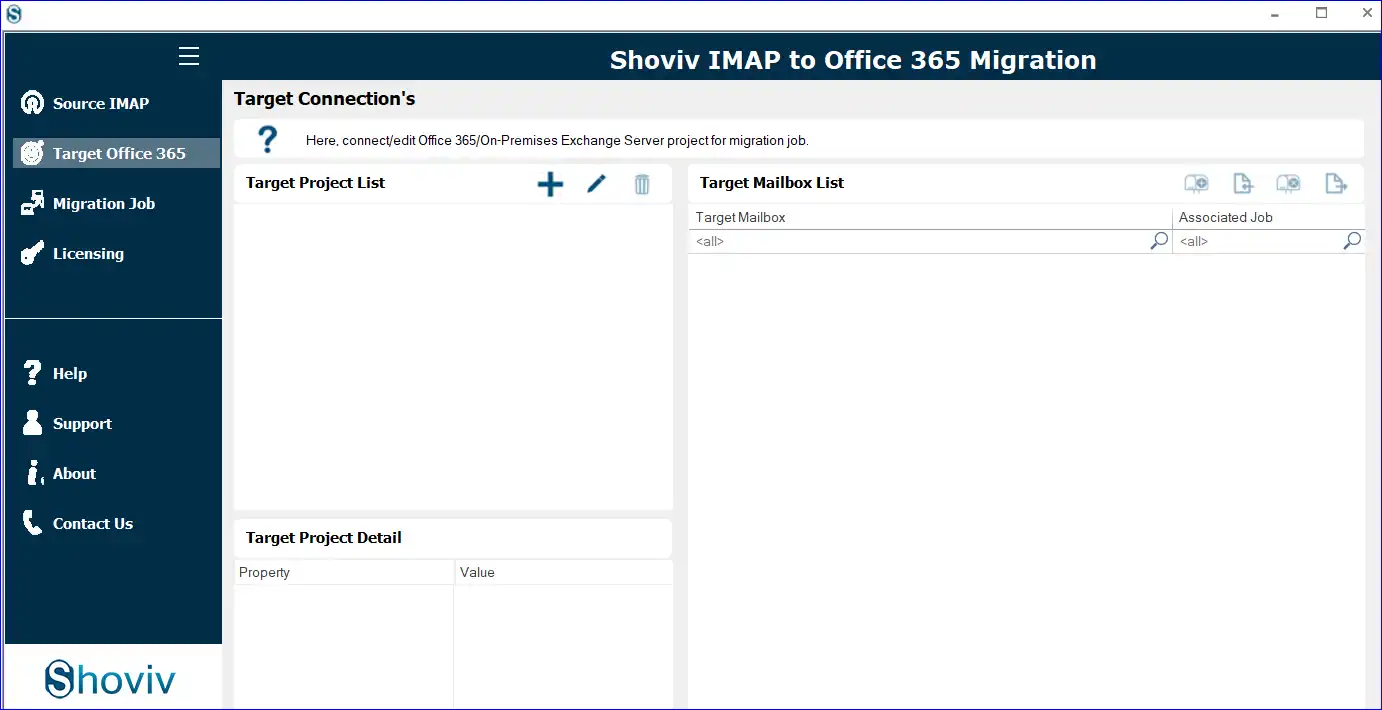
- Open the Target Office 365 tab and add your Microsoft 365 account.
- Go to the Migration Job section from the left panel.
- Click on the (+) Add option to create a new migration job.
- Enter a job name and select Fastmail as the source account.
- Select the Fastmail mailboxes and choose Microsoft 365 as the target.
- Map Fastmail mailboxes with Microsoft 365 mailboxes.
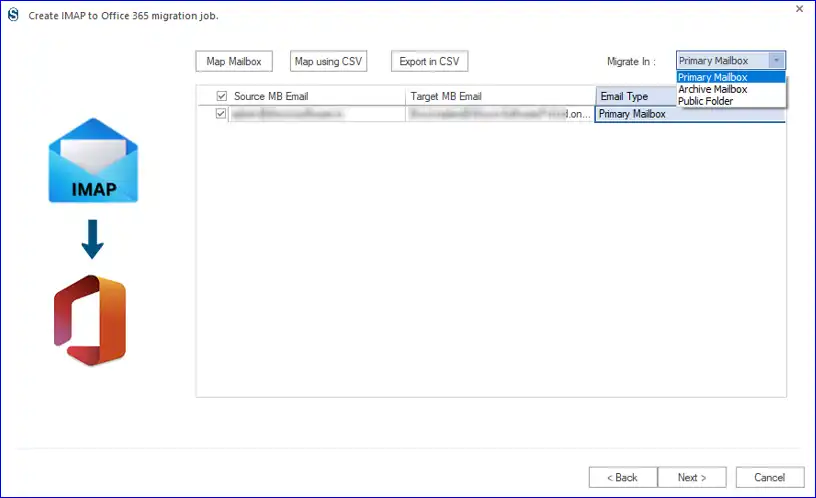
- Choose a mailbox type, such as Primary, Archive, or Public Folder.
- Apply filters such as date range or folder selection if required.
- Adjust settings like retry attempts and processing options.
- Choose to run the migration immediately or schedule it.
- Review the job setup carefully before proceeding.
- The migration will start as per the job run action and monitor the Fastmail-to-Microsoft 365 process until completion.
Key Benefits of Shoviv IMAP to Office 365 Migration Tool
- Support direct migration from Fastmail to Microsoft 365 (IMAP-based).
- Allows bulk mailbox migration in a single process.
- Provides filter options for selective Fastmail data transfer.
- Offers incremental migration support to avoid duplicate data.
- Enables scheduling for the automated Fastmail-to-Microsoft 365 migration.
How to Migrate Fastmail to Microsoft 365 Manually?
Step 1: Prepare Fastmail Account
- Log in to your Fastmail account.
- Go to Settings.
- Enable IMAP access.
- Open Security settings.
- Create an App Password.
Step 2: Configure Fastmail in Outlook
- Open Microsoft Outlook (Desktop).
- Click on File > Add Account.
- Enter your Fastmail email address.
- Select IMAP setup.
- Enter IMAP server details.
- Use the App Password for login.
- Complete account verification.
Step-3: Add Microsoft 365 Account
- Open Outlook again.
- Go to File > Add Account.
- Enter your Microsoft 365 email address.
- Sign in with credentials.
- Allow account synchronization.
Step 4: Transfer Emails
- Select Fastmail mailbox folders.
- Drag and drop emails into the Microsoft 365 mailbox.
- Wait for sync to complete.
Step 5: Final Verification
- Check migrated emails in Microsoft 365
- Verify folders and attachments.
- Confirm successful synchronisation.
Note – This method is suitable for small mailboxes and requires manual effort for each transfer.
Limitations of the Manual Method
- Manual migration takes a lot of time, especially when dealing with large mailboxes or multiple users.
- Users must understand IMAP settings, Outlook configuration, and the proper steps for email handling.
- Each mailbox needs to be migrated separately, which makes it unsuitable for organisations.
- There is a chance of missing emails, attachments, or folder structure during drag-and-drop transfer.
- Users don’t get any proper report or confirmation log after completing the process.
Final Verdict:
Migrating from Fastmail to Microsoft 365 becomes easier when you select the right approach for your data size and technical comfort, helping your audience feel assured and confident in their decision.
Using a structured migration approach ensures a more efficient transfer of emails, giving your audience a sense of control and reducing anxiety about potential issues during the transition.
Frequently Asked Questions:-
Yes, using a proper migration approach, emails, attachments, and folder structure can be transferred safely to Microsoft 365.
Yes, it offers a simple interface that even non-technical users can use to migrate Fastmail data to Microsoft 365 easily.
Yes, the tool preserves the original Fastmail folder hierarchy during migration to Microsoft 365.
Yes, bulk migration is supported, allowing multiple Fastmail mailboxes to be migrated to Microsoft 365 in one process.