Summary: Choosing the right migration approach is essential for a successful Microsoft 365 migration. While businesses migrating from IMAP, Amazon WorkMail, or Google Workspace often use automated migration tools, organizations moving from on-premises Exchange may require Cutover, Staged, or Hybrid migration methods. Regardless of the migration path, proper Active Directory preparation, user mapping, and DNS/MX record updates are critical to ensuring a smooth transition and uninterrupted email flow.
Microsoft 365 has gained a large user base over the past few years due to its comprehensive suite of cloud-based productivity and collaboration tools. As a Software-as-a-Service (SaaS) platform, Microsoft 365 offers a wide range of applications, including Word, Excel, PowerPoint, Outlook, OneDrive, and Microsoft Teams under a single subscription. Microsoft also provides multiple subscription options tailored to different user requirements.
If you are unsure which plan best suits your needs, you can explore our detailed guide on Comparing Microsoft 365 Plans, Pricing, and Features to understand the differences between Business Basic, Business Standard, Business Premium, Enterprise plans, and more. In this guide, we will walk through the step-by-step process of migrating email to Microsoft 365 while covering the key considerations, challenges, and best practices for a successful migration.
Let’s Know Why to Do Email Migration to Microsoft 365
- Office 365 offers many products and services in a single subscription.
- Due to its cloud-based presence, it is very easy to access from anywhere.
- Office 365 always remains updated, hence no downtime.
- When compared to other platforms, Office 365 is cost-efficient.
- Being a product of Microsoft, there is no question of security.
- It has convenient subscription plans that suit the needs of every end user. From single users to enterprises.
Pre-Migration Checklist for Microsoft 365
Many organizations assume that migrating email data to Microsoft 365 is the most challenging part of the process. In reality, the actual data transfer often represents only a small portion of the project. Most migration issues arise from inadequate preparation, misconfigured infrastructure, or overlooked technical requirements.
Before migrating mailboxes to Microsoft 365, ensure your environment meets the following prerequisites to avoid authentication issues, mail delivery interruptions, and migration failures.
1. Verify User Principal Names (UPN) in Active Directory
Organizations using Active Directory should review their user accounts before setting up Microsoft 365 synchronization.
Why Is This Important?
Microsoft 365 uses the User Principal Name (UPN) to identify users. If the on-premises UPN does not match the user’s Microsoft 365 email address, synchronization and sign-in problems can occur.
Example:
- Active Directory UPN: stuart.clark@company.local
- Microsoft 365 Email Address: stuart.clark@company.com
This mismatch can create duplicate identities and authentication issues.
Recommended Action
- Audit all user accounts in Active Directory.
- Ensure the UPN matches the primary email address used in Microsoft 365.
- Replace non-routable domains such as .local with your verified public domain.
- Complete these changes before running Microsoft Entra Connect (formerly Azure AD Connect).
Proper UPN alignment helps ensure a smooth synchronization process and eliminates user login problems after migration.
2. Reduce DNS TTL Before Migration
When moving email services to Microsoft 365, you must update your domain’s DNS records, including MX, SPF, and Autodiscover records.
Why Is This Important?
DNS records are cached across the internet based on their TTL (Time-to-Live) value. If the TTL is set too high, email traffic may continue reaching the old mail server long after the migration is completed.
This can result in:
- Delayed email delivery
- Missing messages
- Mailbox data inconsistencies
- Extended migration cutover times
Recommended Action
At least 24–48 hours before the migration:
- Locate your DNS records with your hosting provider (Cloudflare, GoDaddy, AWS Route 53, etc.).
- Check the TTL values for MX, SPF, and Autodiscover records.
- Reduce the TTL from the default value (often 86,400 seconds or 24 hours) to approximately 300 seconds (5 minutes).
Lower TTL values allow DNS changes to propagate quickly during the migration cutover, minimizing mail flow disruptions.
3. Evaluate Bandwidth and Migration Limits
Large mailbox migrations can place significant demands on both network resources and email servers.
Why Is This Important?
Most email platforms enforce bandwidth and throttling limits to protect service performance. During large migrations, these limits can slow down data transfers or temporarily block migration requests.
Common issues include:
- Slow migration speeds
- Interrupted synchronization jobs
- Server busy responses
- API throttling restrictions
- Delayed mailbox completion
Recommended Action
Before starting the migration:
- Assess the total mailbox data volume.
- Review available internet bandwidth.
- Identify any source-server upload or download limitations.
- Schedule migrations during low-traffic periods whenever possible.
For large-scale migrations, manual methods are often inefficient and time-consuming. Using a professional migration solution can help manage throttling, automate retries, perform incremental synchronization, and maintain data integrity throughout the migration process.
Way to Migrate Email to Microsoft 365:
Most email clients use IMAP (Internet Messaging Access Protocol) to send and receive messages from the server. Some examples are Gmail, Yandex, Yahoo Mail, EarthLink Mail, Apple Mail, SquirrelMail, Zoho Mail, Godaddy Mail, AOL, Hotmail, et cetera. For the complete and effortless email migration to Office 365, Shoviv Software has developed an advanced tool that can migrate emails from any email client using IMAP to O365 in a few clicks. This utility has a lot to offer, and some of its highlighted features are:
- Migrates any IMAP using an email client to Office 365 without any restriction on the number and size of the mailbox.
- Along with migrating into Office 365, this utility also offers migration to Exchange Server.
- It runs on job-based processing and allows users to run multiple jobs in parallel. In this manner, you can migrate multiple mailboxes in a single go.
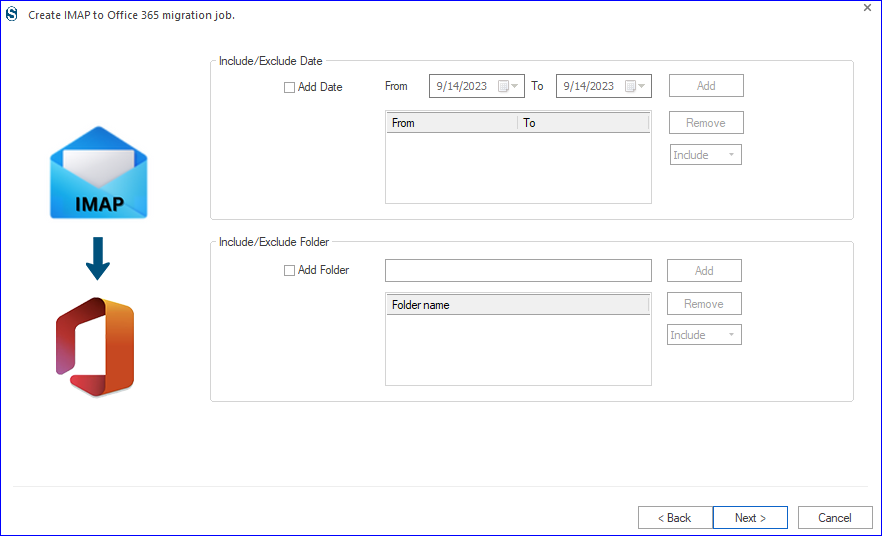
- You can filter the data based on the date range and folder criteria.
- After creating the migration jobs, you can also schedule the migration job, and migration will start at the scheduled time.
- An advanced facility called incremental export is also given within this tool. It allows users to resume the process from the last stop.
- This professional tool keeps originality intact; hence, there is no need to worry about data alteration when you migrate to Office 365.
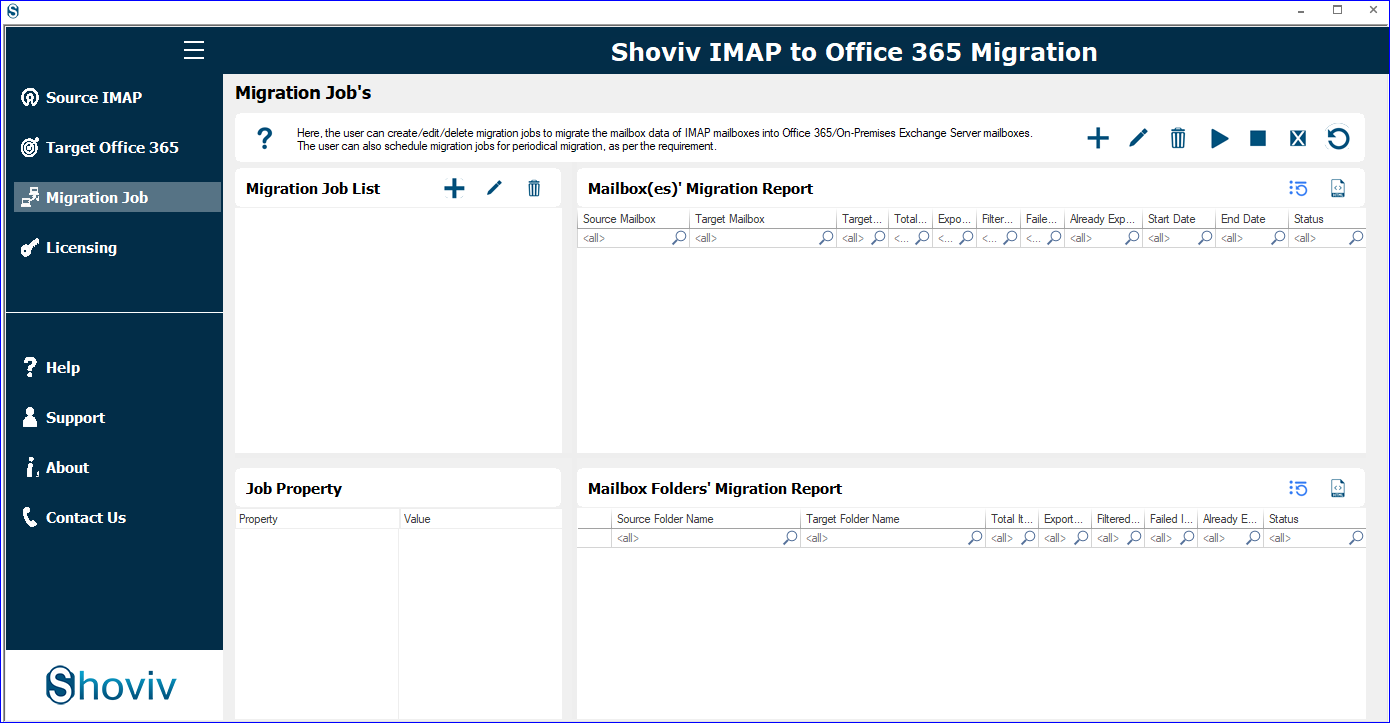
How to Professionally Migrate Email to Office 365 Step by Step?
- Install and open the Shoviv IMAP to Office 365 Migration Tool.
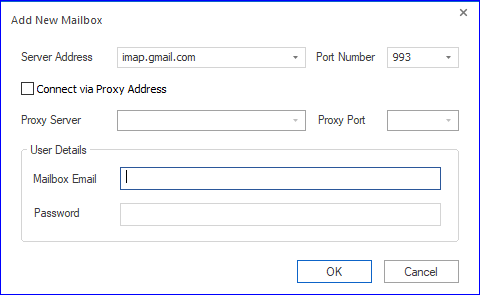
- First, click on the Source IMAP, then the (+) add button.
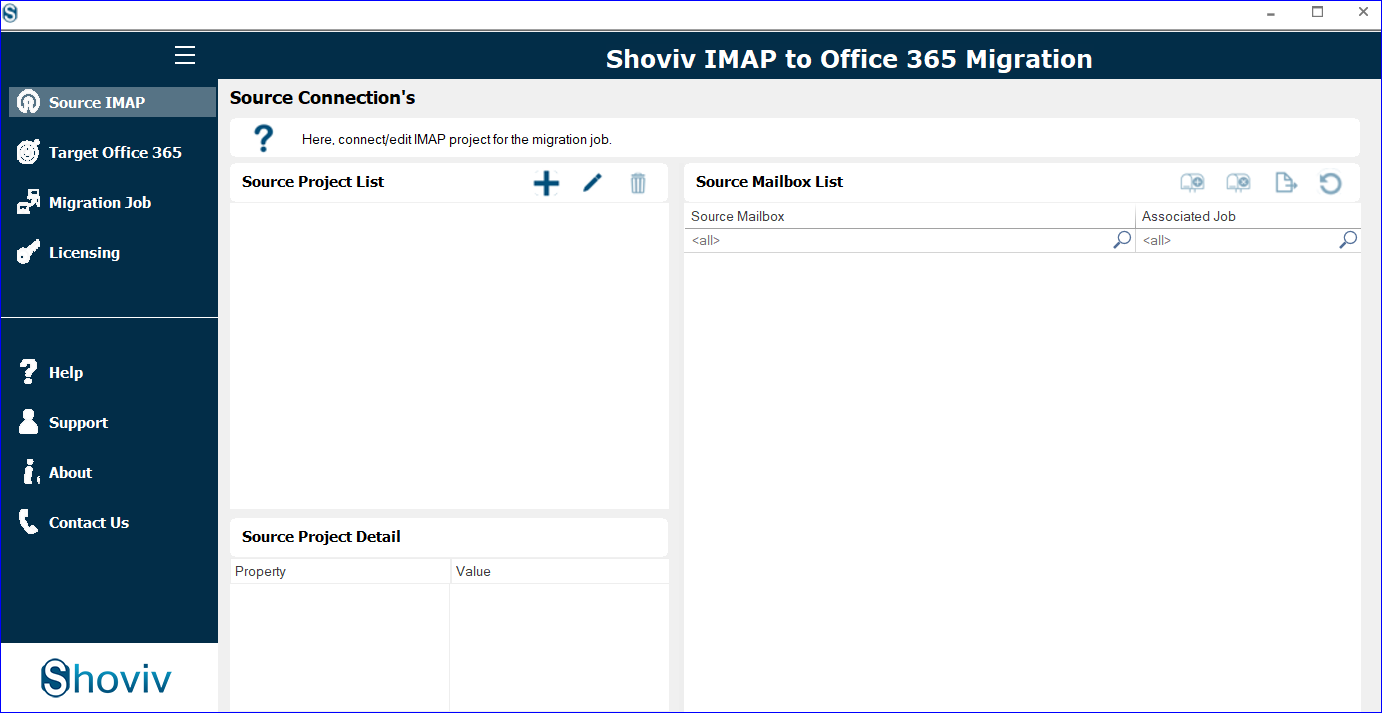
- Enter the asked credentials and click OK.
- Now select the Target Office 365 tab to create an Office 365 connection.
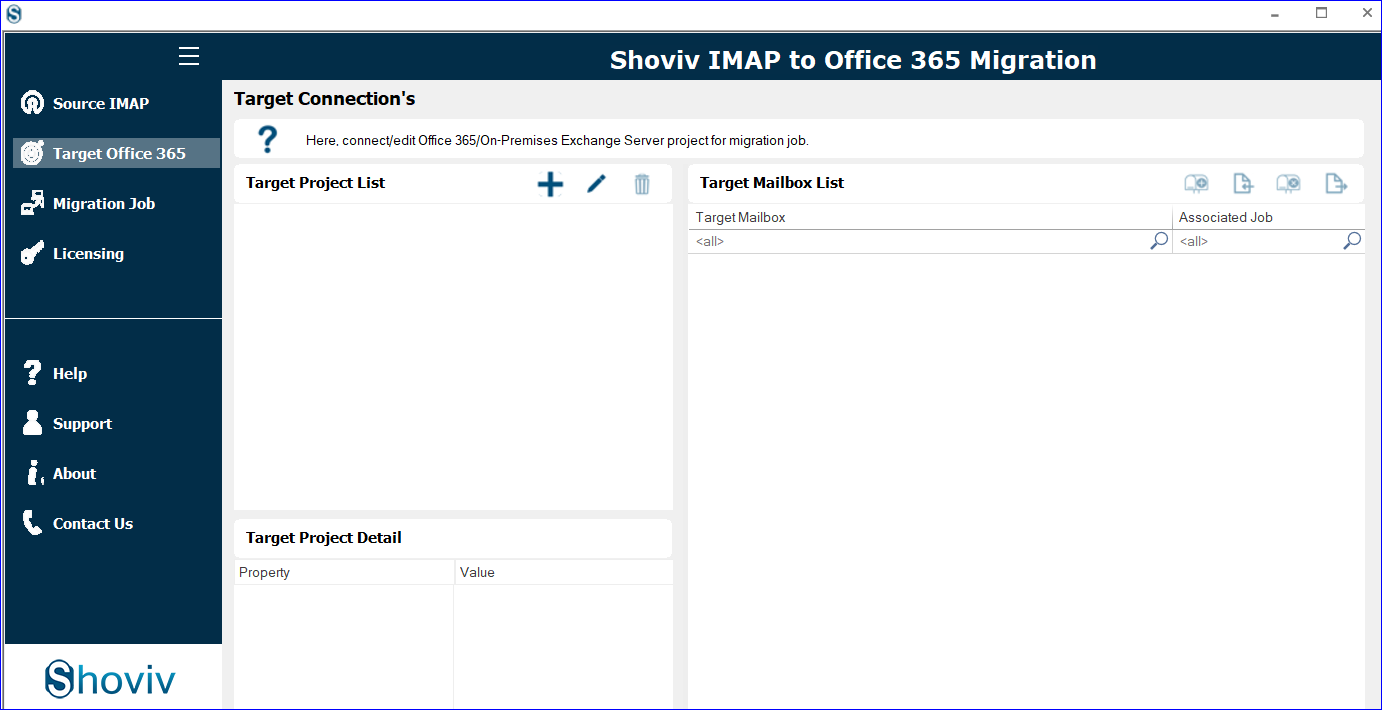
- Provide the required credentials. Must check the Modern Authentication (Auto-Registration). Click OK.

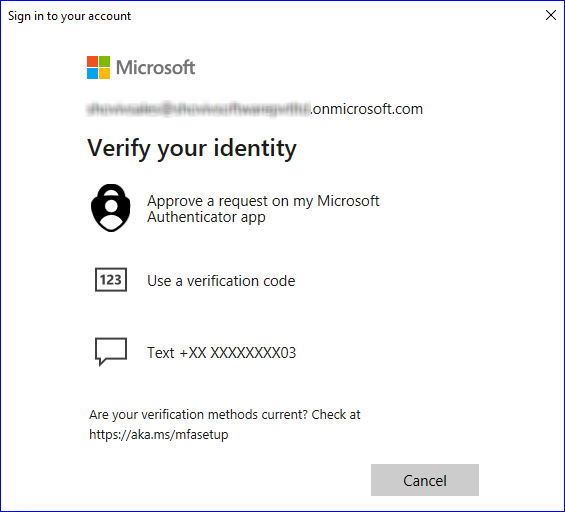
- Provide Microsoft email address and password. Also, verify your identity.
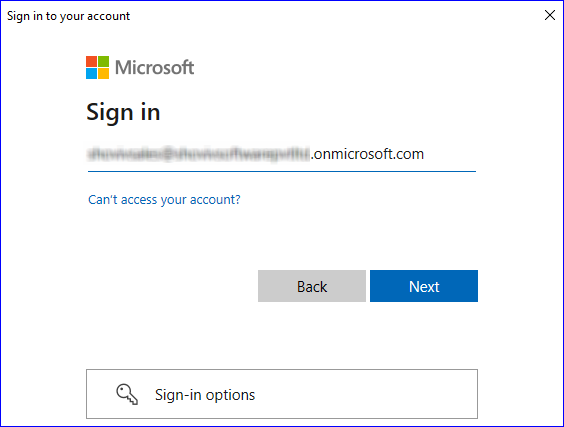
- Click on the Accept to permit request.
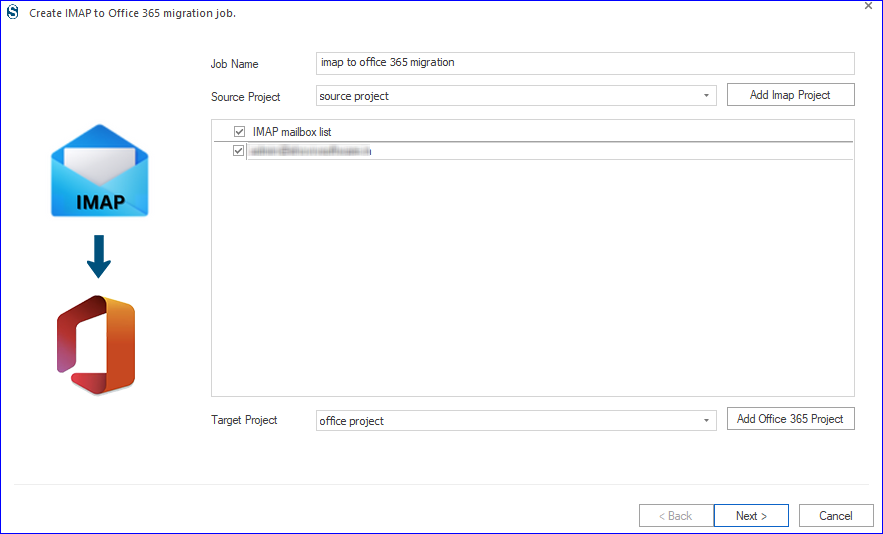
- The next task is to create a migration job and click on the Migration Job tab.
- Give a job name, and add IMAP and Office 365 projects. Check the mailboxes and click Next.
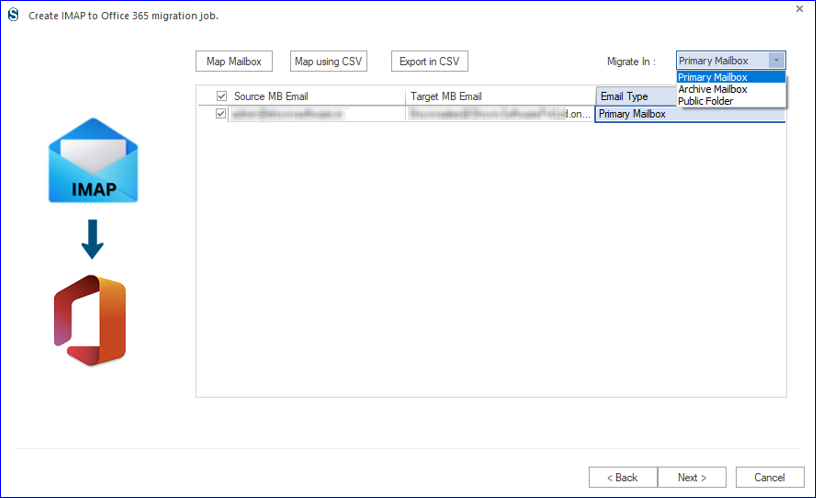
- Map the target mailbox with the source ones. Also, select among Primary/Archive Mailbox and Public Folder. Click Next.
- Apply the folder-wise/date criteria to filter the email data. Click Next.
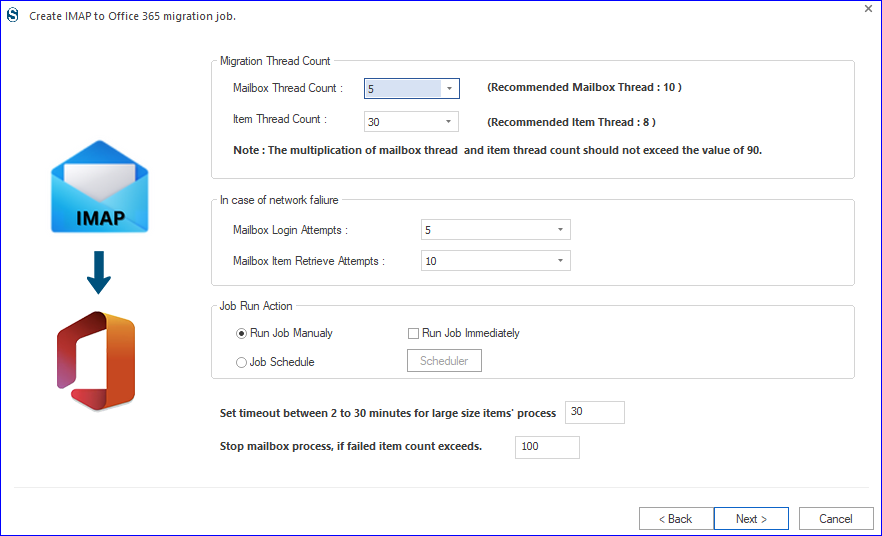
- Now, you will be prompted to the settings. Apply settings as per the need for the task.
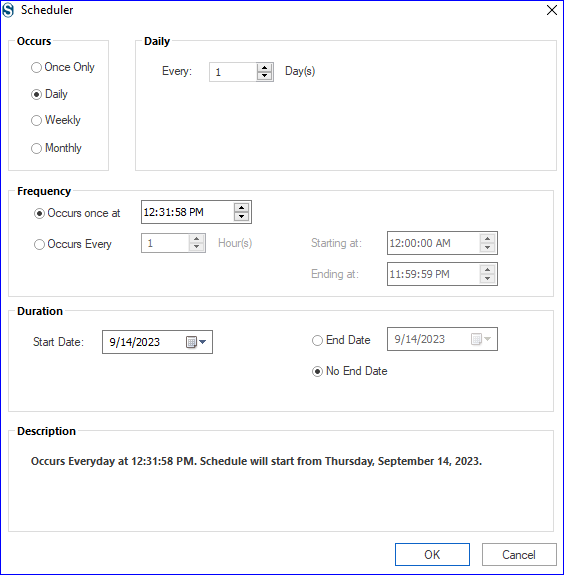
- You will get two options: Run the Job Immediately or Schedule.
- You can schedule migration using occurrence, frequency, and duration criteria.
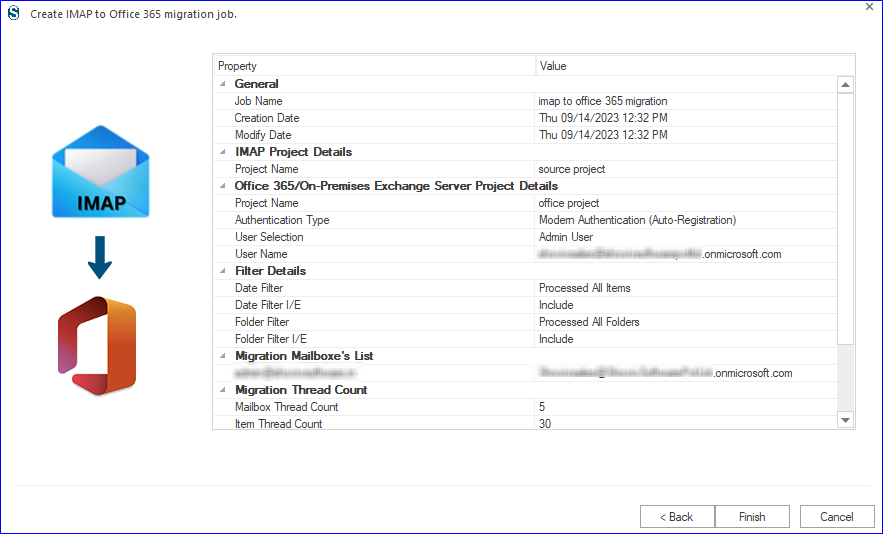
- Finally, check all the settings, and if satisfied, click Finish.
Post-Migration DNS Cutover: Directing Email Traffic to Microsoft 365
After successfully migrating your mailboxes to Microsoft 365 and completing the initial synchronization, the final step is the DNS cutover. This is the stage where you redirect incoming and outgoing email traffic from your old email system to Microsoft 365.
Until your DNS records are updated, new emails will continue to arrive at your previous mail server, even if all mailbox data has already been migrated.
To complete the migration and make Microsoft 365 your active email platform, you must update the key DNS records associated with your domain.
DNS Records Required for Microsoft 365
The following records should be updated in your DNS hosting provider’s control panel, such as Cloudflare, GoDaddy, AWS Route 53, Namecheap, or another DNS management service.
1. Update the MX Record
The MX (Mail Exchanger) record determines where incoming email messages are delivered.
Why Is This Important?
Without updating the MX record, external senders will continue delivering email to your old mail server instead of Microsoft 365.
Recommended Configuration
| Setting | Value |
|---|---|
| Record Type | MX |
| Host/Name | @ (or leave blank, depending on your provider) |
| Points To | Your Microsoft 365 MX endpoint |
| Priority | 0 (Highest Priority) |
Important Note: Microsoft generates a unique MX endpoint for each Microsoft 365 tenant. Before making changes, navigate to:
Microsoft 365 Admin Center → Settings → Domains
Copy the exact MX record provided for your domain and use that value in your DNS configuration.
2. Configure the Autodiscover Record
The Autodiscover record helps email clients automatically locate and connect to Microsoft 365.
Why Is This Important?
Applications such as Outlook for Windows, Outlook for Mac, Outlook Mobile, and other Exchange-compatible clients use Autodiscover to automatically configure user profiles.
Without a valid Autodiscover record, users may need to manually configure mailbox settings.
Recommended Configuration
| Setting | Value |
|---|---|
| Record Type | CNAME |
| Host/Name | autodiscover |
| Points To | autodiscover.outlook.com |
Once configured, users can typically sign in using only their email address and password.
3. Update the SPF Record
The Sender Policy Framework (SPF) record authorizes Microsoft 365 to send email on behalf of your domain.
Why Is This Important?
An incorrect SPF record can cause outgoing emails to be flagged as spam or rejected by recipient mail servers.
Recommended Configuration
| Setting | Value |
|---|---|
| Record Type | TXT |
| Host/Name | @ |
| Value | v=spf1 include.protection.outlook.com -all |
If you use additional email services, marketing platforms, or third-party mail gateways, review your SPF configuration carefully to avoid exceeding SPF lookup limits.
Perform a Final Incremental Synchronization
After updating your DNS records, internet mail routing will gradually begin directing messages to Microsoft 365.
During this transition period, some emails may still reach the old mail server due to DNS caching and propagation delays.
To ensure no messages are missed:
- Run a final incremental synchronization.
- Complete any pending migration batches.
- Verify that new messages are arriving in Microsoft 365 mailboxes.
- Confirm that users can send and receive email successfully.
This final synchronization captures any emails received during the cutover window and ensures mailbox data remains fully up to date.
Verify the Migration
Before decommissioning your old mail environment, verify the following:
- Users can sign in to Microsoft 365.
- Outlook profiles connect successfully.
- Email is flowing in and out of Microsoft 365.
- Shared mailboxes and distribution groups function correctly.
- DNS records have propagated globally.
- No new emails are arriving at the legacy mail server.
Migration Complete
Once the DNS records have propagated and the final synchronization is complete, your organization is fully operational on Microsoft 365.
At this stage, all new email traffic is routed through Microsoft 365, users can access their migrated data, and the legacy email environment can be safely retired according to your organization’s retention and compliance requirements.
Microsoft Native Migration Methods vs. Shoviv Solutions
Microsoft provides several native migration options for moving data to Microsoft 365. While these methods work well in certain environments, they can become challenging when dealing with large-scale migrations, multiple source platforms, or legacy data archives.
The following comparison highlights common migration scenarios and how native Microsoft tools compare with Shoviv migration solutions.
1. Large Enterprise and Cross-Tenant Migrations
Typical Scenario
Organizations migrating thousands of mailboxes between Microsoft 365 tenants or from on-premises environments to Microsoft 365.
Challenges with Native Methods
- Complex user mapping and identity management.
- Dependency on Microsoft Entra Connect (Azure AD Connect) configurations.
- API throttling that can slow migration performance.
- Limited flexibility when handling large migration batches.
- Additional planning required to minimize user disruption.
How Shoviv Helps
- Supports large-scale mailbox migrations without mailbox count restrictions.
- Enables automated mailbox mapping through CSV files.
- Uses parallel processing to improve migration efficiency.
- Supports incremental migration to reduce downtime.
- Simplifies cross-tenant migration projects.
2. On-Premises Exchange to Microsoft 365 Migration
Typical Scenario
Organizations moving from Exchange Server to Microsoft 365.
Challenges with Native Methods
- Requires careful planning for cutover or hybrid deployments.
- User profiles may need reconfiguration after migration.
- Migration projects can become complex for older Exchange environments.
- Downtime risks increase during large cutover migrations.
How Shoviv Helps
- Performs mailbox migration in the background.
- Supports incremental synchronization to keep data updated.
- Preserves folder structure and mailbox metadata.
- Minimizes disruption to end users during migration.
3. Google Workspace, AWS WorkMail, IMAP, and Other Email Platforms
Typical Scenario
Migrating from Google Workspace, Amazon WorkMail, IMAP servers, webmail services, or third-party email platforms to Microsoft 365.
Challenges with Native Methods
- Native IMAP migration primarily transfers email messages.
- Contacts, calendars, and tasks often require separate migration methods.
- Network interruptions can affect migration progress.
- Additional manual effort may be needed to migrate all user data.
How Shoviv Helps
- Migrates emails, contacts, calendars, and tasks.
- Supports multiple cloud and IMAP-based platforms.
- Automatically resumes migration after network interruptions.
- Reduces the need for multiple migration tools.
4. PST, OST, and Legacy Exchange Database Files
Typical Scenario
Organizations need to migrate data stored in PST files, OST files, or offline Exchange database (EDB) files.
Challenges with Native Methods
- Limited support for disconnected or damaged mailbox archives.
- Manual import processes can be time-consuming.
- Recovering data from corrupted files often requires additional tools.
How Shoviv Helps
- Supports PST, OST, and EDB file migration.
- Can process offline and legacy mailbox archives.
- Offers recovery options for damaged or inaccessible files.
- Migrates data directly to Microsoft 365 mailboxes or archive mailboxes.
So, Which Option Should You Choose?
Native Microsoft migration tools are a practical choice when the source and destination environments are fully supported, properly configured, and relatively straightforward.
However, organizations often face more complex requirements such as cross-tenant migrations, legacy archives, hybrid environments, or migrations from non-Microsoft platforms. In these situations, specialized migration solutions like Shoviv can help simplify the process by supporting multiple source types, automating migration tasks, and reducing administrative effort.
The right approach depends on your migration scope, source environment, data volume, and business continuity requirements.
Move your entire workspace to Microsoft 365, including emails, contacts, calendars, and cloud drive data. Choose one of the migration scenarios below to begin.
Final Words:
Successful Microsoft 365 migrations begin long before the first mailbox is moved. Proper Active Directory preparation, DNS optimization, and bandwidth planning can significantly reduce migration risks and minimize business disruption.
Organizations migrate to Microsoft 365 for various reasons, including improved collaboration, enhanced security, cloud accessibility, and simplified IT management. However, choosing the right migration solution is equally important for a smooth transition.
Shoviv offers a range of Microsoft 365 migration solutions designed to simplify the migration process. These tools come with user-friendly features such as incremental migration, mailbox mapping, scheduling, filtering options, and support for multiple source platforms. As a result, they are widely used by IT administrators and migration professionals.
To help users evaluate the software, Shoviv provides a free trial version of its migration tools. The trial allows users to test the migration process before purchasing a license. Additionally, free technical support is available to assist users with installation, configuration, and migration-related queries.
Frequently Asked Questions:
Yes, you can easily migrate ProtonMail to Office 365. You can migrate any IMAP using an email client/server.
Don’t worry if you are migrating through Shoviv professional migration tool and process interrupts. No need to start from scratch; the software will resume the process as well as prevent duplicity in the target.
With demo version there is a restriction of first fifty items per folder. While with a licensed version there are no such restrictions. In working both are same.
Yes, you can create multiple jobs and in each job add and migrate multiple mailboxes concurrently.