Summary: Migrations to any version of the Exchange Server will always be a difficult task. No matter how technically skilled you are, there are possibilities of problems while handling the migration. Although, you can take the help of this technical guide which will allow you to migrate Exchange 2010 to 2016 quickly. This guide contains the methods which will help you make the migration effective.
To make the migration successful, it is important to fulfill all prerequisites like meeting the hardware requirement, Operating System, keeping both Exchange versions integrated, and many more.
Since Exchange 2016 is the latest operational version, many users want to do Exchange 2010 to 2016 migration. However, most users find it confusing while executing the migration since the manual process is complex.
Today we will tell you how to upgrade from Exchange 2010 to 2016 with 100% success. But first, let’s examine the manual method for migrating Exchange 2010 to 2016.
What will you get new in Exchange 2016 Version? Explained
Exchange 2016 brings additional features, which is one of the common reasons why many users are getting attracted towards it. Although, due to the fact that Microsoft has already stopped providing support for Exchange Server 2010, users are looking to migrate Exchange 2010 to 2016 edition. Ultimately, this migration will lead to an improvement in the user experience while working with the new Exchange version.
However, to provide information about such improvements in the new Exchange version, we have created a brief of them which are as follows:
- Enhancement in the Search capabilities in the Exchange Server 2016 edition, which allows users to locate 10 mailboxes in a single search.
- After the Cumulative Update 1, the setups of the Exchange Server are now available for download as an ISO file instead of the .exe.
- Advancement in the Calendar now comes with a new look and is capable of notifying users about their upcoming email events.
- Exchange 2016 edition enables users to store their mailboxes over the cloud apart from the on-premises location.
- It offers better collaboration with SharePoint and One drive.
- Support of 17 new languages has been added to Outlook on the web.
- Updation in the certificate that Outlook web uses, which has changed to SHA-2 Compliant.
This is to provide you with a better understanding of the new update for Exchange 2016. Now, explore some better ways which help to switch your Exchange Server.
Steps to Upgrade/Migrate Exchange 2010 to 2016 Manually:
Literally, you cannot move directly from Exchange 2007 or 2003 to Exchange 2016. Hence Exchange 2010 is the oldest version from where you can directly upgrade to Exchange 2016. Before starting the Exchange 2010 to Exchange 2016 migration, let’s know the prerequisites.
- Your Operating System must be compatible with the mailing platform.
- Ensure Integration between 2016 and 2010 Exchange Server platforms.
- You must fulfill all the hardware requirements.
Upgrade Exchange 2010 to 2016 Using Exchange Admin Center:
(Note: Here, I’m using classic Exchange Admin Center).
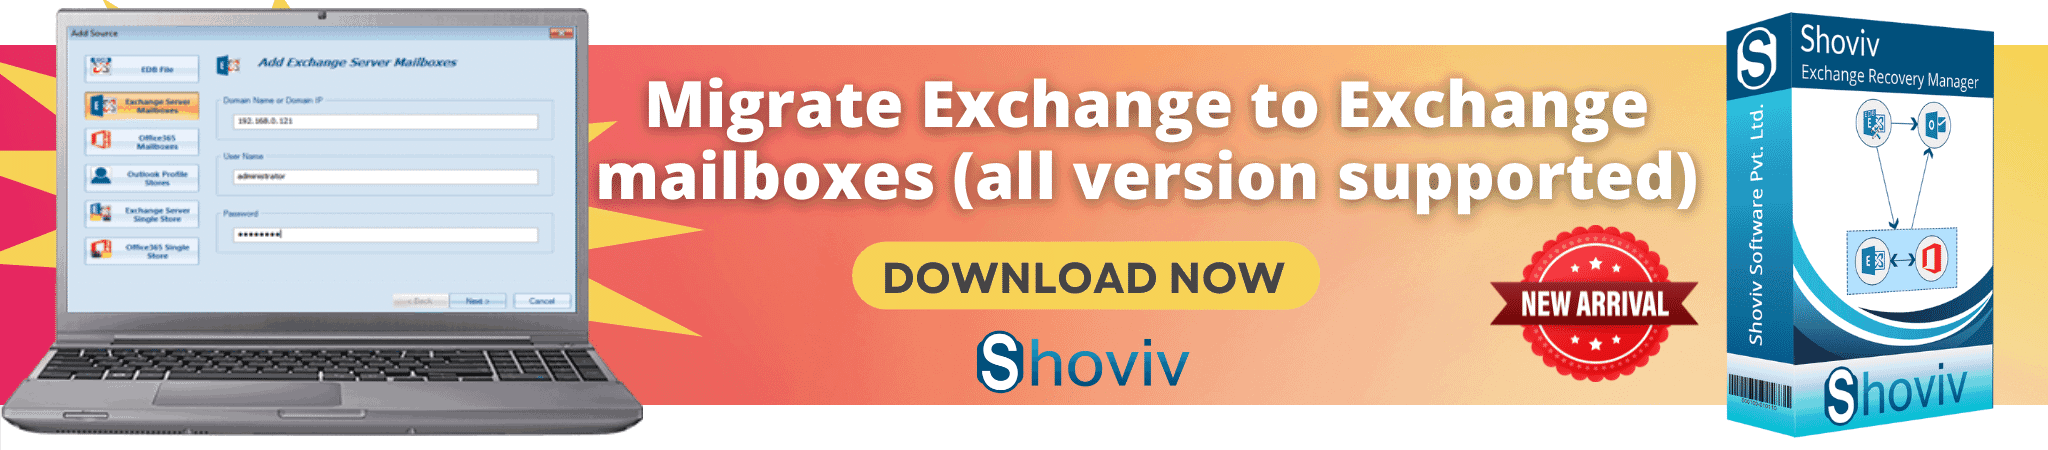
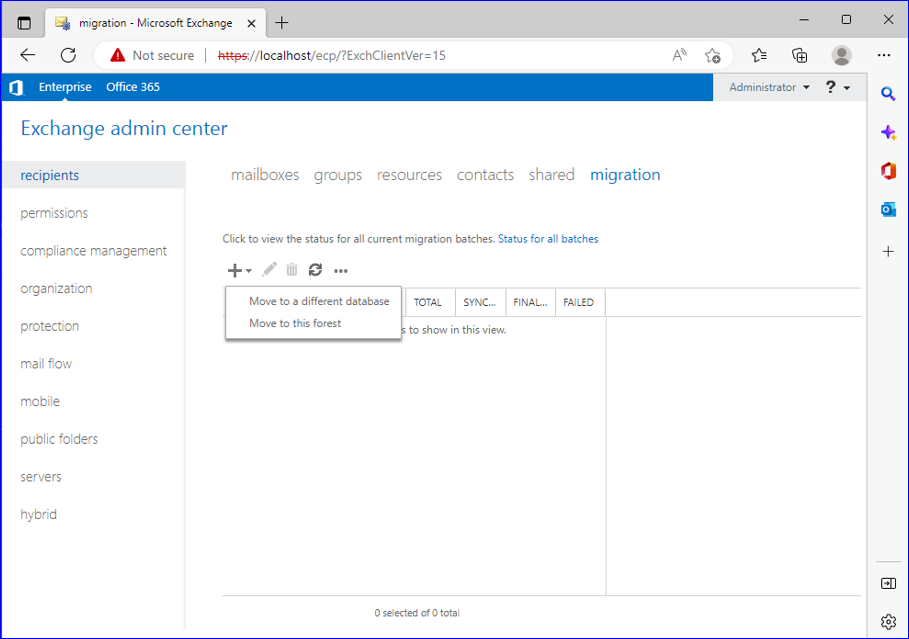
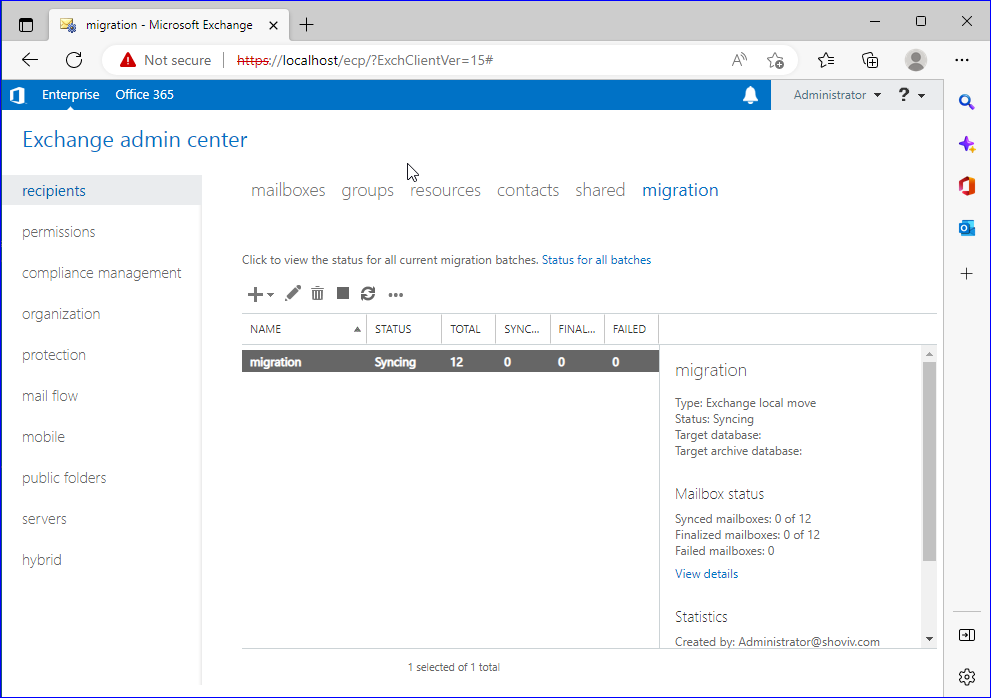
- Open the Exchange Admin Center by clicking here. Then sign in to your account. Now go to the Recipients Tab and select the Migration option. Click on the Add (+) sign and pick the Move to a Different Database option.
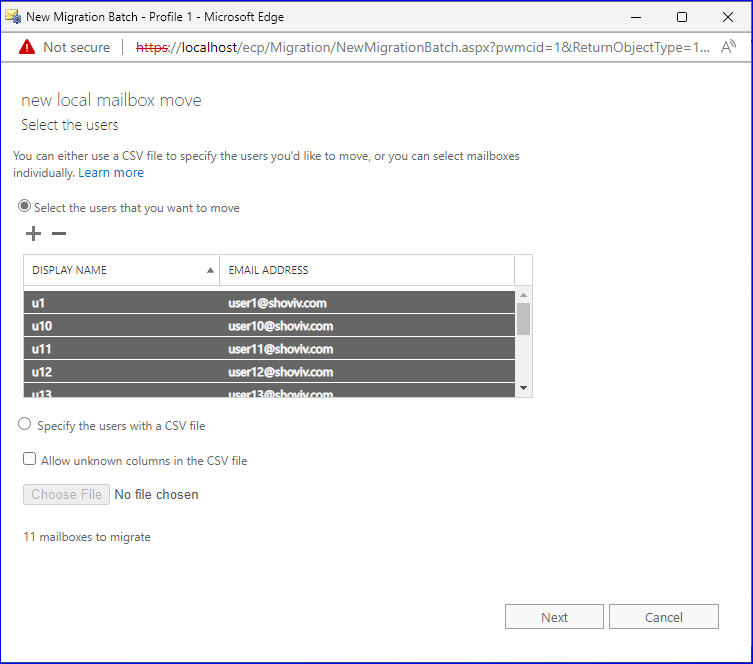
- Following will be the New local mailbox move wizard. Click (+ Add) and select the mailboxes to upgrade into Exchange 2016. Once done with adding users click on the Next button. (One can use a CSV file to add users in bulk).
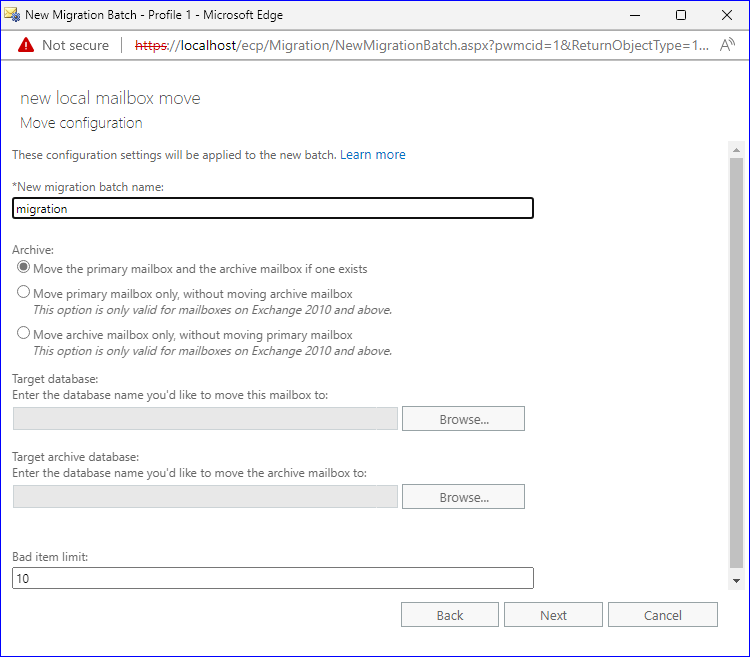
- In the following wizard, provide the New migration batch name, Target database name where you would like to move mailboxes. You can also set the count for Bad items. After that, click Next.
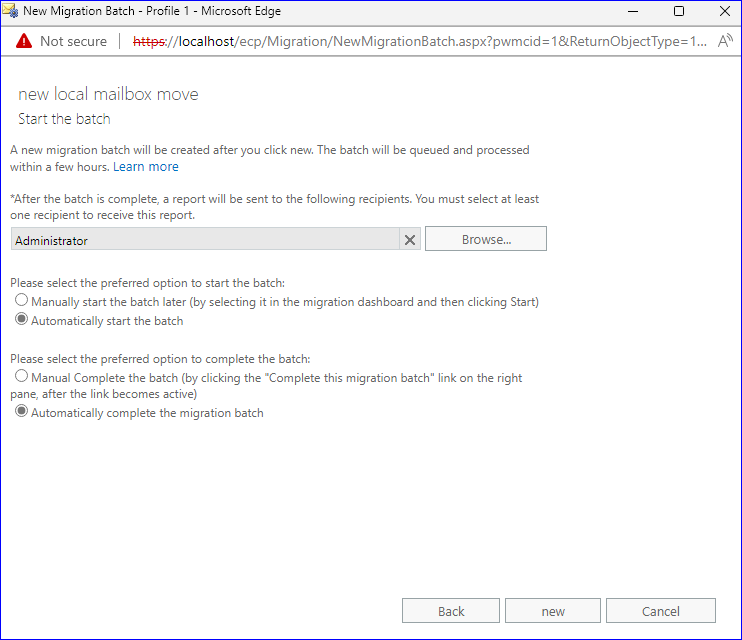
- A new wizard will open. Here, select the user to receive the migration report after the migration gets completed. Also, pick the option to Start and Complete the migration batch and click on the New button.
- Once done with the above steps go back to the Migration wizard and ensure whether the upgrade process is running or not.
As you would have observed by now, the process to manually migrate Exchange 2010 to 2016 is quite nuanced. If you want to excuse yourself from the hassle and complication of the manual process, we have an alternate for you.
Shoviv Migration Tool – Easy Solution:
Shoviv Exchange Server Migration can carry the process to migrate Exchange 2010 to 2016 without any need of intervention from you. Not only is it fully automatic, but it has also got a bunch of features to let you design results according to your choice.
Specialties of Exchange Server Migration Software:
You would never have encountered the smoothness in the process to migrate Exchange 2010 to 2016, which you will have with the Shoviv tool.
Adds Large Source Mailboxes:
Not only smooth but swift migration is also the hallmark of this Exchange Migration tool. This tool would amplify the process to upgrade Exchange 2010 to 2016 by adding large source mailboxes at once. There is no size limitation in adding the Exchange mailboxes.
Keeps Folder Hierarchy Intact:
People who migrate Exchange 2010 to 2016 complain of their folder hierarchy going haywire. This tool takes care that it doesn’t happen to its users. The software maintains the proper folder hierarchy of added source mailboxes. Also, there is no chance of the source mailbox getting affected while adding them to the folder list.
Preview Facility to View Source Mailbox Items:
This Exchange migration tool takes every possible step to ensure the users’ comfort. The preview facility is an addition to it. Before you command the tool to migrate Exchange 2010 to 2016, it will let you view the added mailboxes at once. You can view item body, item property, recipients, and attachments.
Migrates Source Mailboxes to the Popular PST Format:
Along with Exchange 2010 to 2016 migration, this tool lets you migrate the added mailboxes to Outlook PST. The user even gets the option of splitting PST files into any size of files they would want. It lets users arrange large PST files into smaller PST files conveniently.
Migrates from Exchange to Office 365:
With this Exchange migration tool, you can not only migrate Exchange 2010 to 2016, but you can also Export from Exchange to Office 365. You can migrate single or multiple-source mailboxes to Office 365.
Migrate Live Exchange Public Folder and Archive Mailbox:
Using this software, you can also migrate Live Exchange public folders/ archive Mailbox and EDB Public folder to another Live Exchange/ Office 365 Public folder and archive mailbox.
Filters Added Source Mailbox Items:
If in the process of Exchange 2010 to 2016 migration, you want to exclude/ include items, this tool is at your service. Its filter option lets you include and exclude source mailbox items to filter items based on two criteria- message class and item date.
Prevent Duplicity in the target mailbox:
We have kept users’ expectations in the center of the software developing process, and it can be possible that your source mailbox keeps duplicate items. The software has an advanced algorithm that automatically filters out duplicate items from the migration process.
Search Criteria to Easily Search Added Items:
Using this feature, you can search out your desired item instantly. The criteria allowed are multiple- message class, message date, CC, BCC, subject, attachment name, etc.
Resume interrupted process with Incremental Export:
Process interruption is the worst scenario that appears during the migration process. Manually, if the migration process gets interrupted, you have to start it over. But Shoviv tool offers an Incremental export option that effectively resumes the interrupted process and saves the user’s effort and time.
Check These Features with a Free Trial Version:
These features in a tool that can migrate Exchange 2010 to 2016 may sound amazing on their own, but what if we told you that you can test them for free? Yes, you can enjoy all these services free of cost with the free trial version of this tool. Get it at the soonest and let us know your experience.
Steps to Migrate Exchange 2010 mailboxes to 2016 are:
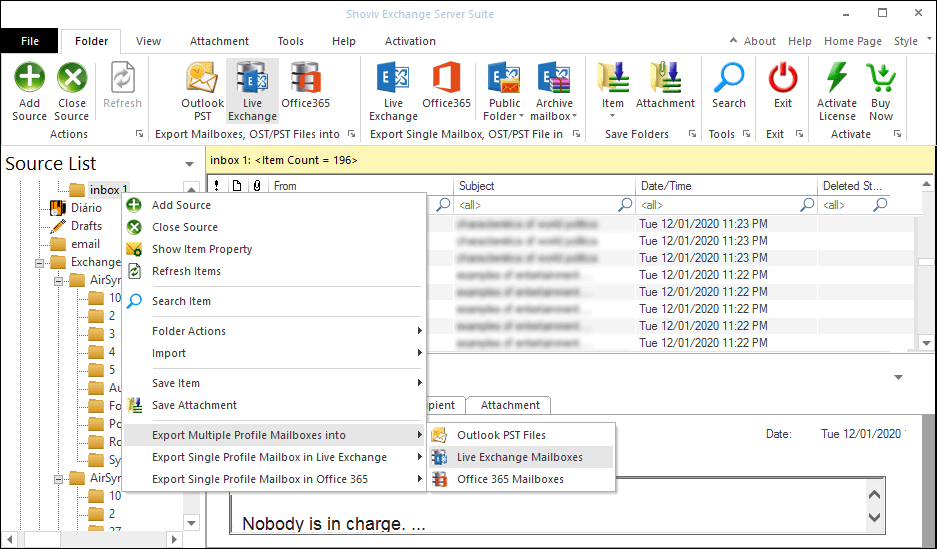
- Add Exchange Server mailboxes to the source.
- Check them and select Live Exchange Mailboxes as the target.
- Check/uncheck subfolders and provide target credentials.
- Map the source, validate the target, and, if necessary, apply a filter.
- The Exchange 2010 to Exchange 2016 migration will start.
How Shoviv Migration Software Works – Detailed Steps
Upgrade Exchange 2010 to 2016 in easy-peasy steps
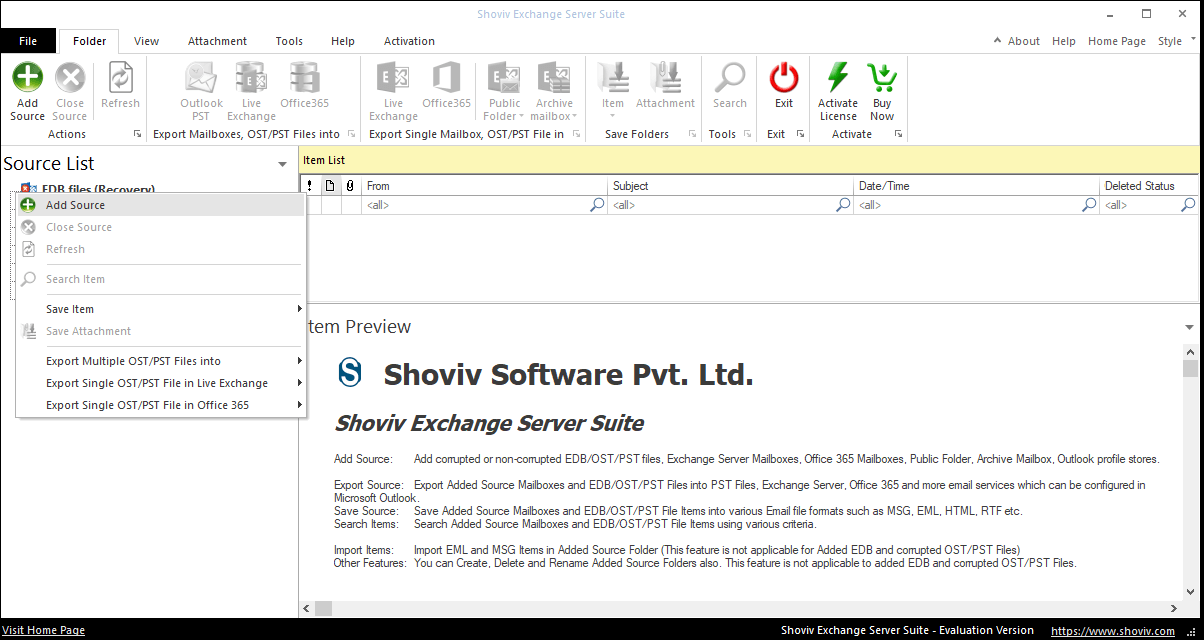
Step1: Start with installing and launching the software.
Step2: Click on the Add Source from the ribbon bar.
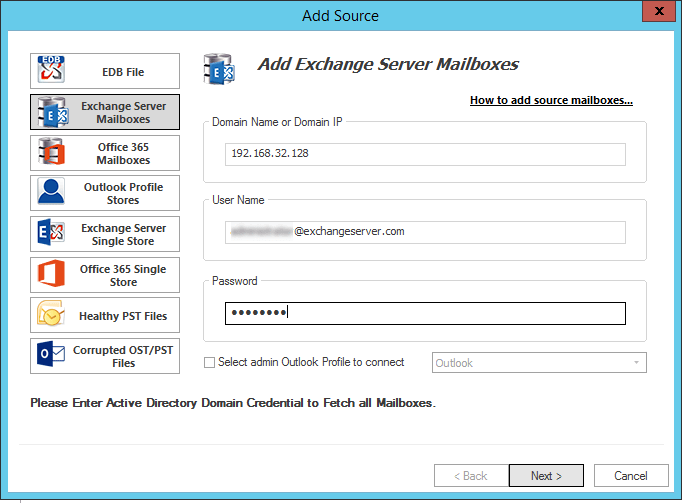
Step3: Select the Exchange Server mailboxes option.
Step4: Provide Exchange admin cred and click on Next.
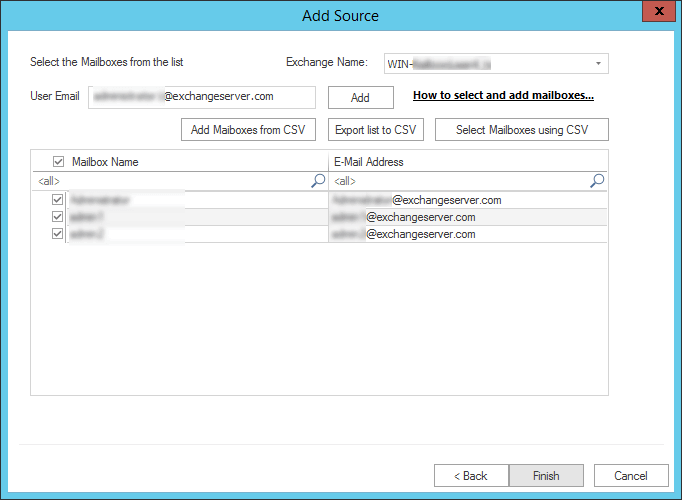
Step5: Select mailboxes to migrate and hit the Next.
Step6: Click the Live Exchange option on the ribbon bar.
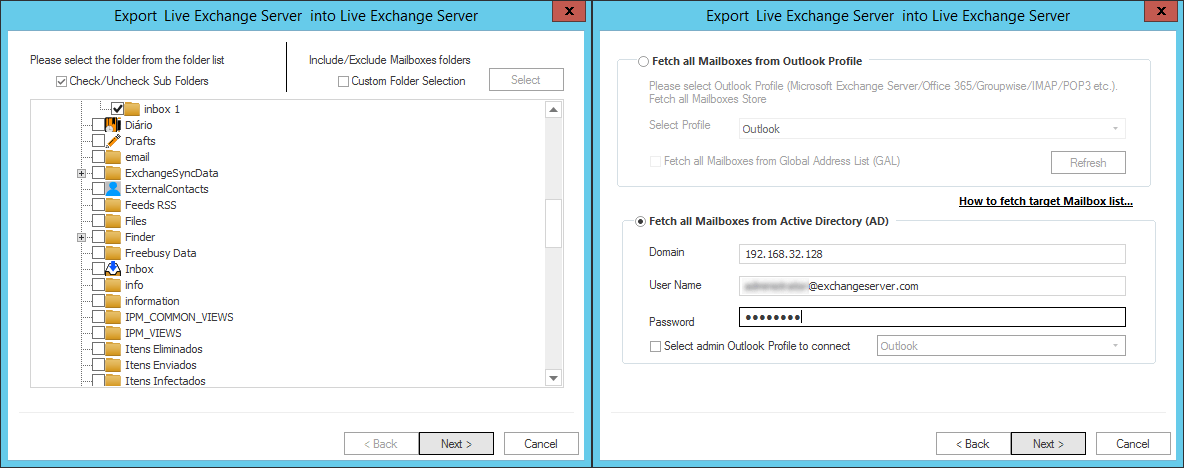
Step7: Check/uncheck subfolders and enter target Exchange cred.
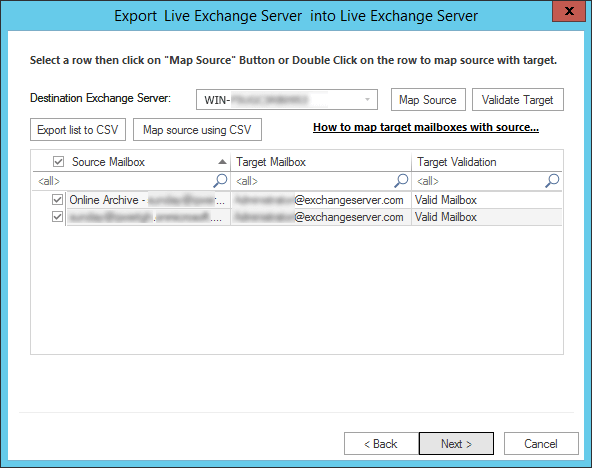
Step8: Now map source and target Exchange mailboxes.

Step9: Use the filter and other advanced options and click Next.
Now, the software will start exporting items from Exchange 2010 to 2016 and display a live log report with all the information.
Bringing all Together:
Exchange to Exchange migration is a hectic task manually, but the Shoviv Software is specially designed for this task. In this write-up, I’ve also mentioned a manual method (Admin Center). Now it’s your call what you choose, hassle with the manual process or effortless upgrade with the professional tool.


Related Topics-