Microsoft 365 (formerly known as Office 365) is a subscription-based software service. It enables users to add Microsoft’s core applications to their subscription plan. Microsoft 365 has many advancements and is single-handedly dominating the email niche nowadays. But as we all know, every coin has two sides, the same in the case of Microsoft 365. Its biggest drawback is it doesn’t provide a native option to create Microsoft 365 backup and store data on the cloud.
Storing data in the cloud is handy for everyone as it is universally accessible. Hence, users can access their data anytime while connecting to the internet. But it also increases the risk of data loss, and nowadays, it has become a severe problem.
Why should you keep Microsoft 365 backup on a hard drive?
If you’re still thinking about why you should keep Office 365 email backup, below are the reasons.
- Where your data is: Many Office 365 users think their data is accessible anywhere and anytime, so they don’t need to keep a backup. But it is not about availability; it is about the security of your data and organization. In case some of your Microsoft 365 data gets deleted or someone intentionally deletes it, where will you find it to retrieve?
- External Threats: We live in an era full of ransomware and data hostage viruses. To protect your Office 365 emails from external threats, several Microsoft and IT professionals suggest using the 3-2-1 rule of backup. This backup strategy states that you should have 3 copies of data 1st is your server data, and 2nd is the Microsoft 365 backup copy on the local system, and the third one on a different system or storage device. 3-2-1- strategy is the best you could do.
- Your data is your responsibility: The business data of your organization’s process is valuable, and it’s your company’s responsibility to ensure its availability and security. Besides this, Microsoft has already mentioned on their data service availability that “Microsoft is not liable for any data loss or disruption. Also, in case of Outage, users will not be able to retrieve their stored data.” Microsoft also recommends users store a full backup of Microsoft 365 emails with the help of a third-party service or software.
These are the leading and frightened causes to backup Office 365. Along with these, there are many more reasons, such as data flexibility (if backup in PST file), Sending complete Office 365 data, and Office 365 to Office 365 migration, you name it.
How to backup Microsoft 365 emails?
There are two approaches available for Microsoft 365 backup. One is using a manual method, and the second one is with the help of a professional third-party Office 365 email backup software.
In-Office 365, you can use E-discovery to backup Office 365 emails into a local drive, but I’ll only suggest this method if you’ve got a good technical hand or at least one or two tech geeks in your team. Let’s process through the e-Discovery method.
Office 365 emails backup with Microsoft eDiscovery
eDiscovery allows you to search for content across Office 365 mailboxes, and you can even export this content to a hard drive in PST file format. But it is recommended use the eDiscovery only if you have a technical team or at least one tech geek in your team. So let’s start with the system requirements:
System Requirements for eDiscovery
- Make sure you’re using Windows 7 or later versions.
- Microsoft .NET Framework 4.5.
- Microsoft Edge or Internet Explorer 10 and later versions.
- Install Click Once add-in if doing the process in Mozilla Firefox or Google Chrome.
eDiscovery process for Microsoft 365 backup
- Step1: Login to your Microsoft 365 account and visit the Microsoft 365 admin center.
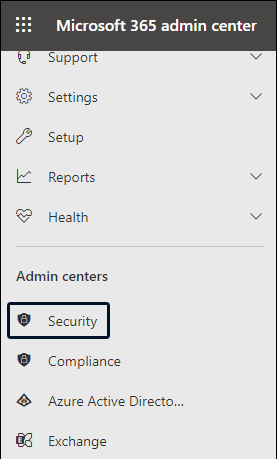
- Step2: Expand the Admin center menu and click on the Compliance & Security option.
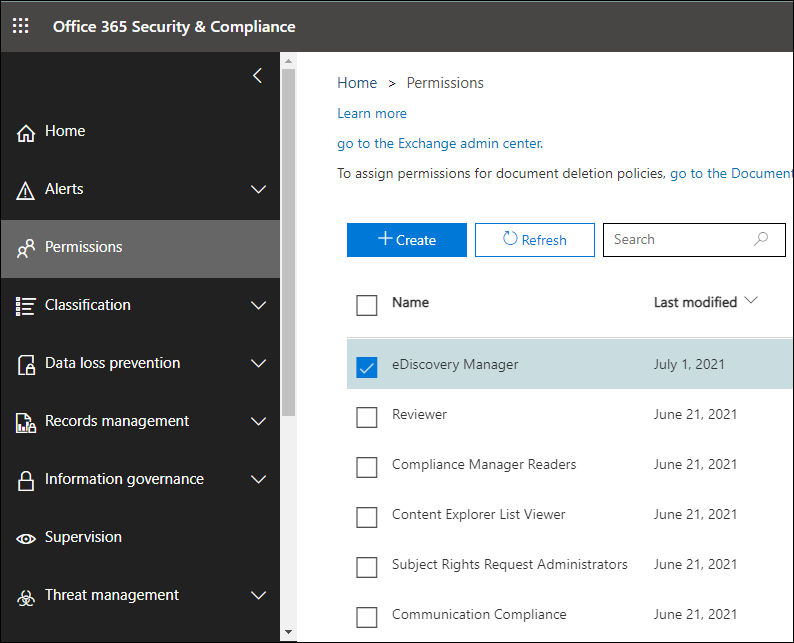
- Step3: Now click the Permissions and hit eDiscovery Manager.
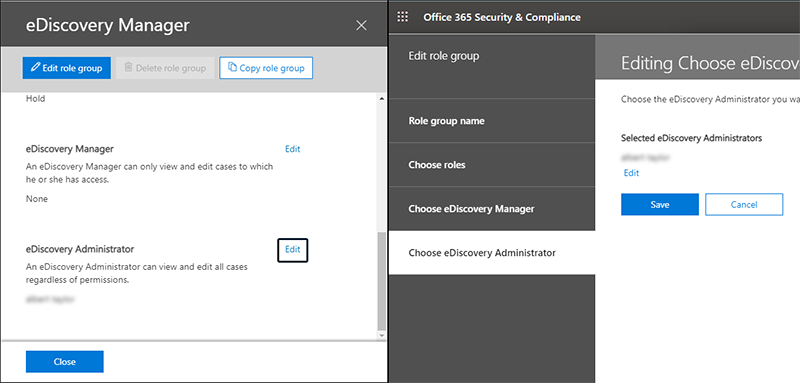
- Step4: Click the Edit option adjacent to the eDiscovery Administrator option and select an eDiscovery administrator.
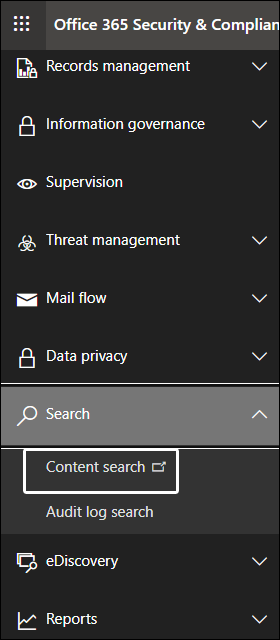
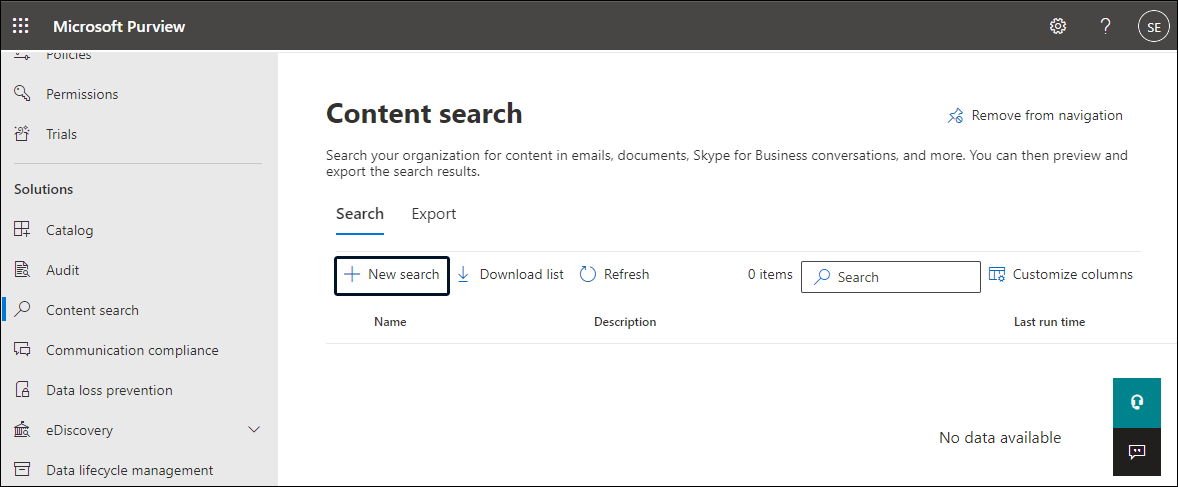
- Step5: Now click on the Search option, and click the Content Search.
- Step 6: In the content search window, click the +New Search option.
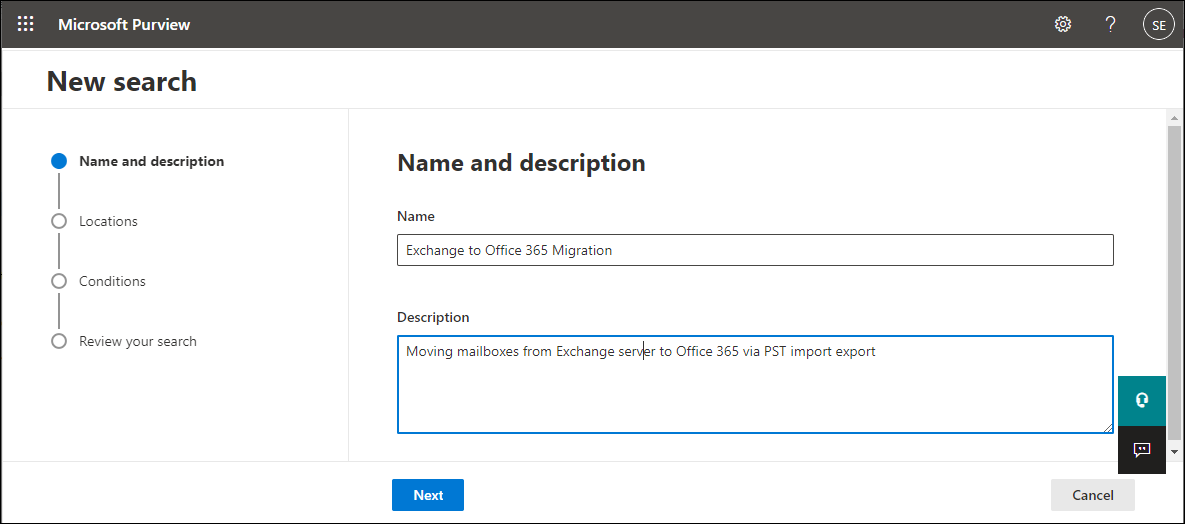
- Step7: Following, provide a Name and Description for the Search and click Next.
- Step8: Choose the mailboxes for Microsoft 365 backup and proceed further by clicking the Next.
- Step9: Apply conditions to backup emails on specific criteria, and at last, review your Search and click Submit.
- Step10: Now again, go to the Search window and pick the recently created Search.
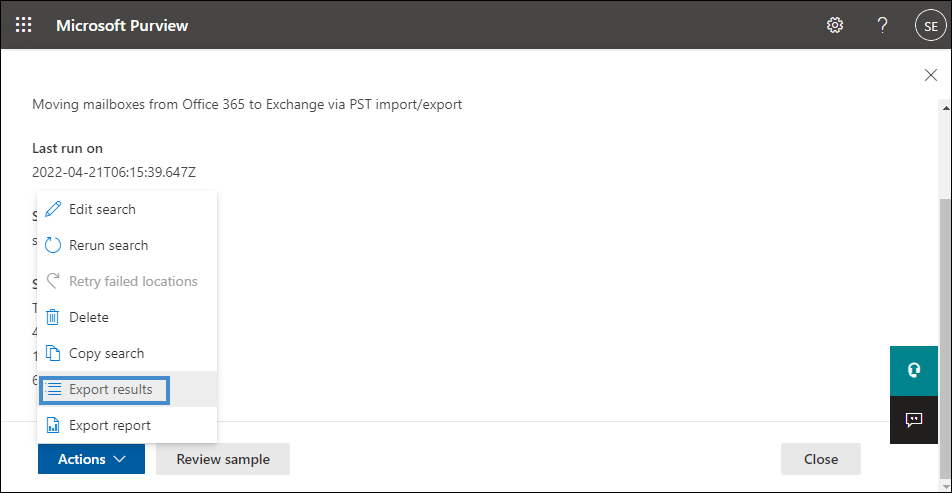
- Step11: Now, from the Action’s dropdown menu, click the Export Results option and check the appropriate options.
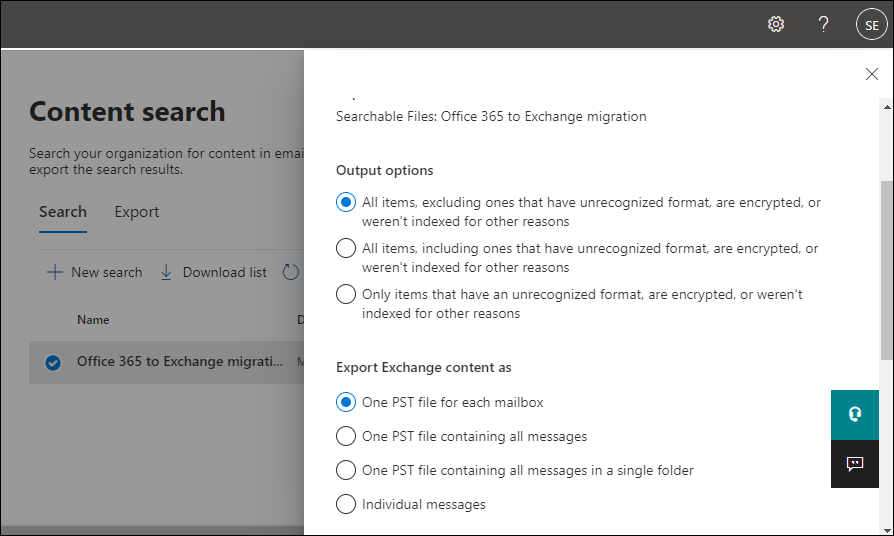
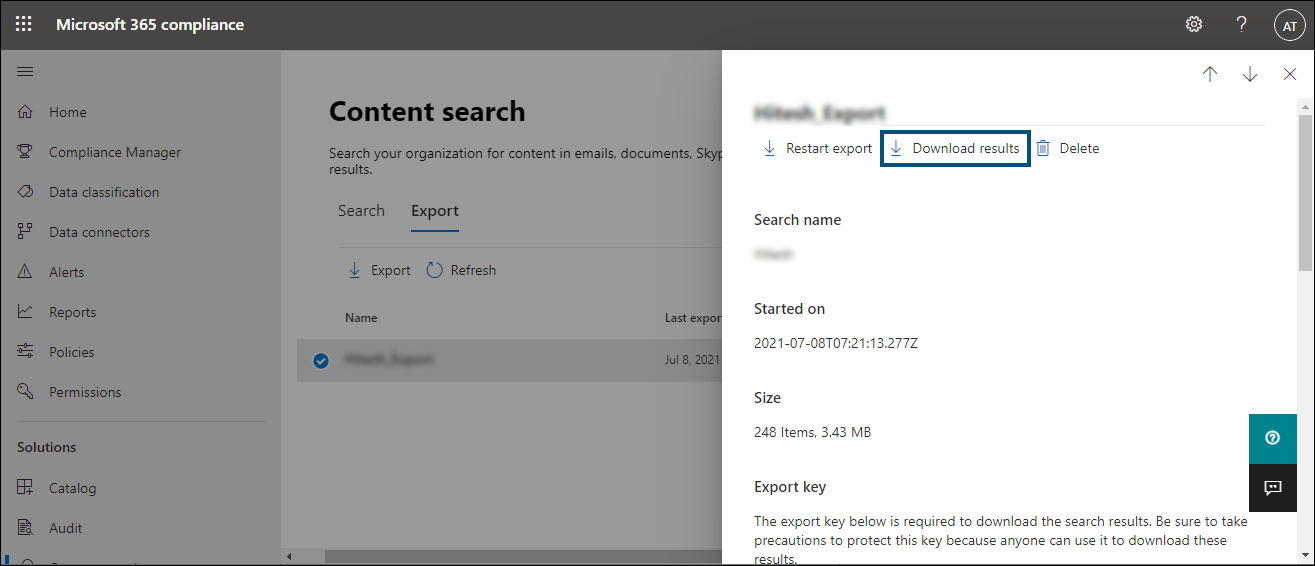
- Step12: From the export tab, click the last export and copy the export key. Then, click download results. (Download Results option may take a few minutes to enable).
- Step13: The above step will install the eDiscovery Export tool in your system. Go to the search bar and open the tool.
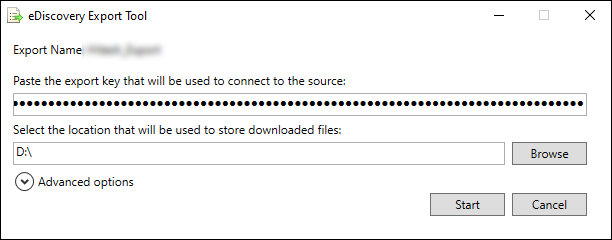
- Step14: Browse a location to save the Office 365 mailboxes into PST format and paste the export key. Now the tool will start the process for Office 365 email backup.
Why isn’t eDiscovery a preferred choice for Microsoft 365 backup?
eDiscovery works, but there are several complications in the tool, such as you cannot pick public folders and archive mailboxes. Also, it is a long and technical process. A single misstep can make you lose all of your Microsoft 365’s mailboxes. Its other loopholes are as follows:
Sometimes the Export button gets missing, or your export may not finish, and if this is the case, then there are two possible reasons for this.
-
- You didn’t have an assigned mailbox import/export request, or the changes don’t make at the moment. You can use the following Powershell cmd. to assign the roles in the quickest way.
New-ManagementRoleAssignment –Role "Mailbox Import Export" –User "user name"
- You’re using an outdated browser or didn’t have installed the ClickOnce add-in.
It doesn’t prevent duplicity: Yeah, this is the worst problem with the eDiscovery export tool. There are several instances when users find uncountable duplicate items. Also, the deduplication mechanism has a loophole as sometimes it counts unique items as a duplicate items.
Moreover, the Search is quite hectic, and there are high chances of the PST file getting corrupted.
These are the loopholes and drawbacks of manual solutions. I suggest using an automated tool such as Shoviv Office 365 Backup and Restore tool for an enhanced experience.
Reliable Alternative for Microsoft 365 Email Backup
You can protect your company’s Microsoft 365 emails using Shoviv Office 365 Backup Tool. It is an automated tool specially developed to backup Microsoft 365 (formerly known as Office 365) mailboxes.
One of the best things about the software is that users can control their Microsoft 365 mailbox backup process. And if needed, you can also use this software to restore them.
The software is a simple desktop-based application and is very easy to use. Even non-technocrats can use this software without any technical assistance. There are many looked for features in the tool that make this tool a Microsoft MVPs and administrators’ preferred choice to backup Office 365 emails. Let’s have a look at some of its features.
Why Shoviv is a professional’s preferred software for Microsoft 365 backup?
There are few other software in the market that can backup Microsoft 365 emails, but Shoviv Office 365 Backup Tool provides features that are rarely available in other Office 365 email backup tools.
Like you can create multiple backup jobs and run them simultaneously. Also, with the scheduler option, you can completely make the backup process automated and run it for a specific period. Once users schedule the backup process, the software will backup Microsoft 365 emails in the background. Apart from this, we all want a tool that can backup data on-increment basis. In layman’s terms, if you back up a mailbox, you’ll definitely back up it after a period, and at that time, you want to skip the already backup data, and that’s what Shoviv Office 365 backup and restore tool allows; it takes backup on-increment basis.
The tool comes with a free trial version to know its other features and examine it in your backup environment. Below is the step-by-step process for Office 365 email backup; you must install the free version first.
Backup Microsoft 365 with The Following Easy Steps
- Open the free Microsoft 365 backup software.
- Choose Connect Office 365 from the ribbon.
- Enter the Office 365 admin credentials and click Next.
- Choose mailboxes to backup and create a backup directory.
- Enter a backup job name and set the desired filter.
- Add the additional settings and schedule the backup.
- Verify all your settings and click Finish.
Detailed Microsoft Office 365 emails Backup Process
- Firstly, install and open the software.
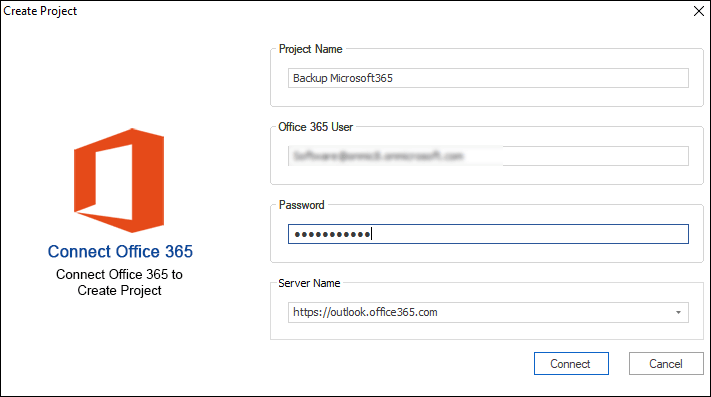
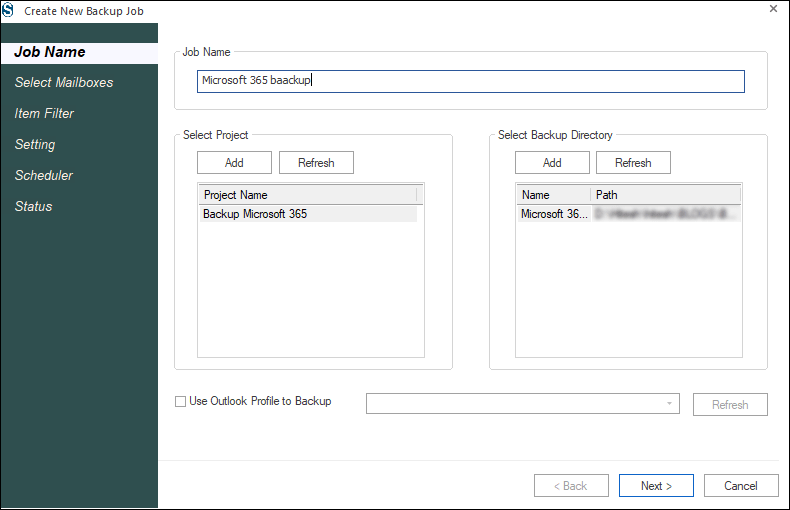
- Then, click on the Connect Office 365 option and create a backup project.

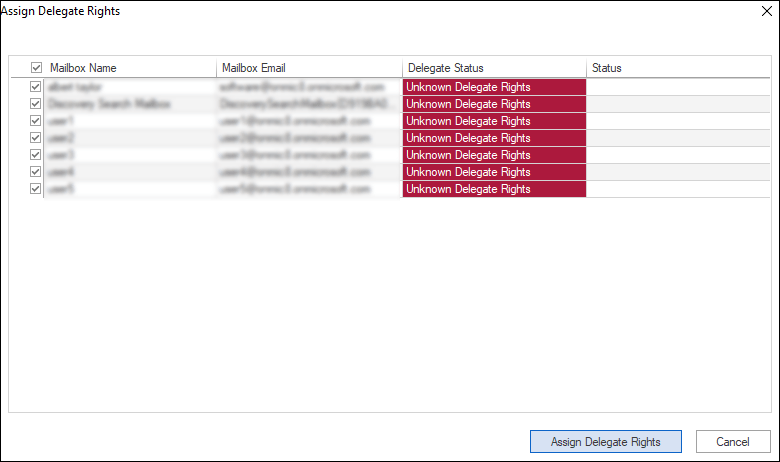
- Now assign delegate rights to the mailboxes and go to the Backup Directory window.

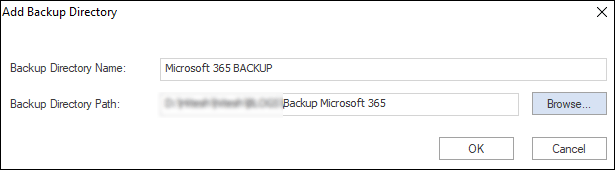
- Here, provide a name and choose the directory to store Microsoft 365 backup files.

- Then, go to the Backup job tab and provide the name for the backup job. After that, click on the Next button.

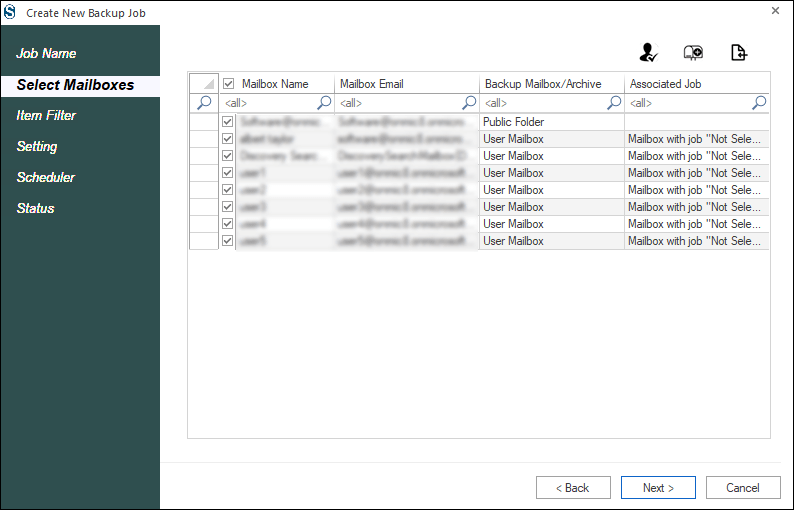
- In the following dialog, select the mailboxes you want to backup in the PST file and click the Next button. (You can also provide delegate rights from this window).

- Now, the filter wizard pops up. Users can filter data on the Include/exclude Message class, Date range, and Folder filter basis. Once done, click the Next button.

- The following wizard will be the Settings wizard. Here select the backup thread count and other settings as per need. Users can also split the resultant PST file (which will store the Microsoft 365 backup).

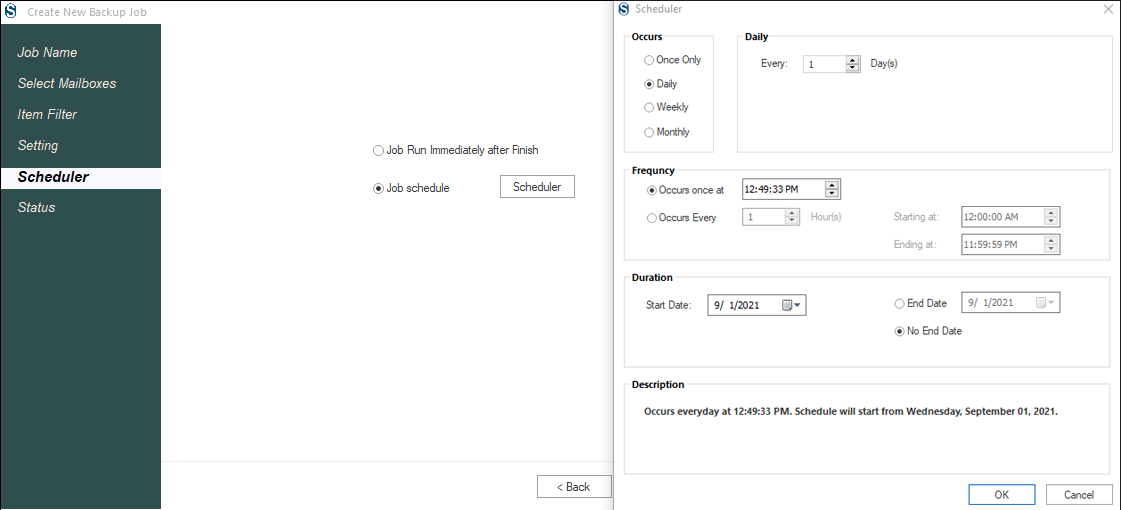
- Now, you will see the scheduler window. From this window, you can run the backup job immediately or schedule the Office 365 email backup job.

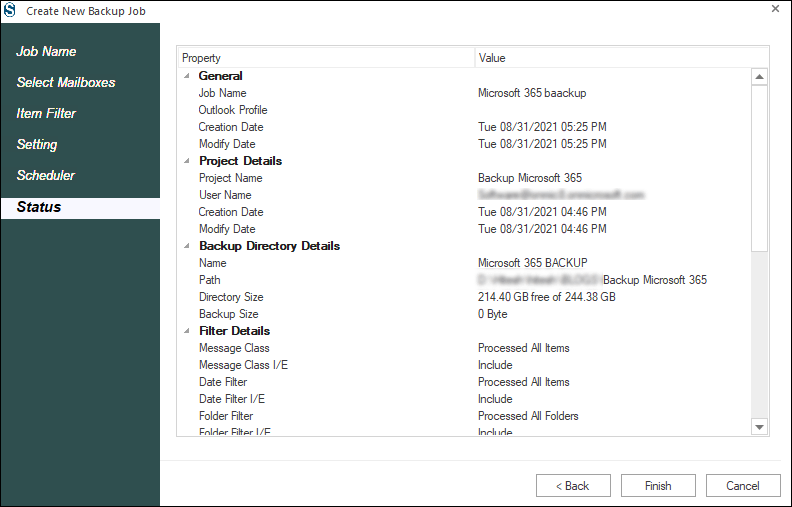
- At last, you can preview all the property and value set for backup Microsoft 365 mailboxes. If satisfied, click on the Finish, or click Back to change the settings.

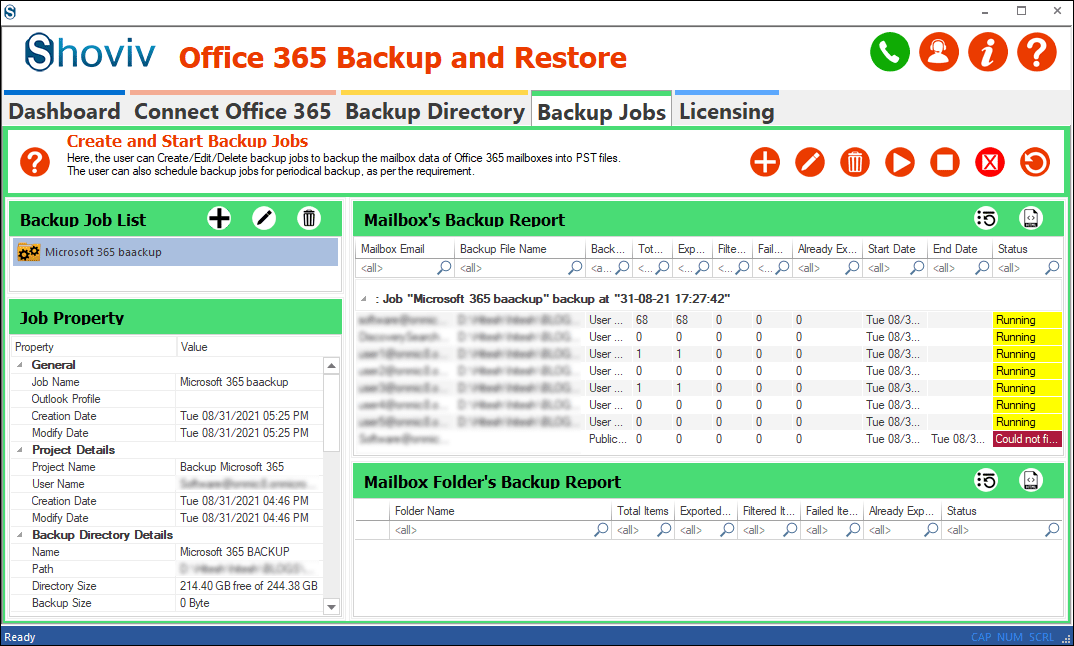
- Once you click the Finish button, the software starts creating selected Microsoft 365 Mailboxes’ backup. Users can monitor the complete process on their screens and stop and resume it anytime.


Bringing it all together
Nowadays, Microsoft 365’s advanced features are attracting users towards it and are dominating the email niche. Many Microsoft 365 users make a blunder as they think they don’t need to create Microsoft 365 backup as they can access it from anywhere. But backup comes in handy to retrieve data in case of data loss.


[WPSM_AC id=7452]