If you are an Outlook user or somehow you have data in PST file format and want to migrate PST to Office 365 then you have landed on the right post. Office 365 is a cloud-based software as a service that offers a one-stop solution. It will help you access all your emails from anywhere and anytime, no matter what device you’re using. Whatever the reason to import PST to Office 365, here is the solution for all.
In this article, we’ll discuss Office 365, the benefits of Office 365, and why one should switch to this cloud-based service. Also, I’ll help you learn how to import PST to Office 365 manually as well as using a professional solution.
Overview of PST to Microsoft 365 Migration
Migrating local Outlook Data Files (.pst) to Exchange Online ensures that your legacy emails, contacts, and calendars are centralized, searchable, and accessible from any device.
| Feature | Manual (Network Upload) | Professional Software |
| Complexity | High (PowerShell & CSV Mapping) | Low (GUI-based) |
| Speed | Slow (Dependent on AzCopy) | High (Direct API Migration) |
| Data Integrity | Risks of human error in mapping | 100% Accuracy & Previews |
| Prerequisites | Admin Rights & Technical Skills | User or Admin Credentials |
Why do Users import PST to Office 365?
Organizations desire a solution that allows them to work on various tasks. Microsoft’s Office 365 is a standalone platform that offers various services to ease users’ work. Below we are sharing some common things that insist users import PST files to Office 365 mailboxes.
Widely Accessible: Being a cloud-based service, Office 365 allows users to access the data from anywhere on any device at any time. Also, the data is being regularly backed up by using advanced security measures.
Easy Setup and Management: It is straightforward to set up users with Office 365 and manage. You can start installing the tools right after you complete the setup process. You can do it by yourself or get help from your IT partner.
Excellent Collaboration: While using Office 365, you can easily edit files, manage projects remotely, communicate with your staff from anywhere, etc.
Simplified Process: It is very easy to import PST to Office 365; no matter which storage you’re using. Since Office 365 supports regular updates, you don’t need to migrate your data again.
Data Loss Prevention: There’s nothing more valuable than data. So, losing any crucial information can be disastrous sometimes. The data protection and backup services offered by Office 365 help you avoid such loss. Being a world leader in cloud security and privacy, Microsoft assures you that your data is always safe in Office 365.
Always Up-to-date: If you switch to Office 365, you don’t need to wait a couple of years for the next product release of Microsoft. Instead, you’ll get instant updates and bug fixes as soon as they’re ready.
These are the up-to-date features of Office 365 that insist users import PST to Exchange Online mailboxes. Besides, users could have more things that may motivate them to move to MS Office 365.
Quickly Import your mailbox from Outlook PST file to Office 365 Account. Start with Shoviv PST to Office 365 Migration tool and Migrate your Emails, Contacts and calendars directly to Exchange Online Mailbox.
How to Upload PST to Office 365 (Exchange Online) Mailboxes?
If your organization has switched to Office 365, you need to migrate your business data to this cloud-based service. Let’s talk about the crucial emails and other mailbox data stored in the classic Outlook application. How would you migrate emails to an Office 365 account? Sometimes this might be a challenge if you don’t have sound knowledge. But don’t worry. I’ll help you with this. There are three ways by which you can import PST to an Office 365 account: either you can try a DIY manual trick, or you can use a professional solution.
First, let’s start with the DIY trick that requires no 3rd party tool to move PSTs into Office 365. You must be familiar with the Import & Export feature of Microsoft Outlook. You’re going to use this feature here.
Method 1: Import PST to Office 365 Using Azure AzCopy Tool (Without Outlook Application):-
Below, I am outlining the steps to upload PST to Office 365. Users have to perform all steps in a very precise manner so there is no possibility of error.
- Firstly, log in to Microsoft Admin Centre (Microsoft Purview) and go to Data Lifecycle Management.

- Now, click on the Microsoft 365 and then Import.
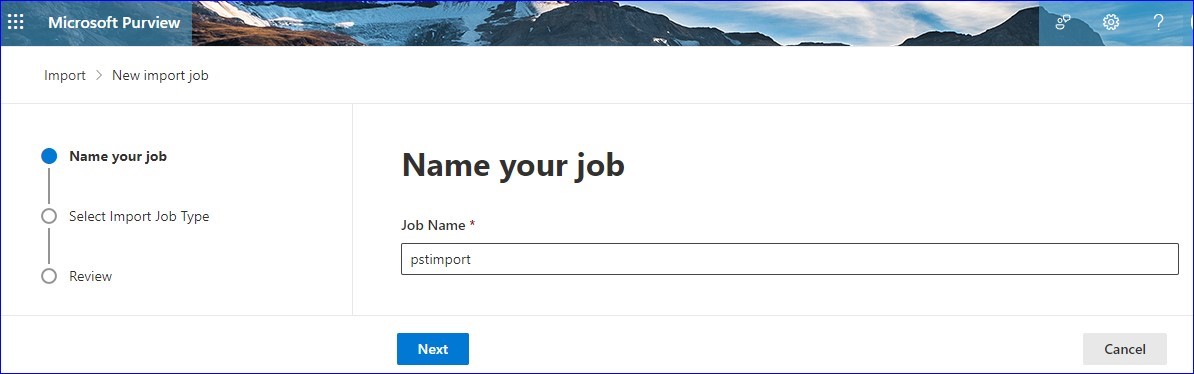
- Create an import job, and in this manner, first give it a name. Click on the Next.
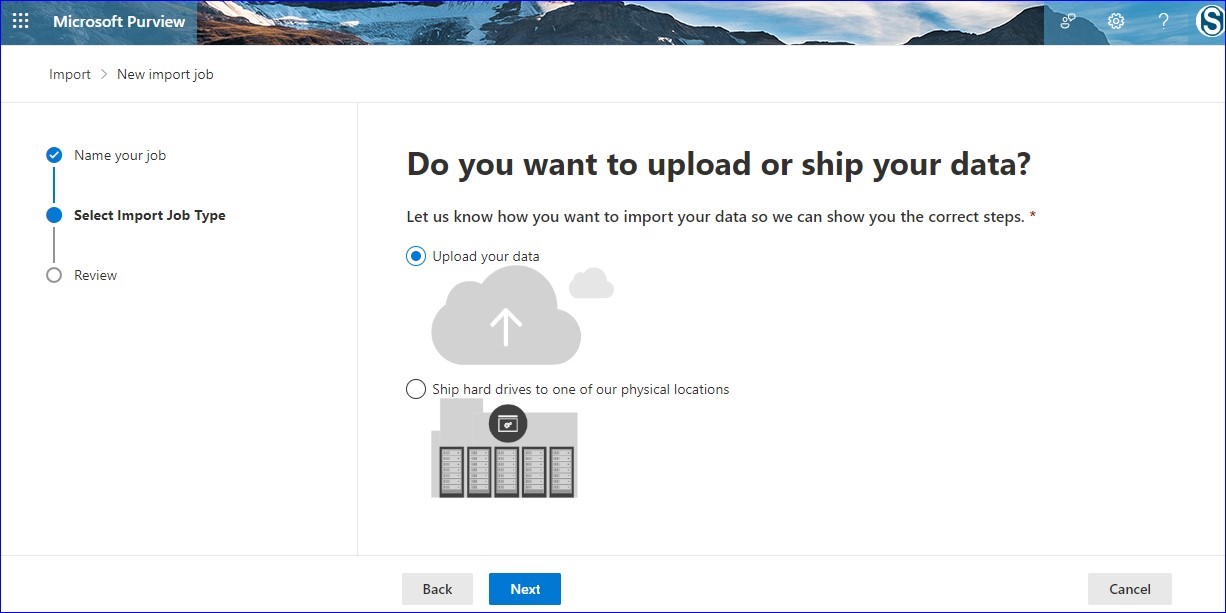
- Here, must select the import type. Here, you have two options: Upload your data and ship the hard drive to any physical center of Microsoft.
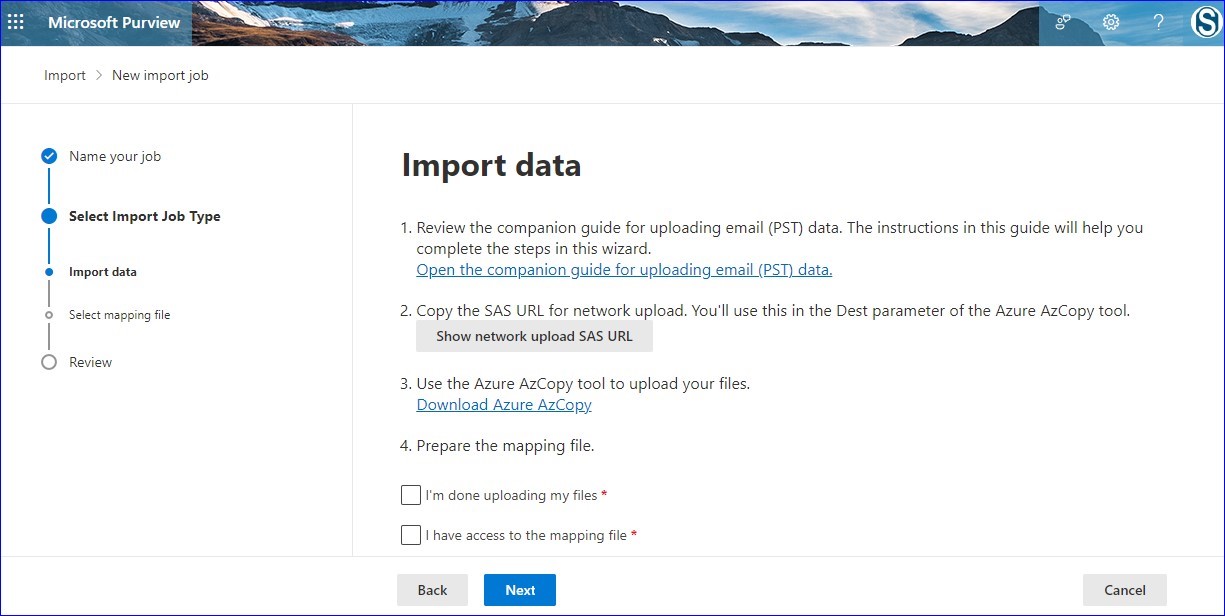
- You are now prompted to the “Import Data”page, where you have to perform several tasks instructed here. It also includes using the Azure AzCopy Tool. Finally, click on the Next.
Method 2: Import a PST file in Microsoft 365 Using Outlook Application
First, we will use the Outlook Import/Export option to export a PST file. Follow the below steps to migrate the PST file to Office 365 using the Outlook email client.
Follow the steps to Import PST to Office 365:
- First, launch Microsoft Outlook on your system with an Office 365 mailbox profile. On the taskbar, click the File tab > Open & Export > Import/Export.
- On the Import and Export dialog, select Import from another program or file option. Then, click Next to continue the process.
- On the Import a File dialogue, select Outlook Data File (.pst). Click Next to continue the process.
- On the Import Outlook Data File dialogue box, click the Browse… button to locate the PST file you want to import. Select the PST file, and click Open.
- Then, choose the option Do not import duplicates, and click Next to continue the process. Finally, click Finish.
Important Note: When importing PST files to Office 365 using Outlook Profile, ensure proper administrative privileges as only users with admin access can perform this action securely and efficiently.
Things to Know Before Start Importing PST to Office 365 Manually:
- The user should be well-versed with the Microsoft Azure AZ Copy Tool and other technicalities. For a novice, it is like walking on eggshells.
- If you have multiple PST files, it will consume a lot of time as you have to import them individually.
- There are no advanced options to customize the process as per the need for the desired results. If the process interrupts then you have to restart the process.
- Chances of human error are also there.
Method 3: Using Shoviv PST to Office 365 Migration Software
Shoviv is a renowned name in the field of Software development and for the Office 365 Import PST process, Shoviv has developed an advanced tool. The Shoviv PST to Office 365 Migration is embedded with many looking for features. This tool comes in very handy when Import PST to Office 365 and Live Exchange as well as to repair multiple PST files and add and recover Multiple OST/PST files (corrupted and non-corrupted) along with features. Some of the highlighted features are:
- Shoviv PST to Office 365 migration tool exports multiple OST/PST files in Office 365 mailboxes.
- Moreover, it can export PST files into the Live Exchange and Office 365 mailboxes by mapping PST files to the Live Exchange and Office 365 mailbox.
- The tool is easy to use for all users, so they can import PST files to Office 365 in a simple manner.
- The software also has an Incremental Export facility that enables users to resume the interrupted process.
- Shoviv PST to Office 365 saves OST/PST file items in EML, MSG, and HTML file formats.
- It also removes duplicity from the PST file and excludes and filters already migrated items during the migration.
So, the above-given details are evident as to why to choose Shoviv software to upload PST to Office 365.
Quick Steps to Import PST File to Office 365 Mailbox
- Step1: Install, Open, and Add PST files.
- Step2: Choose the Office 365 option on the ribbon bar.
- Step3: Now connect to Office 365.
- Step4: Use the filter and advanced options as needed.
- Step5: The software will start to migrate PST to Office 365.
Detail Guide to Safely Import PST to Office 365 Using Shoviv
- Download and open the Shoviv PST to Office 365 migration tool.
- Click on the Add PST/OST Files option, available on the ribbon bar.
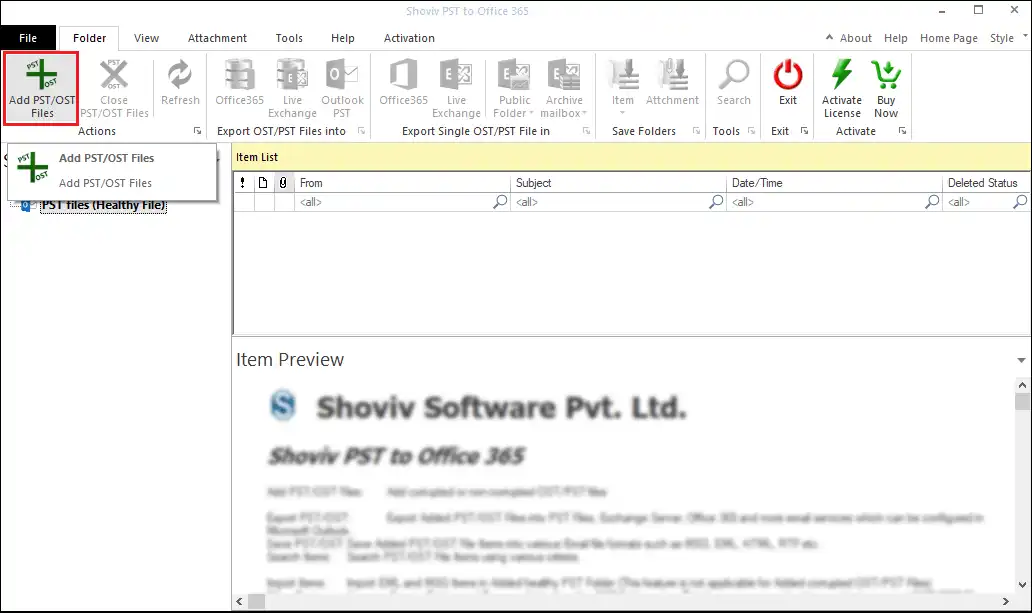
- A dialogue box will appear, here choose the PST file type (corrupted/healthy PST file, an option given at the top of the dialogue box).
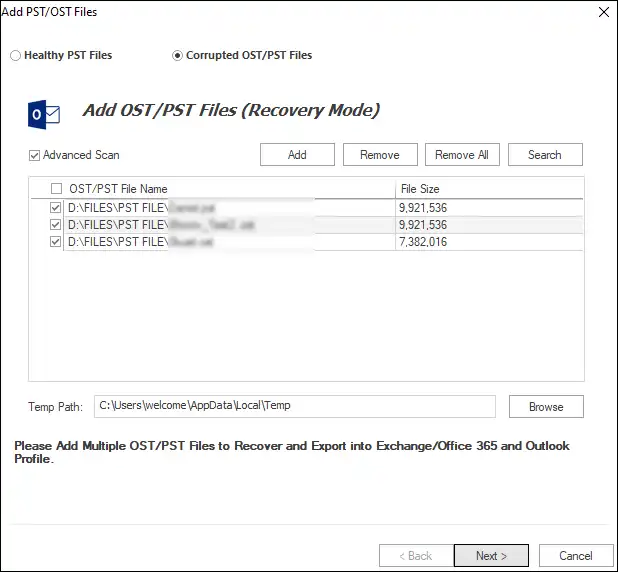
- Click on the Add button and Add/Search PST files. (For an advance scan, you can mark the Advance Scan option).
- Check the required PST files, click on Next, and the list of selected files will be visible on the left side under the source list.

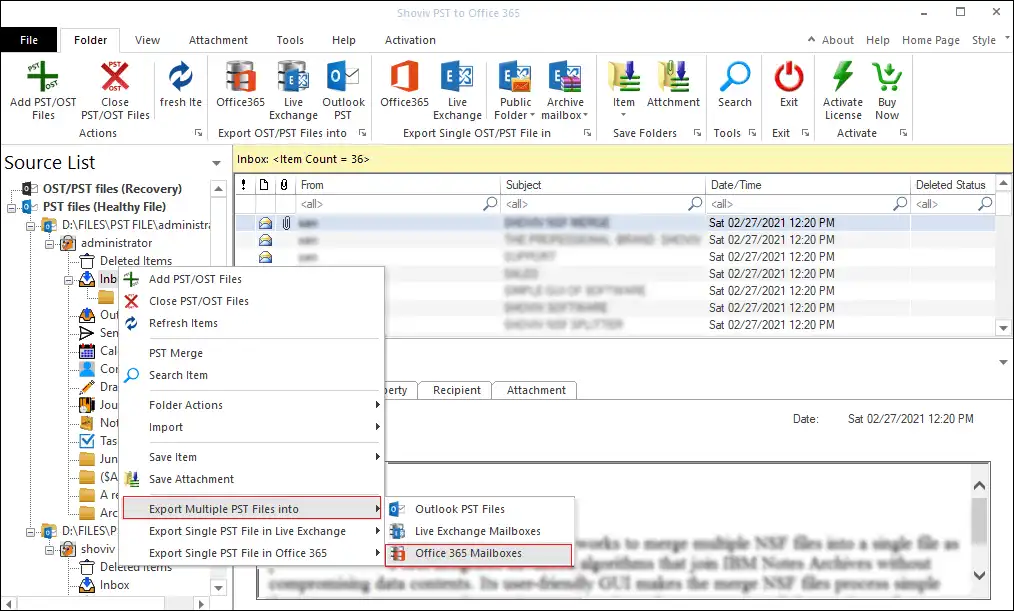
- Now click on the Office 365 option from the ribbon bar or by right-clicking select the Export OST/PST files into >> Office 365 Mailboxes.
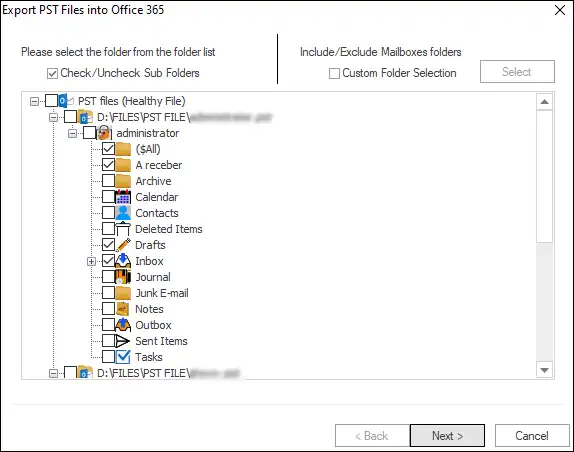
- Then, Check/Uncheck subfolders and hit the Next button.
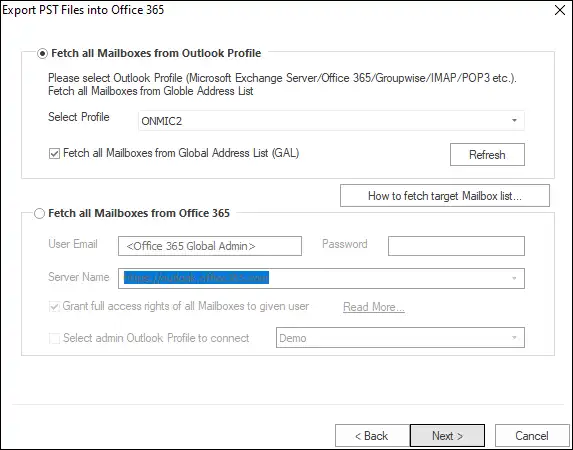
- Now, use fetch all Mailboxes from Outlook Profile option to connect with Office 365.
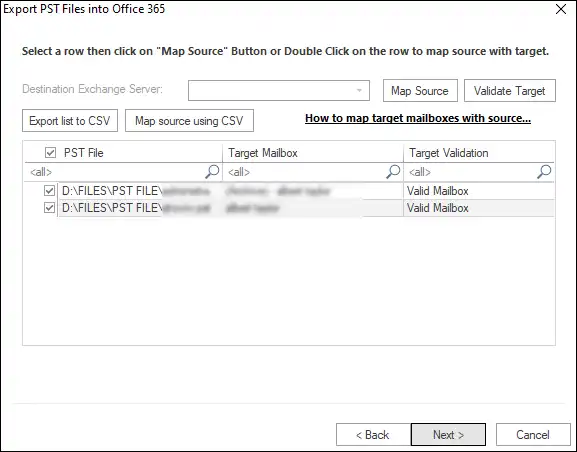
- Now map the PST with Office 365 mailboxes and click Next. (Multiple sources and target mapping, users can create and map using CSV file).
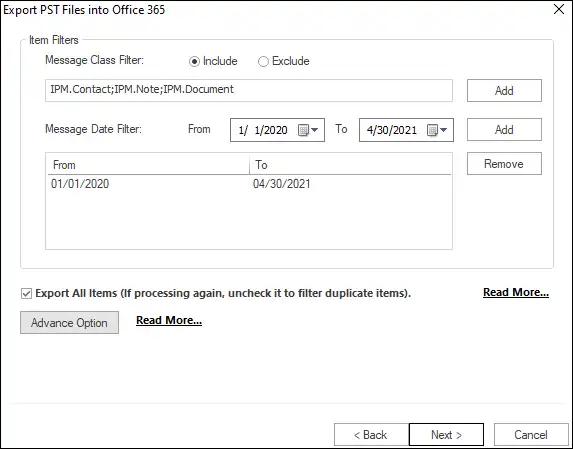
- Next will be the filter wizard. Use the filter option on the Message class and message date criteria.
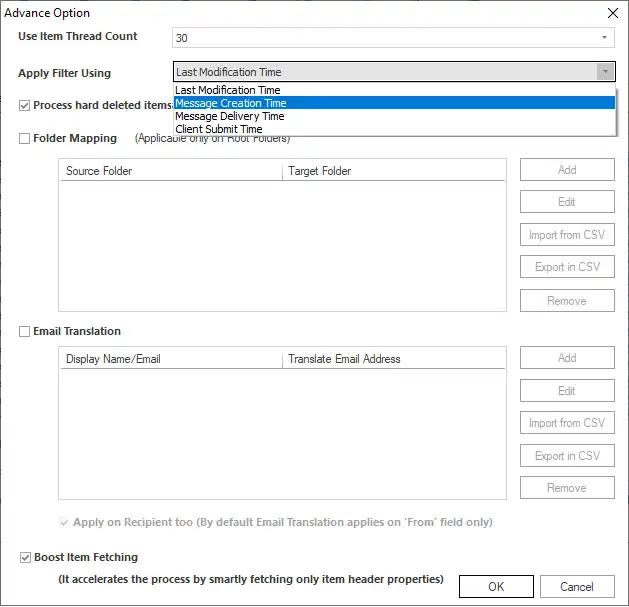
- Click the Advanced Options button for email translation and folder mapping features. Also, you can boost item fetching speed by smartly fetching only item header properties.
- Now click OK, and then hit Next. Now the software will start to migrate PST to Office 365 mailboxes as per your settings. During the migration, the software will display a live report. (Wait until the migration process is running. After the migration process is completed, you can save the migration report).

- At last, click on Finish.
By these simple steps, users can easily and perfectly upload PST to Office 365.
“Step by Step video Tutorial to Import Outlook data file .pst into Microsoft 365 Mailbox”
Also Read: How to Import PST file to office 365 Shared mailbox?
Final Words:
Above, we discussed Office 365 and the benefits of cloud-based service. Also, we’ve talked about the aids of Office 365 and the complex manual way to import PST to Office 365. We have also discussed professional software for speedy migration. In the end, we can conclude that the Shoviv PST to Office 365 migration tool is the best way to process PST file migration tasks as it consists of a lot of features. Download its free demo version and explore its features.
Frequently Asked Questions:
A: Organizations desire a solution that allows them to work on various tasks. Microsoft’s Office 365 is a standalone platform that offers various services to ease users’ work. The PST files hold the crucial data of an Outlook user or organization, so to keep this data safe, they must go for this importing process.
A: Follow the below steps:
1: Install and Open Shoviv PST to Office 365 Migration Tool.
2: Add the PST file and choose Office 365.
3: Check or uncheck subfolders and connect to Office365.
4: Use advanced features like filter options.
5: The process will start to import PST to Office 365.
A: Yes, the PST to Office 365 import tool allows you to export PST files from the Outlook 2016 version to Office 365. Even you can process the PST file from any version of MS Outlook.
A: With Shoviv’s tool users can repair PST file and upload them to Office 365. The tool proficiently recovers the corrupt PST files and shows a preview before uploading.
A: Yes, you can import PST files into Outlook online using the Shoviv software.