Microsoft officially ended the support for the Exchange Server 2010 on 13th October 2020. After this, a trend to migrate Exchange 2010 to 2019 is visible. If you are still using Exchange 2010 and want to migrate to 2019 (the latest version), then you have landed on the right post; read till the end and complete your migration task professionally. After the end of support, there are no security updates, technical support, and bug fixes from Microsoft.
Download a trial version of Migrate Exchange 2010 to 2019 to know in a better way.
Why Migrate Exchange 2010 to 2019?
Exchange 2010’s life has ended, and no one will ever wish to work with outdated technology. There are some other specific reasons too:
- Exchange Server 2019 is the latest and safest, and most advanced version.
- If the user faces any problem or bug running Exchange 2010, Microsoft will not provide you with technical support after 13th October 2020.
- Exchange 2019 supports email address internationalization. I.e., Non-English characters in email.
- Calendar management is better and more advanced than the last version.
- In Exchange 2019, the meeting request forwarding feature and control of the Out- the Office setting are advanced. And it is more user-centric than the past versions.
How to Migrate Exchange 2010 to 2019?
Migration from Exchange 2010 to Exchange 2019, unfortunately, can’t be possible to do directly in a manual way. Microsoft doesn’t provide any method to directly migrate Exchange 2010 to 2019. To migrate from Exchange 2010 to Exchange 2019, first, users need to migrate to Exchange 2013 or Exchange 2016 from Exchange 2010.
Exchange Server 2010 and 2019 use different Active Directory Forests; therefore, they can’t have such a big leap of migration bypassing middle versions. Exchange 2010 and 2019 can co-exist only with Exchange 2013 and 2016. Also, for any non-technocrat, it is Everest winning task to successfully execute the task. So, for effortless, errorless and efficient processing, using a professional third-party tool is the only option.
Professional Third-Party Tool: Shoviv Software
To proficiently migrate Exchange 2010 to 2019, users must use a professional third-party tool. Shoviv Exchange Migration Tool is an advanced tool to directly migrate Exchange 2010 to 2019. The tool provides many user-oriented features to smoothly execute the migration task. The software is built with an advanced algorithm and comes with a user-friendly GUI.
- This software offers adding multiple sources for the migration process; EDB File, Exchange Server Mailboxes, Office 365 Mailboxes, Outlook Profile Stores, et cetera.
- The software is proficient in recovering corrupted and inaccessible EDB files and migrating them.
- Similarly, it smoothly migrates multiple numbers of mailboxes without any restriction on the size limit.
- The software allows adding all the versions of Microsoft Exchange Server as a source and migrating to other Exchange Servers.
- Shoviv tool also migrates source mailboxes to Live Exchange (On-premises), Office 365, Outlook Profile, etc.
- It has a search option, filter option, and incremental export.
- Moreover, mapping of the source mailbox with the target is also available.
- It also saves source mailboxes in various file formats like HTML, EML, MSG, RTF, vCard, and vCal.
Simple steps that you have to follow:
- Step 1: Add Exchange Server as the Source.
- Step 2: Now select the Live Exchange Server from the ribbon bar.
- Step 3: Fetch target mailboxes by entering the asked details.
- Step 4: Map and validate the source and target mailboxes.
- Step 5: Apply filter if needed and click Next.
- Step 6: Exchange 2010 to 2019 migration will start.
Step-by-Step Process to Migrate Exchange 2010 to 2019:
- Firstly, install and launch the Shoviv migration tool.
- Now using the Add Source button, select the Exchange Server Mailboxes option and then enter the asked credentials. Click on the Next.

- Here, you can see the mailbox items in the source list. Here, select the Live Exchange option from the ribbon bar.

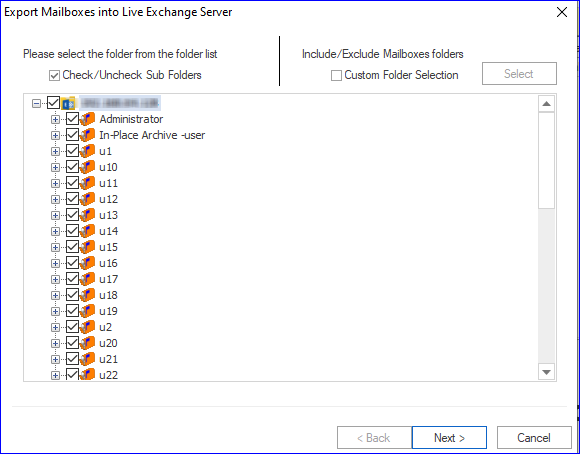
- Check/uncheck subfolders as per the migration requirement and click on Next.
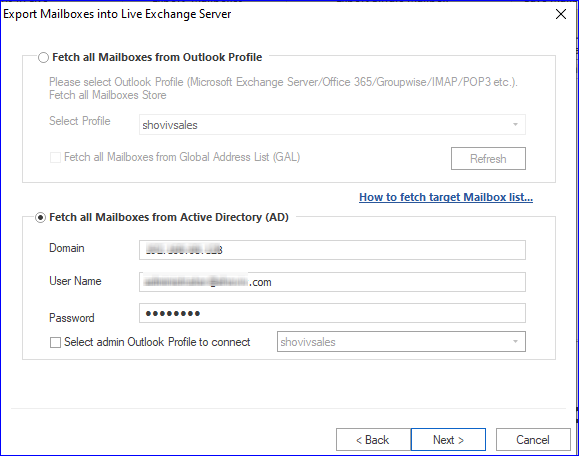
- Now, you have to provide the credentials to fetch target mailboxes hence use the “Fetch all mailboxes from Active Directory” option. Provide the asked details and click Next.
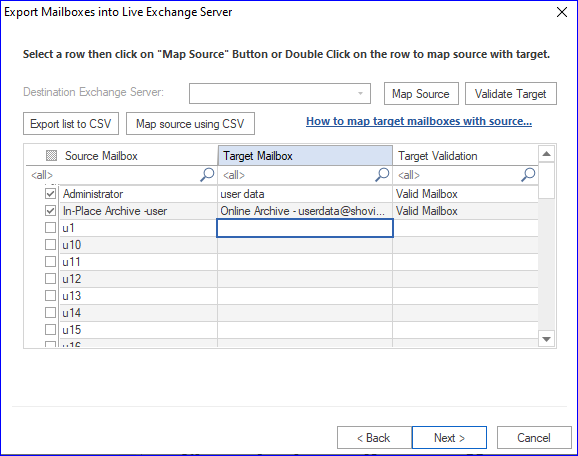
- Here, you move to the mapping page. Map the source mailbox with the target mailbox and validate. After successful validation, click Next.
- You will be prompted to the filter page. Here, you have two filter options; Message Class Filter and Message Date Filter. Apply filter if required. If you are processing for the first time, keep “Export All Items” checked.
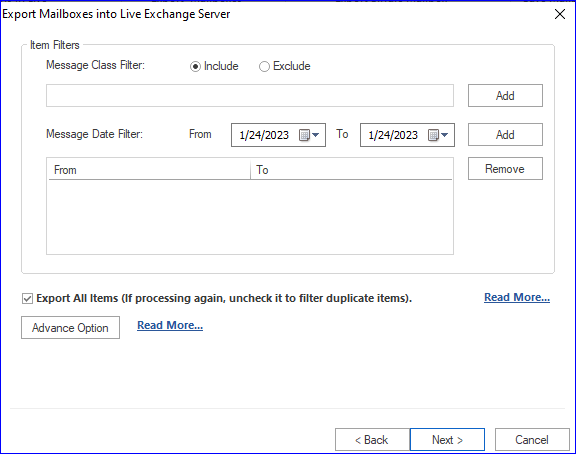
- If you are doing it for the second time and want to migrate only items that were not exported earlier, then uncheck this. Finally, click on Next.
- Now, the migration process has started. When the process completes, the software displays a completion message; click Ok.
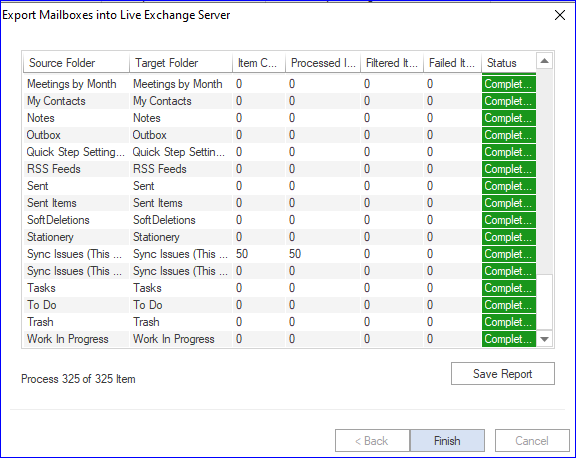
- You can see the live log report; click on Finish when the process completes. You can also save the report for future reference. And this is how you can migrate Exchange 2010 to 2019.
Wrapping up:
To be advanced, one should have advanced technologies; thus, migration toward the latest is necessary. Exchange Server 2010 is old technology whose support life has ended. Moreover, Exchange 2019 is the advanced and latest technology and has many new features. Many organizations/users have been looking for a way to migrate Exchange 2010 to 2019. Shoviv Exchange Migration Tool comes as an advanced tool and delivers hassle-free processing. A free demo/trial version of migration software is also available to download, which allows the migration of the first 50 items per folder.