Summary: If you are planning to migrate Namecheap email to Microsoft 365, this guide will help you complete the process using both manual and professional methods. Learn step-by-step solutions and choose the most reliable approach for a smooth migration.
Namecheap is a well-known platform that provides domain registration, web hosting, and email hosting services. Many individuals and small businesses start with Namecheap email due to its affordability and simple setup. It allows users to create domain-based email accounts and manage communication effectively.
On the other hand, Microsoft 365 (formerly Office 365) is a cloud-based productivity suite that offers advanced email services through Outlook, along with tools like Teams, OneDrive, and SharePoint. It is designed for businesses that require secure, scalable, and collaborative working environments.
When organizations decide to upgrade their email infrastructure, they often look for ways to migrate Namecheap email to Office 365 to ensure better performance and centralized management.
Reasons to Migrate Namecheap Email to Microsoft 365
There are several practical reasons why users prefer Namecheap email to Office 365 migration:
- Limited Storage Capacity – Namecheap provides restricted mailbox storage compared to Microsoft 365, which offers large mailbox sizes and OneDrive storage.
- Lack of Collaboration Tools – Namecheap email does not include integrated tools like Teams or SharePoint for teamwork and file sharing.
- Basic Security Features – While Namecheap offers standard protection, Microsoft 365 includes advanced threat protection, encryption, and compliance features.
- No Centralised Management – Managing users and permissions is more efficient in Microsoft 365 through its admin center.
- Scalability Issues – As businesses grow, adding users and managing resources becomes easier in Microsoft 365.
- Business Expansion Needs – Organizations require a unified platform to handle emails, files, and communication efficiently.
Pre-Migration Checklist
Before starting the Namecheap email to Microsoft 365 migration, it is important to prepare your environment properly:
- Take a complete backup of all Namecheap mailboxes.
- Verify your domain in Microsoft 365.
- Create user mailboxes and assign licenses.
- Collect IMAP server details from Namecheap.
- Ensure proper network connectivity and firewall settings.
- Inform users about the migration process and timeline.
Proper planning helps avoid data loss and ensures a smooth transition.
Manual Methods to Migrate Namecheap Email to Office 365
Method 1: IMAP Migration via Microsoft 365
It is the most commonly used native method to migrate Namecheap email to Office 365. Here are the steps:
- Verify your domain in the Microsoft 365 Admin Center.
- Create user mailboxes and assign licenses.
- Prepare a CSV file with user credentials.
- Go to the Exchange Admin Center and create a migration batch.
- Select IMAP migration and upload the CSV file.
- Start the migration process and monitor progress.
- Update DNS (MX records) in Namecheap.
- Complete migration and stop syncing.
Method 2: Using Outlook (Drag & Drop)
This method is suitable for small-scale migrations. Here are the steps:
- Add a Namecheap email account in Outlook using IMAP
- Add an Office 365 account to the same Outlook profile.
- Wait for both mailboxes to sync.
- Drag and drop emails and folders to the Office 365 mailbox.
Method 3: PST Export and Import Method
This method involves exporting and importing mailbox data. Here are the steps:
- Configure the Namecheap account in Outlook.
- Export emails to a PST file.
- Add an Office 365 account in Outlook.
- Import the PST file into the Office 365 mailbox.
Drawbacks of Manual Methods
- Although manual approaches are free, they come with several limitations:
- Only emails are migrated (no contacts or calendars).
- High chances of data loss or duplication.
- Time-consuming for large mailboxes.
- Requires technical expertise.
- No automation or scheduling options.
- Difficult to handle bulk migrations.
These issues make manual methods less reliable for business environments.
Professional Method to Migrate Namecheap Email to Microsoft 365
When manual methods start becoming time-consuming and increase the chances of errors, switching to a reliable IMAP-based solution becomes necessary. The Shoviv IMAP to Office 365 Migration Tool is designed to simplify the entire migration process from Namecheap to Microsoft 365 without complications.
It allows users to establish a direct connection between source (IMAP) and target (Office 365) accounts, ensuring smooth data transfer. The tool works efficiently even with large mailboxes and maintains complete data accuracy during the migration process.
With features like incremental migration, users can rerun the process without creating duplicate items. Additionally, its filtering options help in migration only the required data, making the process more controlled and efficient.
Steps to Migrate Namecheap Email to Office 365:
Follow these simple steps to perform the migration:
- Install and launch the Shoviv IMAP to Office 365 Migration Tool on your system.
- Click on the Source IMAP tab and add your Namecheap email account by entering the required IMAP credentials.
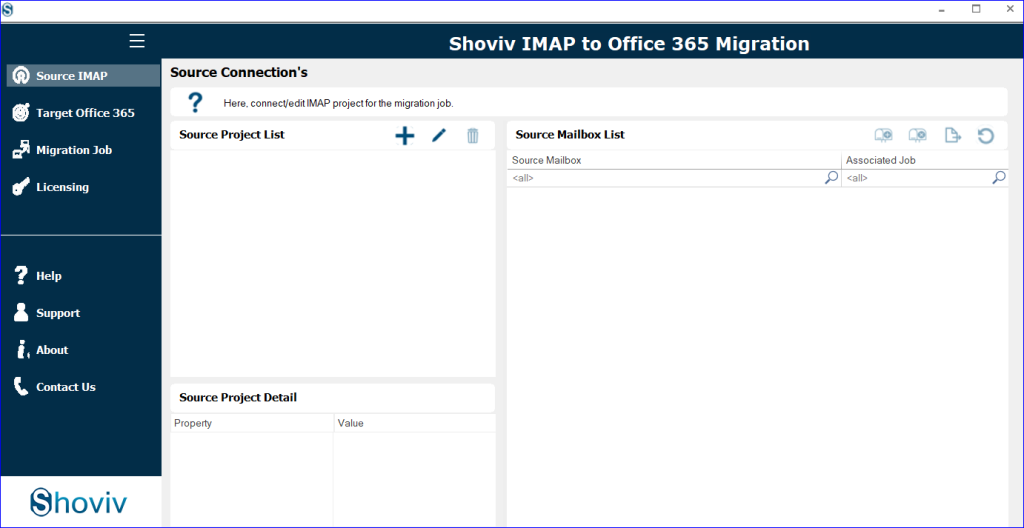
- Now, navigate to the Target Office 365 tab and connect your Microsoft 365 account with proper permissions.

- After establishing both connections, go to the Migration Job section and click on the Add (+) button to create a new job.
- Enter a job name and select the source project (IMAP account) that you have configured.
- Choose the required mailboxes from the source and map them with the corresponding Office 365 mailboxes.
- Select the Migrate In option and define whether you want to migrate data into the Primary Mailbox, Archive Mailbox, or Public Folder.

- Apply filters if needed (such as date range or specific folders) to perform selective migration.
- Configure advanced settings like thread count, retry attempts, and scheduling options based on your requirements.
- Review the job summary and click Finish/Start to begin the migration process.
Key Features of Shoviv IMAP to Office 365 Migration tool
- Migrate multiple mailboxes at once.
- Avoid duplicate data during re-runs.
- Migrate selective emails based on date or folder.
- Keeps original structure intact.
- Suitable for large mailboxes.
- Automate migration tasks.
- Easy for both technical and non-technical users.
- Ensure complete data integrity.
Wrapping up:
In this blog, we explained how to migrate Namecheap email to Office 365 using both manual and professional methods. Migrating Namecheap email to Microsoft 365 can be a crucial step toward improving email management and overall productivity. With the right approach, the transition can be smooth and well-organised.
While manual approaches are available, they come with multiple limitations. For users looking for a reliable and efficient way to handle this process, professional tools offer a practical solution that ensures accuracy and saves time. Try the free demo version of the professional Namecheap Email to Microsoft 365 Migration Tool. 24*7 free technical support facility is also available with this utility.
Frequently Asked Questions
Yes, you can use IMAP migration, Outlook drag-and-drop, or PST import methods. However, these methods require technical knowledge and are time-consuming.
No, manual IMAP methods only migrate emails. Contacts and calendars need to be transferred separately.
The duration depends on mailbox size and the number of users. It can take a few hours to several days.
Yes, manual methods may cause data loss or duplication if not performed carefully. Professional tools reduce this risk.
It provides secure, fast, and bulk migration with advanced features like filtering, scheduling, and incremental export.
Yes, the tool supports bulk migration, allowing you to transfer multiple Namecheap mailboxes to Microsoft 365 efficiently.