It is good to be up-to-date hence migration toward the latest and updated technology is a good thing. Exchange 2019 is not much changed from Exchange 2016, but some of the crucial features, especially the upgraded security feature, are very advanced from the last one. However, it is not everyone’s cup of tea to migrate Exchange 2016 to Exchange 2019 without any professional third-party tool. Manual ways ask for technical hands, and there is a risk of data loss.
This blog moves around the reasons and ways for Exchange 2016 to 2019 migration. Let’s start with the reasons.
Why should you upgrade Exchange 2016 to 2019?
- Being the latest version of the Exchange, it is the safest and most advanced version so far.
- The meeting request forwarding feature and control of Out –out-of-office settings have improved from the last ones.
- It supports email address internationalization. I.e., email addresses can contain special characters specific to a particular language.
- In Exchange 2019, Calendar Management has improved from the last one.
Instant Solution: Get a simple way to Upgrade/Migrate from Exchange Server 2016 to Exchange
Server 2019 Using Shoviv Exchange Migrator software. Start your free trial today.
Manual Way to Migrate Exchange 2016 to 2019:
Going manually asks for the technical hands. If you are a novice, then must have a backup of data as it is technically complex.
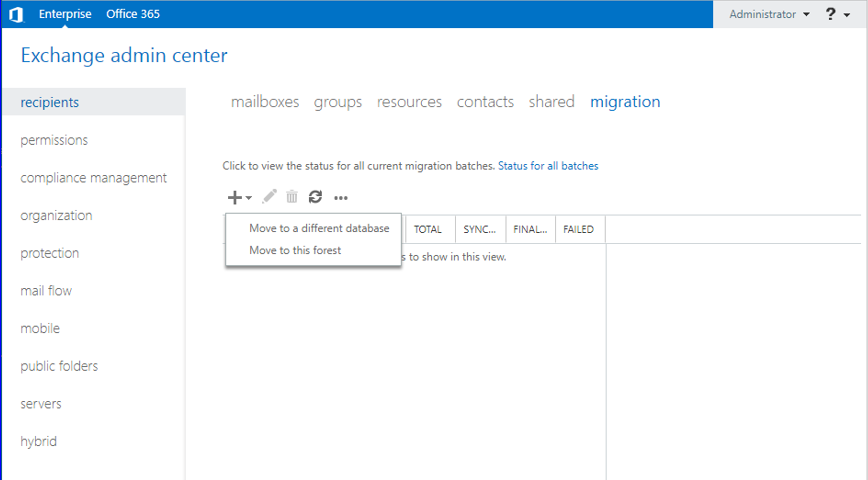
- Open the Exchange Admin Centre, follow Recipients>>Migration, click on Add+, and choose Move to a different database.
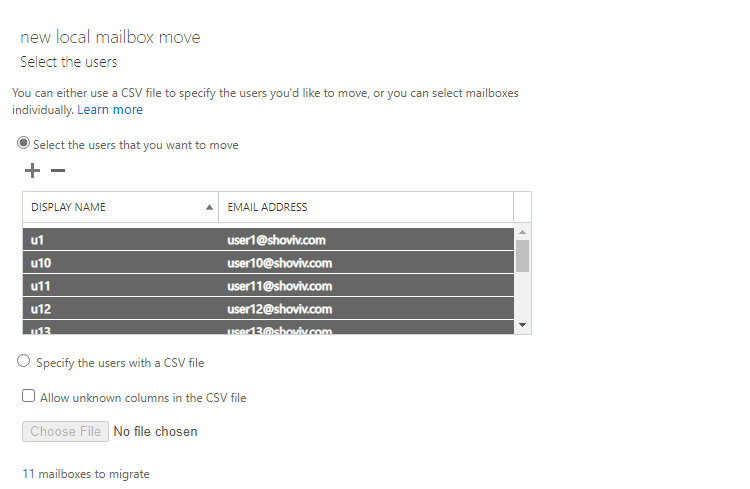
- New Local mailbox move wizard will open. Here, add the mailboxes to migrate and provide the essential details.
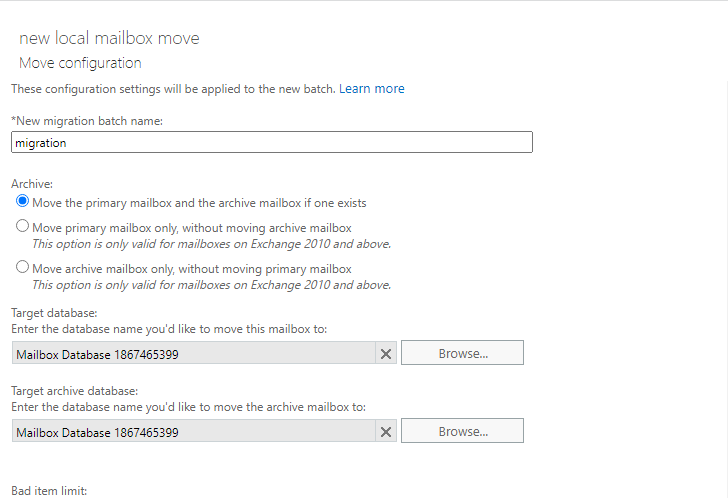
- The Move Configuration page will open. Here must provide the new batch name and select the Exchange Server 2019 database as the destination. Click Next.
- Now, Start the batch page will open, configure the migration setting as per the requirements, and click Next.
- By this, batch Migration will start, and you can see its status as “Scheduled.” The status will change to ‘Complete” after the successful migration.
- Instead of using the Exchange Admin Centre for Exchange 2016 to 2019 migration, you can also use the Exchange Management Shell Command to migrate mailboxes, audit log mailboxes, arbitrary mailboxes, and monitor mailboxes.
- After successfully migrating the entire database, you can delete the Exchange database by the given command.
Identity “Databasename”| Remove- MailboxDatabase
- Once you upgrade Exchange 2016 to 2019, you can uninstall Exchange Server 2016 by using the given command:
“C;\Program Files\ Microsoft\Exchange Server\V 15 \Bin setup.exe/mode:uninstall
Why Professionals Don’t Prefer Manual Method?
- If you go manually, it is a very tedious and time-consuming way to migrate Exchange 2016 to 2019.
- Doer should be a technical expert in Exchange. For novice users, it is an Everest-winning task.
- Also, there are chances of human error, leading to data loss.
- There will be a long downtime during manual migration, and you cannot utilize your mailbox on the server.
Professional Tool to Migrate Exchange 2016 to 2019:
A professional third-party tool is a must for the easy and accurate Exchange 2016 to 2019 migration. Shoviv Exchange Migration Tool is a perfect professional tool for this. It is a powerful multitasking solution that is embedded with numerous user-centric features. We recommend installing the free Exchange Migration tool version and evaluating its skills and capabilities. The process goes as follows:
- First, install and launch the Shoviv Exchange Migrator.
- Click on the Source Connection tab to connect with the Exchange Server.

- Give a project name and enter the username and password.

- Now click on the Target Connection and repeat the same steps as the Source Connection.
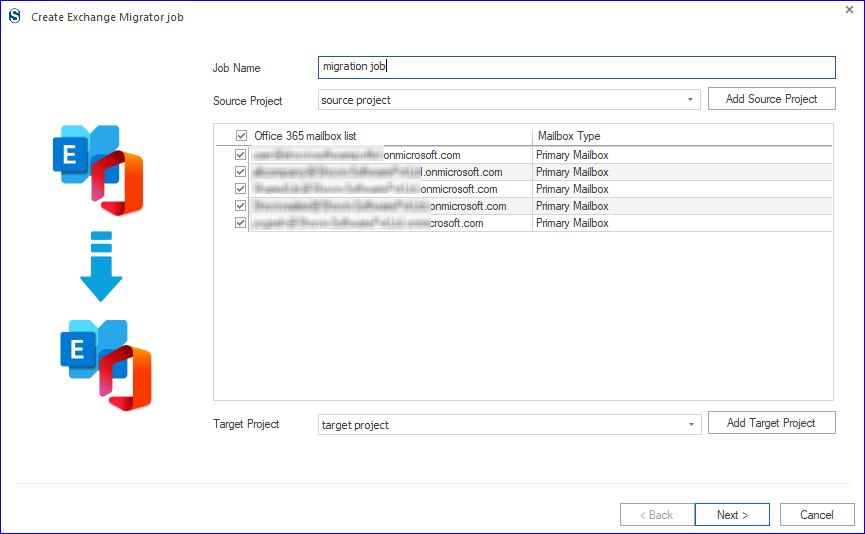
- Next, click on the Migration Job tab and select the default mailbox.

- Give a job name, add source project, check mailboxes, and add target project. Click on the Next.
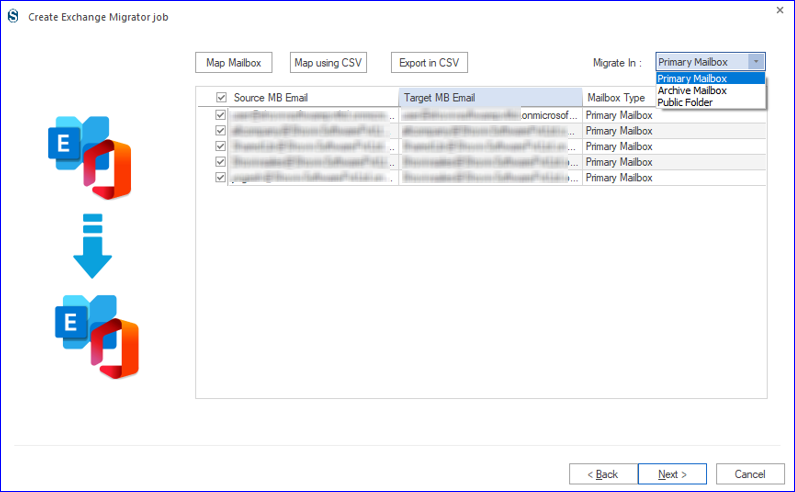
- Map the source mailbox with the target. Also, select the mailbox type for the target. Click on the Next.
- Now, you are prompted to the filter page. Here, you can apply the filter as per the need. Click on the Next.

- Apply settings as per the need of the task. You can also take job run action: immediate or scheduled.
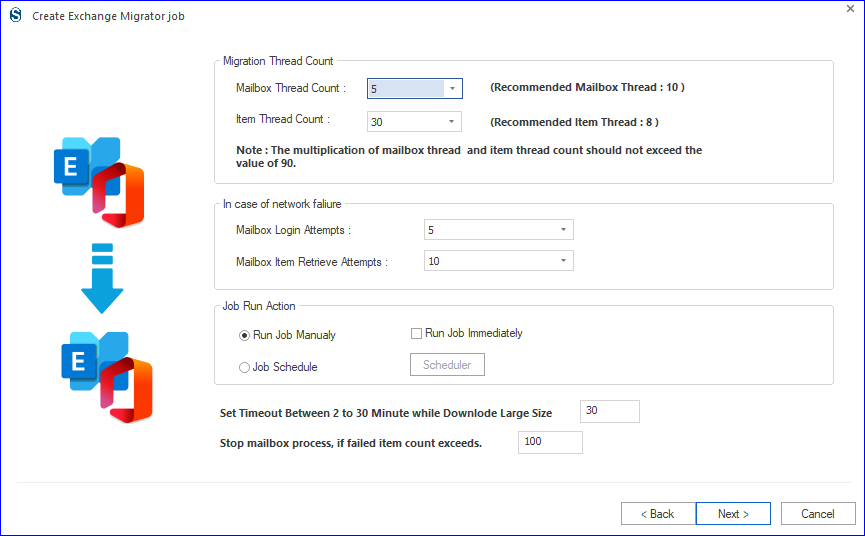
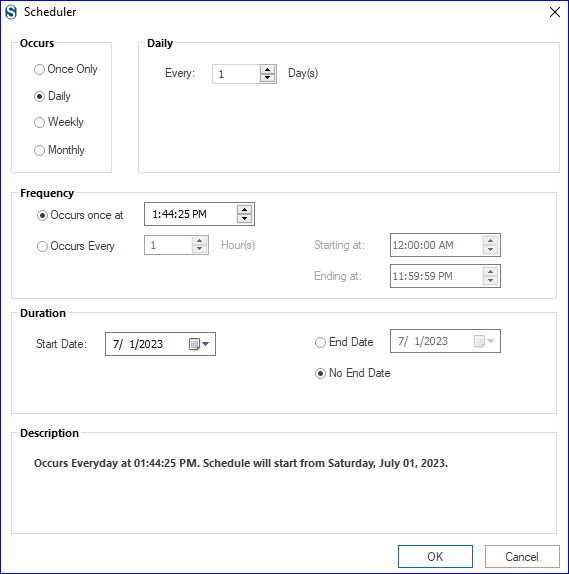
- To schedule the job, set frequency, occurrence, and duration. The migration will start at the scheduled time.
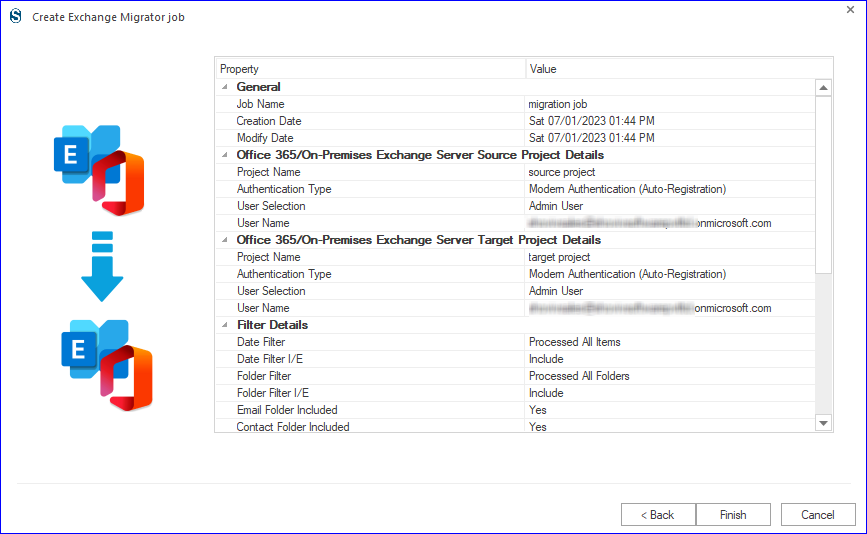
- Finally, you will get a preview of the created migration job. If you are satisfied with the settings, then click on the Finish. You can also edit the job by going back.
So, it is an easy process to migrate Exchange 2016 to 2019. Besides its easy process, the software offers every feature required to make the migration effective.
Characteristics of the Shoviv Exchange Migration Tool:
- There is no restriction on size limit; you can add and migrate multiple numbers of mailboxes up to the maximum possible size in one go.
- It runs on job-based processing and is capable of running multiple jobs concurrently.
- Shoviv Exchange Migration Tool properly maintains the folder hierarchy and maintains data integrity. Hence, all your data will remain untouched and unaltered.
- During the upgrade, a process interruption is the worst scenario, as interruptions can corrupt or inaccessible your mailboxes. But with the Shoviv Exchange Migration Tool, you can quickly resume the interrupted process.
- The software allows users to preview added Exchange mailbox data before the upgrade to ensure data accuracy and decide which items to include/exclude for the migration.
Wrapping Up:
Migration toward the latest and upgraded one is obvious. Exchange 2016 to 2019 migration is for the same. For accurate migration with facilities, the manual method is not preferred. Shoviv Exchange Migration Tool is a professional tool that best suits professionals. It provides an easy way to upgrade Exchange 2016 to 2019. The free trial/demo version of the software is also available to check its processing, which allows the migration of the first 50 items per folder.