There are various reasons for the Office 365 email backup to be in PST format. In this write-up, ways to back up the Microsoft 365 mailbox are mentioned. Moreover, a free demo version of the software is also available to download.
Overview:
We know that Office 365 is the future of email clients as it effectively fulfils the needs of the modern working era. Unfortunately, there is no option to store these crucial emails. Having backup enables users to face data loss and unauthorized access, like worst scenarios, without any hassle. You can backup emails using the eDiscovery and Shoviv Office 365 email backup utility.
In this article, I’ve described both methods. Read the complete article and choose a solution that is convenient for you and your needs.
Explore How and Why Back up Office 365 Emails:
We all know Office 365 does not provide an option to back up data on the local disk, and several reasons have initiated users to back up Office 365 mailboxes to PST. PST file is the most suitable option to back up Office 365 mailboxes because it can be opened and previewed in any Outlook version. Let’s know about all comprehensively:
Why Back up Office 365 Mailboxes?
- As we are aware, we pay for storage in Office 365, and by backing up the Office 365 data, you can cut down the storage cost.
- Being a cloud-based service, the Office 365 mailbox data remains universally accessible, and there are always chances of unauthorized access and hacking.
- In case of accidental deletion of data or data loss in any way, retrieving the data will be a boon if you have a backup of Office 365 mailboxes.
Is your email data safe? Take control and backup your Office 365 emails. Download the Shoviv Office 365 Backup and Restore tool and start your free trial today.


How do you back up Office 365 emails to PST?
Here, we are mentioning two ways to back up Office 365 mailboxes to PST: the manual Method and the Professional third-party Office 365 Backup tool. Manually, users can use the E-discovery method to back up Office 365 emails. The e-discovery method has three phases.
- Choose e-Discovery administrator
- Perform a new content search
- Export the searched result to PST
Before we start the Office 365 email backup using the manual method, there are some system requirements.
System Requirements:
- Windows: 32-bit or 64-bit version of Windows 7 or above.
- NET Framework 4.5
- Internet Explorer 8 or later version
- If using Google Chrome or Mozilla Firefox, you must install click once add-in.
The step-by-step process for the E-discovery method:
Now, we will learn the steps to take the Office 365 mailbox backup using an E-discovery solution. Learn each step carefully for an accurate backup.
Phase1:
- Firstly, log in to your Office 365 account with the administrator credentials.
- Secondly, open the Office 365 Admin Center and click on Security.
- Now, go to the Permission option from the left pane and select e-Discovery Manager from the list.
- A new window will pop up. Here, click on the edit button, which is available opposite the e-Discovery administrator.
- Now, choose the eDiscovery administrator and hit Save.
Phase2:
- Go to the search option from the left pane and click on the content search.
- Now, the content search window will open. Here, click the New search option.
- Provide the name and description for your new search and click Next.
- Now, the location window pops up. Choose the Locations or search the mailboxes you want to back up in the PST file and click the Next.
- Now select the keywords and apply the conditions as needed. After that, click Next (Not compulsory).
- Finally, review your search settings and click on Submit. If you want to change your search settings, click Back.
Phase3:
- Select your search from the search list, then click on the Action.
- Now click on the Export result option and choose your output option. After that, click on the Export.
- Now go to the Export tab, select your last export and click on the Download results. After that, scroll down and copy the Export key.
- A click-once application, named e-Discovery export tool, will open. Now, paste the copied export key and browse the location to save the PST file.
- At last, click on the Start button, and the tool will begin the Office 365 email backup process.
Limitations of Manual Method:
- The manual method has complicated and time-consuming processing.
- The manual way fails to back up selective data such as emails, contacts, or calendars.
- It asks for prior technical knowledge before processing the manual method. It is not suitable for novice users.
- There are high chances of data alteration. It doesn’t guarantee an accurate and complete backup.
Professional Office 365 Backup Solution:
No one wants to risk the data and not have extra time for the manual backup. Thus, for the perfect and accurate Office 365 Backup, a professional third-party tool is a must. Shoviv Office 365 Backup Tool is the most suitable backup for Office 365 emails (mailbox) to PST files. Shoviv Office 365 Backup Solution comes with a user-friendly GUI, and it is embedded with several user-centric features. It is a perfect solution for a simple, fast, and accurate backup. Have a look at what it facilitates:
Features:
- Shoviv Office 365 email backup software smoothly backups the Office 365 mailboxes into PST format. With its user-friendly GUI, running it is an easy task, and any novice user can efficiently perform this.
- It provides the complete backup of User Mailboxes, Archive Mailboxes, Public Folders, etc.
- It offers the option for periodic scheduled Office 365 email backup. Users can choose options like Daily, Weekly, or Monthly. With this option, the user will get rid of the need to remember the timely backup.
- The software provides an effective filter option based on “Date” and “Items.” By this, users can get rid of unwanted data.
- An advanced option for full and incremental backup is also available in the Shoviv Office 365 Backup Email Solution. This tool comes in handy when the user takes a backup again, and only data that is increased during the last process will be backed up. It prevents the duplicity of the data.
- It proceeds with the Job-based backup process; there is no need to create connections all the time, and a one-time relationship is enough to run jobs.
- The software works concurrently, and it can smoothly run multiple jobs at a time.
- The option to restore the backup file to Office 365 Mailboxes is also given.
- In the end, the software also generates the status report of the complete Office 365 mailbox backup process.
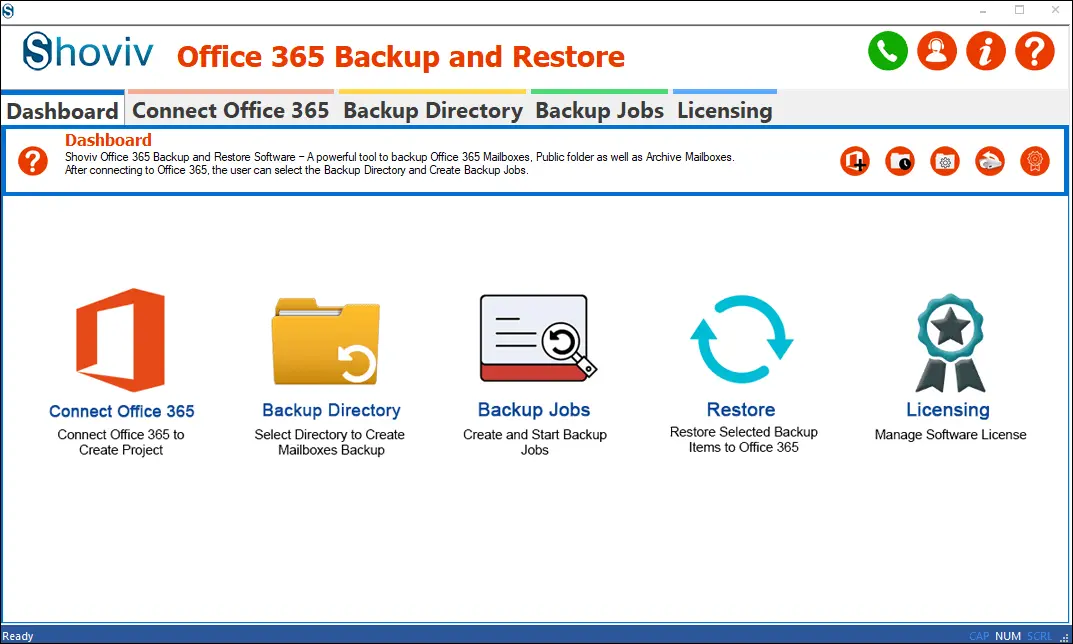
How does Shoviv Office 365 Backup and Restore Works?
Running Shoviv Office 365 Backup and Restore Tool is very easy to do the task because it comes with a user-friendly GUI. Below are the steps that will help you to understand how to backup Office 365 Mailboxes in PST.
5 Easy Steps to Back up Office 365 Mailboxes
- Run Shoviv Office 365 Backup and Restore tool.
- Create a backup project and choose a backup directory.
- Then, Apply filters and click Next.
- Schedule your backup jobs and click Finish.
- Now the software will start the backup process.
Detailed Preview: How does this tool work to take Office 365 mailbox backup?
- Firstly, install and open Shoviv Office 365 Backup and Restore software.
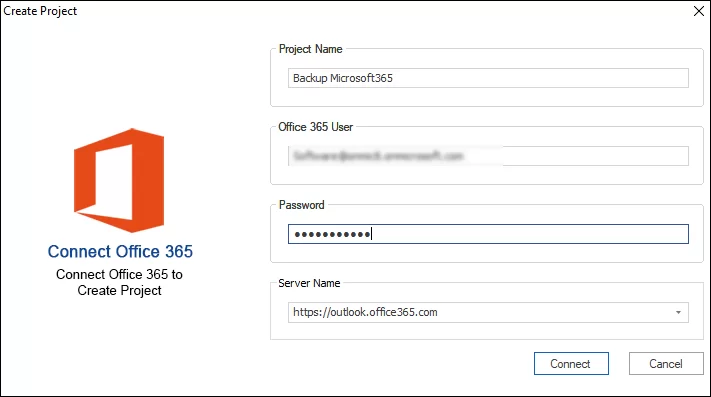
- Then, create a project to connect Office 365 user mailboxes and fetch the users’ mailbox list by clicking on the Connect Office 365.
- Now, a dialog box will appear, enter the asked details of the Office 365 admin user, and click the Connect.
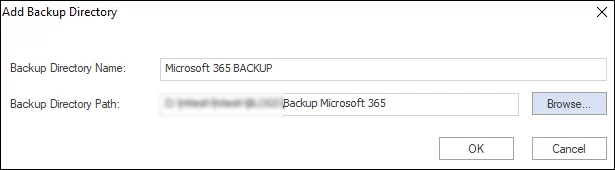
- Click on the Add (+) icon from the Backup Directory Tab, and provide a name for the directory. After that, browse the directory/folder path to store the backup files of Office 365 mailboxes.
- Now, create a new backup job by clicking on the Add (+) button of the toolbar of the Backup Jobs Tab. After this, a new dialog box will open, provide the name for the new backup job and click the Next.
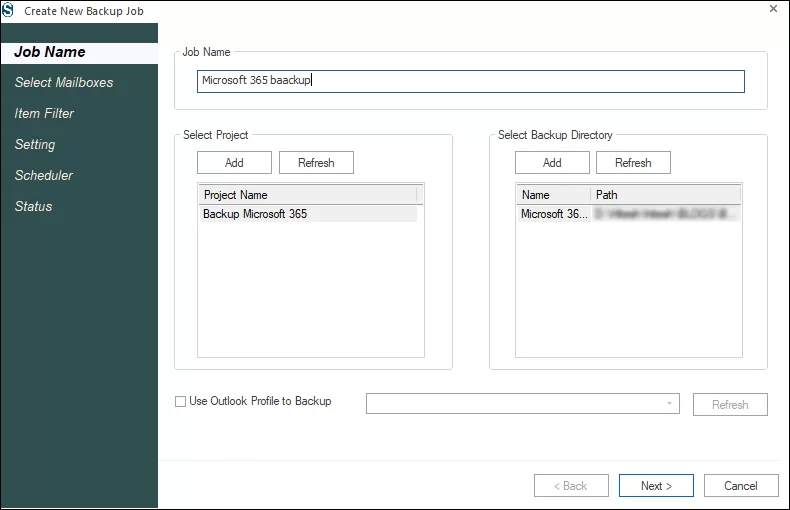
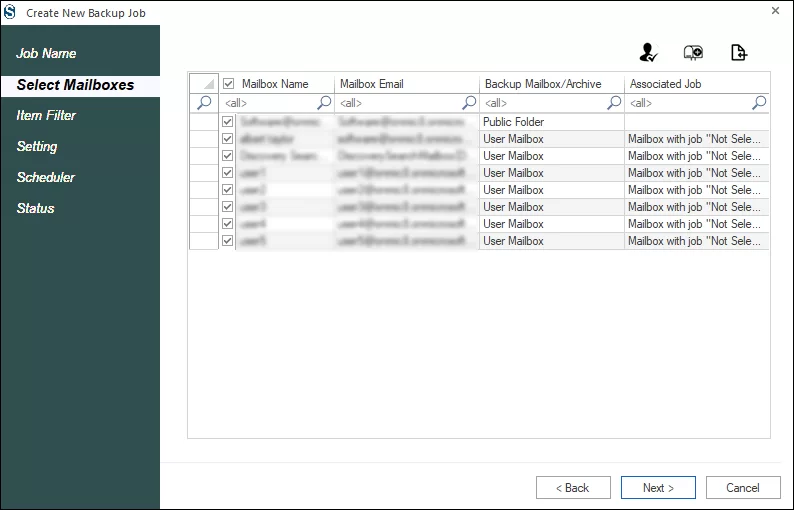
- A new wizard will open; select the mailboxes of which backup is needed and click on the Next.
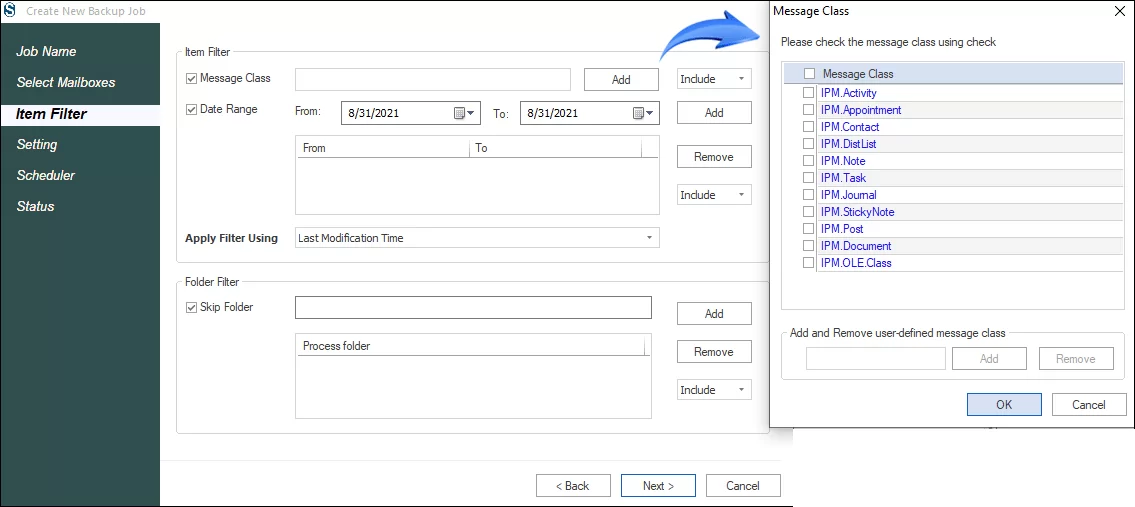
- Next will be the filter page with three filter options, i.e., Message Class, Date Range, and Folder Filter. Apply filter as per the need and click the Next.
- You will be prompted to setting dialog. Here Set Backup thread counts for mailbox and items. Select attempts for Office 365 connections and Other MAPI connections for network failure scenarios. Here, the user can also provide the size, after which the PST file will split, and click on the Next.

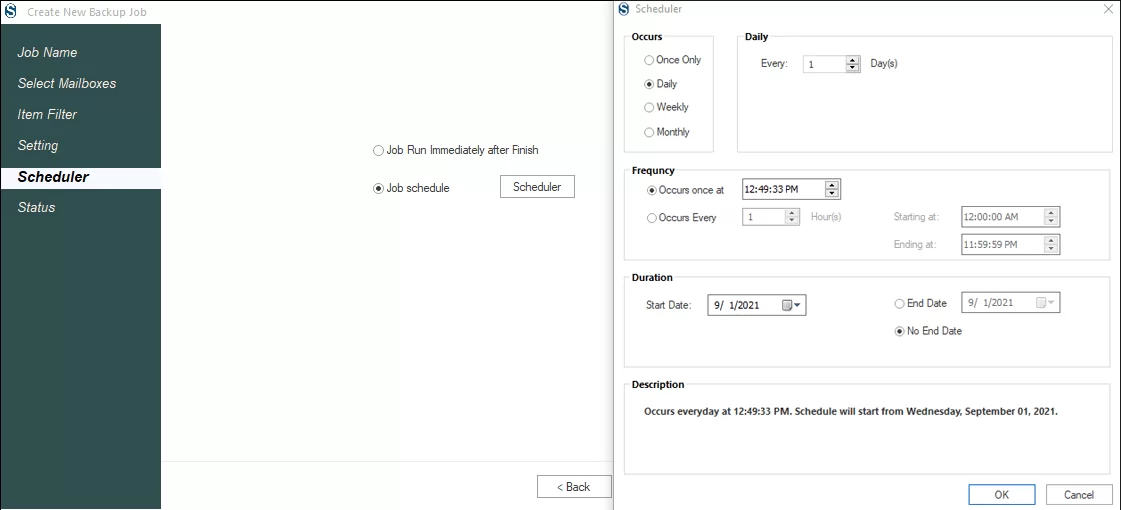
- Now, the user will get to the next window, where two options will be available to you. One is for immediate process and another for applying scheduler. Here users can schedule the backup process for Daily, Weekly, Monthly, or Once Only.
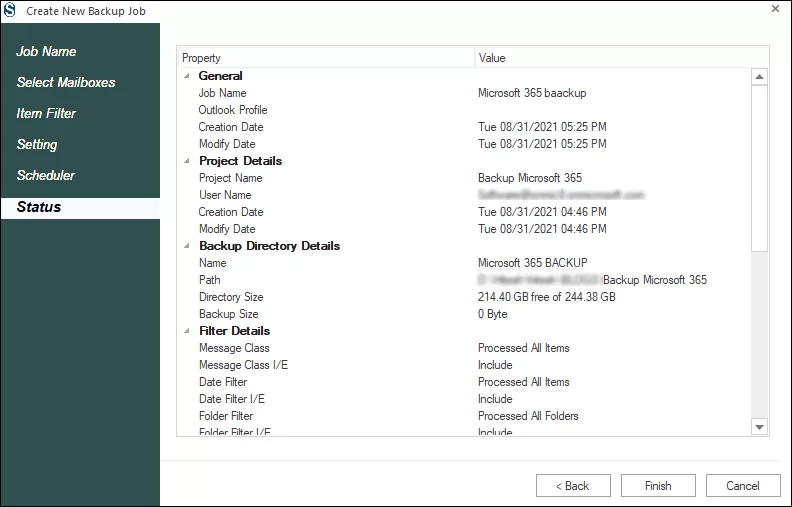
- Now, you will be prompted to the Status Page, where you can verify the status of the created backup job. If you’re satisfied with the report, click on the Finish button, or if not satisfied, edit by going back.
- Now, the software will display a live log report of the backup process; you can see all the essential information related to processing.
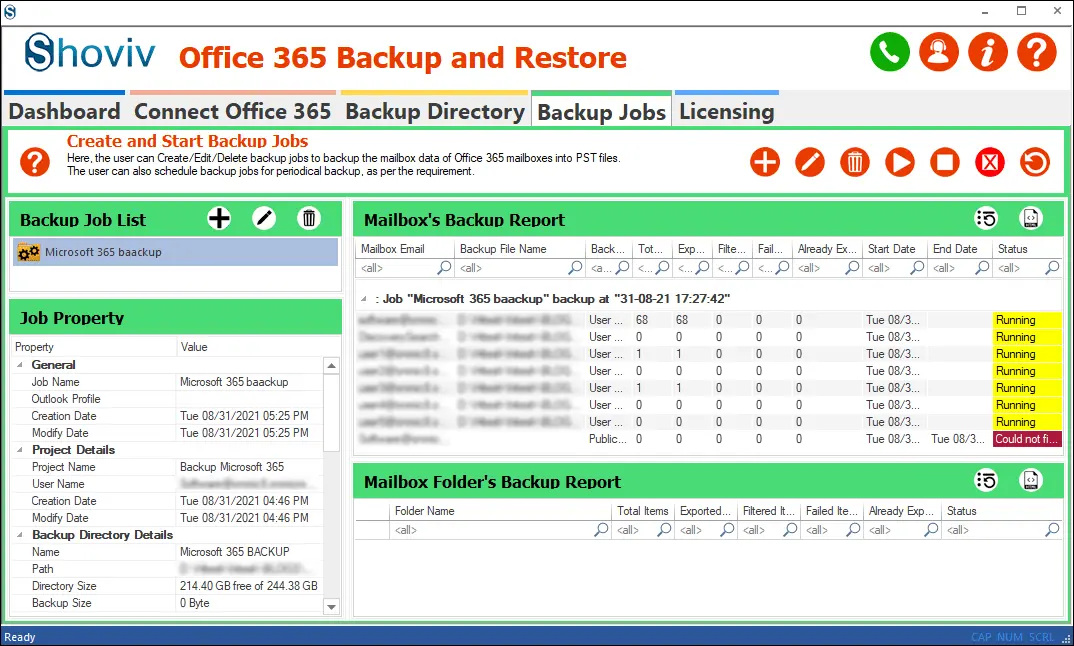
It is how users can take Office 365 email backup using the Shoviv Office 365 Backup and Restore tool.
Final Words:
For various reasons, there is a need to back up Office 365 emails to PST. There are manual methods as well as a professional third-party tool. Manual methods like E-discovery fail to provide a user-friendly way to do the Office 365 email backup task. However, Shoviv Office 365 Backup Tool is a one-stop solution for effortlessly backing up emails. Install the free demo version of the software and explore this utility for free.
Frequently Asked Questions:
Install and run the Shoviv Office 365 Backup and Restore tool.
Create a backup project and choose a backup directory.
Then, apply filters and click Next.
Schedule your backup jobs and click Finish.
Now, the software will start the backup process.
Shoviv Office 365 Backup Tool provides an option to split large PST files. Users can set the size for the resultant PST file, and the software will split the PST file when it reaches the set limit.
The software works on job-based processing, and for each job, one can add multiple mailboxes without limitations. Moreover, the software can create and run multiple jobs simultaneously.
The demo version is just a restricted version of the paid/licensed version. In working, both are the same; after applying for the license, it turns to the licensed version.

- Team Site vs Communication Site in SharePoint: Explained - May 16, 2025
- How to Download Multiple Files from SharePoint Like a Pro? - May 9, 2025
- SharePoint vs OneDrive: What Sets Them Apart? - May 5, 2025