Companies opt to move from on-premise Exchange Server to Office 365 and there are several reasons behind this like reliability, enhanced security features, real-time sync, and flexibility of subscription plans. But, the actual method of bulk mailbox migration to Office 365 is a difficult one, which can be easy to get wrong. Here we will get to know that process.
Migration of bulk Exchange server Mailboxes to Office 365
For bulk mailbox migration, first, you need to setup hybrid deployment in order to serve as an intermediate step. These steps will show you how to initiate the method. The total time taken by the process of migration will depend on the number of mailboxes in each moving batch. It takes approx fifteen minutes in configuration. A user who implements the migration should be given appropriate permissions before initiating the process.
For those who use an Exchange server 2013, need to be sure that MRS Proxy (Mailbox Replication Proxy Service) is enabled on Client Access servers.
Create Exchange server remote migration endpoints at the beginning of the process. The endpoint contains the settings of the connection for on-premises Exchange server running Mailbox Replication Proxy Service. This is quite vital for the move. Now, enable Mailbox Replication Proxy Service.
- Open Exchange Admin Center and go to Servers–Virtual Directories.
- Now, go to the CAE. Click the EWS virtual directory and then on Edit.
- Go with Mailbox Replication Proxy enable checkbox.
- Save to make the process complete.
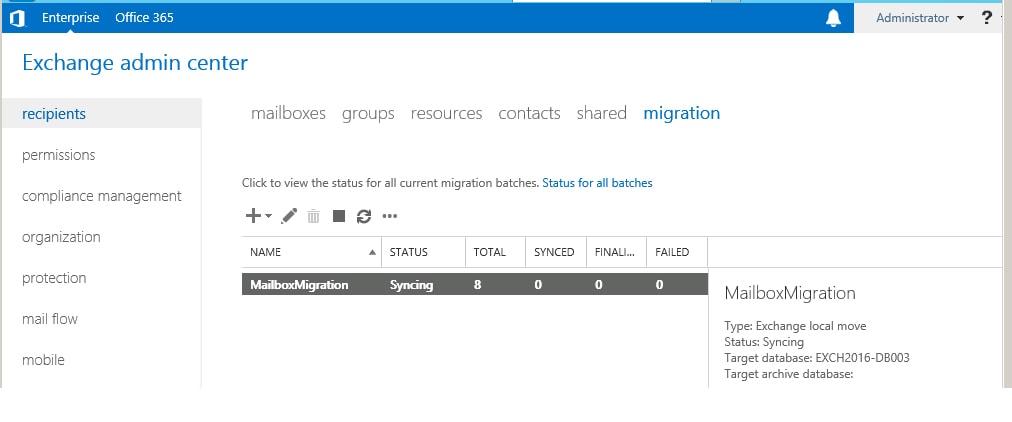
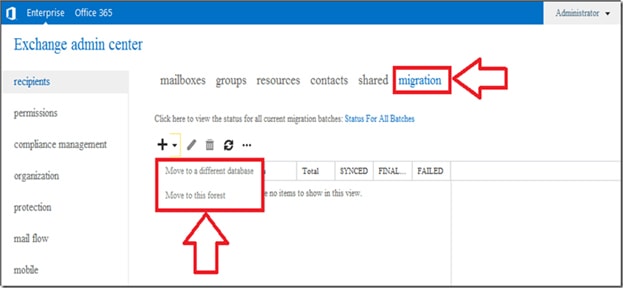
Moving bulk mailboxes with EAC
In EAC in office 365, the Remote move migration wizard is present that can be used to migrate mailboxes. It can be done by following ways-
- Open EAC and go to ‘Office 365 — Recipients — Migration’.
- Choose Migrate to Exchange Online from given options.
- Select Remote migration move option on ‘Select a migration type’ page and click next.
- Select on-premises users that need to be moved to Office 365 from the exchange server. After adding click next.
- Go to the option ‘Enter the Windows user account credential’. Provide the required value in ‘On-premises administrator name’ column, and enter your password. Click next.
- Open confirmation page and verify the details. Click Next.
- Navigate to ‘Move configuration’. Provide a new migration batch name.
Select the target delivery domain by clicking down arrow icon for the mailboxes which are moving to office 365. Click next to proceed. Now, open ‘Start the batch’ page and go with one recipient (at least) and collect complete batch report. Verify the selection ‘Automatically start the batch option’, and select the checkbox given in front of ‘Automatically complete the migration batch’.
When the bulk mailbox migration has done, it is suggested to eliminate the finished migration batches. This will vanish the possibility of any kind of error. To know more about Office 365 migration you can also read our previous blog on GroupWise to Office 365 Migration.
Limitations and Drawbacks of Manual Method of Migration-
- The Process of manual bulk mailbox migration to Office 365 is very slow.
- It is not as easy as we think to perform this method.
- Only, An Export user can use this method
- Manual migration is time taking and it is not 100% reliable as well.
Shoviv Exchange Server Suite – The Savior
Our impeccable performer Shoviv Exchange Server Suite is a powerful tool which performs the task of bulk mailbox migration to Office 365 very effectively. It is less time consuming as compared to other tools available in the market along with the manual method. It guarantees you 100% move of complete files without any data loss.