We know that the recommended upper limit for the PST file is 50 GB, and above this PST file may face issues. To work smoothly on Outlook or with PST files, it is necessary for users to split PST files. The PST splitting process allows users to break their oversized PST files into more manageable sizes. A large PST file can disrupt the workflow and slow down Outlook’s performance. Continue reading this blog to the end to know the reasons behind splitting and easy ways to do the same.
Why is there a need to split a large PST file?
- Oversized PST files are always prone to corruption; Microsoft has defined 50 GB as the upper limit of PST files.
- The PST file items can become inaccessible if the size is large
- Outlook performance might be affected, which disrupts the business workflow.
- Within oversized PST files, it isn’t very easy for users to manage data.
So, users need to split PST files into smaller parts to avoid such issues and continue to work smoothly on their Outlook client.
How to split/divide/break Outlook PST files?
Users can implement two ways to divide the large PST file into smaller ones:
- Manual Methods – to break a PST file with Outlook.
- Automated Method- to split a PST file without Outlook.
Manual Ways to Split/Reduce the Size of the Large PST File
Manual Method 1: Outlook’s Import/Export option to break the PST file:
Steps for splitting the large PST file using Microsoft Outlook:
- Start Microsoft Outlook and go to the File tab.
- Then, navigate to the Account Settings dropdown and proceed with the Account Settings option.
- Thereafter, click the Data File tab and click the Add button.
- Give a name to the file and choose the Save as type (Outlook Data File). After that, tap the OK button to add the PST file.
- Once done, continue on the File tab, select the Open & Export, and click the Import/Export option.
- Afterwards, you have to choose the Export to a file option and go with the Next button.
- Then, you must proceed with the Outlook data file (.pst) option and tap the Next button.
- Now, select the folders you want to export and tick the Include Subfolders option per your needs.
- Use the Browse button to pick the location where you want the resultant PST.
- Also, you can mark the Do not export duplicate items if necessary and click the Finish button.
Manual Method 2: PST file size reduction using the Outlook Archive:
To break a large PST file into smaller ones with the Outlook Archive option, you can follow the steps:
- Open Outlook and click the File tab.
- After that, you have to select the Cleanup Tools dropdown and click the Archive option.
- Thereafter, choose a date range in the “Archive items older than” box.
- Following that, tap the Browse button to select the desired location to save the resultant archive file.
- Once done with everything, click the OK button.
Why Professionals Don’t Use Manual Methods:
- It is a very tedious and time-consuming process, hence not suitable for professionals.
- No exact solutions to split PST files into smaller sizes; they only allow users to reduce oversized PST file sizes.
- Users might lose data integrity when using manual ways to divide the PST file.
- It is necessary to use Outlook if breaking PST files using manual methods.
- A technical understanding of Microsoft Outlook is needed to use manual solutions.
Split PST files without Outlook: Use Shoviv’s Professional Tool
The Professional Tool developed by Shoviv Software is a tested and verified utility. This software comes with various features to overcome the PST file-splitting challenges. It is easy for users to handle this solution, as no prior technical understanding is required. Users do not need to use Microsoft Outlook to run this professional solution to break up the large PST file.
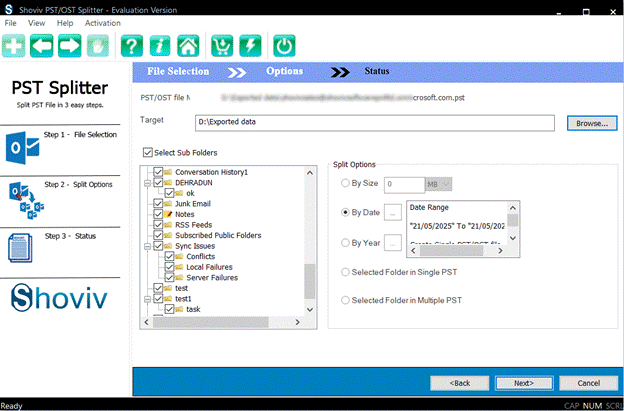
Users can also split a PST file by date, year, folder, and size with the Shoviv PST Splitter Tool. It also keeps the folder hierarchy and data integrity intact even after processing.
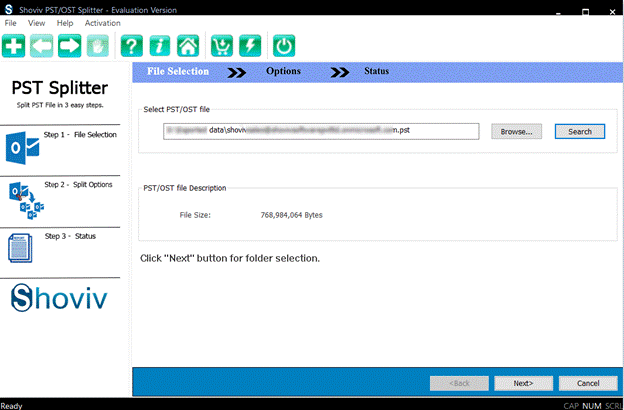
Steps to Split a Large PST File into Small PSTs:
- Open the Software and add the desired PST using the Browse button.
- You can also use the Search button to choose the PST file to split. After adding the file, click the Next button.
- Then, you can select/deselect the folders and subfolders.

- After that, you have to choose/browse the target folder by clicking the Browse.
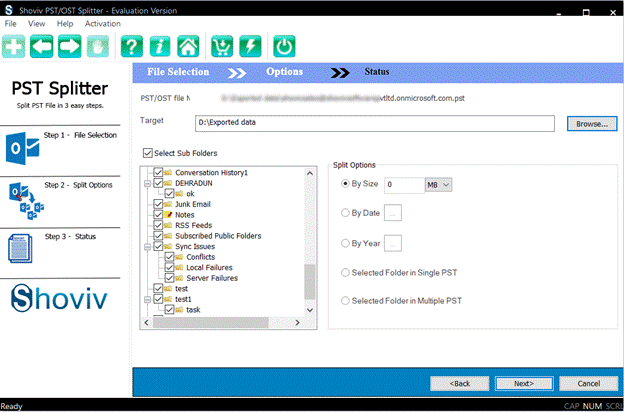
- This tool also allows you to choose to split a large PST file by size, folder, year, or date.
- You can also use the options: Selected Folder in Single PST and Selected Folder in Multiple PST. Then, tap the Next button.
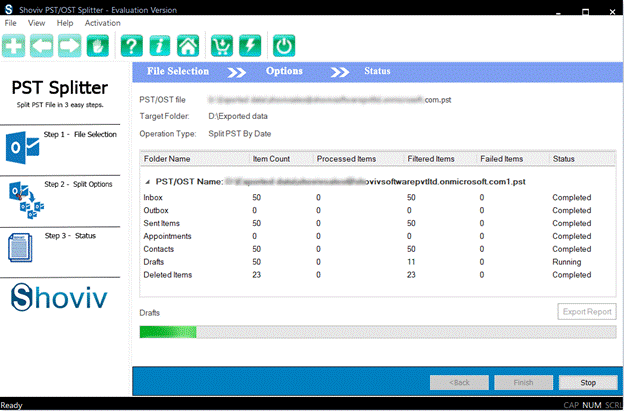
- Finally, this software will begin processing. Click the Finish button after completing the task.
Final Words:
Large-sized PSTs are always prone to corruption, and sometimes Outlook fails to open them. Hence, splitting a PST file is an essential task for users to manage their data in the PST file more effectively. Moreover, users can also avoid issues with Outlook, such as performance problems, PST data inaccessibility, and many more. The manual methods might not be the perfect way to split the PST file, as they have limitations and require Outlook. So, to divide/break a PST file without Outlook, users should use the Shoviv PST Splitter. It also comes with a trial version; which users can try on their Windows operating system.
Frequently Asked Questions:
The free version offered by Shoviv is just a restricted version that allows processing the first fifty items per folder. There are no such limitations with the paid/licensed version.
Simple steps to split a PST file are:
1. Launch the Tool.
2. Browse the desired PST file and click Next.
3. Choose the option/criteria to split and browse the target.
4. Click Next to begin the PST splitting task.
You can use the Move, Archive, and Import/Export facilities to split the large PST file in the Outlook email client.
Yes. You can split the PST file by size, date, or folder, and even by year.
Yes. It is possible to break a large PST file without using Outlook.
1. Data in the PST file can become inaccessible.
2. High chances of data corruption.
3. Microsoft Outlook can be slow down.
4. Risk of permanent data loss.
More risks may occur if you do not divide large PST files.


