Summary: Importing an OST file into Outlook is a common requirement when users need to access mailbox data from an old, inactive, deleted, or corrupted Outlook profile. However, Outlook does not allow users to directly import or open an OST file in another profile because OST files are tied to a specific MAPI profile, such as Exchange, IMAP, Microsoft 365, or Outlook.com account that created them. To access OST mailbox items such as emails, contacts, calendars, tasks, notes, and attachments, the OST file usually needs to be converted into Outlook-supported PST format first.
This guide explains how to import OST files into Outlook 2021, 2019, 2016, 2013, Microsoft 365, and Outlook New using practical methods. It also covers why OST files cannot be added directly to Outlook, when manual options may work, their limitations, and how an OST to PST conversion tool can help in cases involving orphaned, inaccessible, large, or corrupted OST files. By the end, you will understand the safest way to recover OST data and access it again in Outlook without losing important mailbox information.
Active vs Orphaned OST File: What You Need to Know
Before attempting any import method, it is important to understand the current state of your Offline Storage Table (OST) file. Many users overlook the fact that Microsoft Outlook handles OST files differently based on whether they are still connected to the Exchange server or have become orphaned.
This distinction plays a critical role in determining which import or recovery method will successfully access your data. Choosing the wrong approach can lead to synchronization issues, inaccessible mailbox items, or incomplete data migration.
1. The Active OST (Connected to Server)
An Active OST is currently linked and synchronizing with its original Microsoft 365 or Exchange Server profile. Because the MAPI profile is actively authenticating your credentials, the encryption on the file is unlocked.
Solution: If your OST is active and you simply want to back it up or move it, you do not need third-party software. You can use Outlook’s built-in Import/Export Wizard (File > Open & Export > Import/Export) to extract the data to a PST file, or use the native AutoArchive feature to offload older emails.
2. The Orphaned OST (Disconnected or Corrupted)
An Orphaned OST is a database file that has been permanently disconnected from its original Exchange server. This occurs when an employee leaves the company and their profile is deleted, the Exchange server crashes, or you simply copy the .ost file to a new Windows computer via a USB drive.
OST files are not generic data files; they are heavily encrypted cache files tied to a specific Exchange EntryID and RPC over HTTP profile key. Once that original profile is gone, the OST becomes orphaned.
Solution: Microsoft provides zero built-in utilities to open, read, or import an orphaned OST file. The Import/Export wizard will immediately throw an error if you attempt to target an orphaned file. The only way to unpack this database and recover the emails, contacts, and calendar data is by utilizing a dedicated third-party extraction tool like the Shoviv OST to PST Converter, which bypasses the missing MAPI profile requirements to restructure the raw data into an accessible PST format.
Why Can’t You Import an OST File Directly into Microsoft Outlook?
Many users assume an OST file is simply a PST file with a different file extension. Architecturally, this is false. While a PST is a portable, standalone database, an Offline Storage Table (OST) is engineered strictly as a synchronized local cache of a live server mailbox.
Microsoft designed OST files with inherent security protocols to prevent unauthorized offline data extraction. Here is the technical breakdown of why you cannot simply copy an OST to a flash drive and open it on another computer:
- MAPI Profile Binding – An OST file is hardcoded to the exact MAPI (Messaging Application Programming Interface) profile of the Windows machine that originally generated it. Outlook does not just verify your email address; it validates the unique hardware and profile signature of the host machine.
- Exchange EntryID Encryption – The database structure within the OST is encrypted using a unique Exchange EntryID. The Exchange server holds the corresponding decryption key. If the server cannot actively authenticate the user account, the database remains cryptographically locked.
- RPC over HTTP Authentication – The background synchronization between the OST and the server relies on RPC over HTTP (or MAPI over HTTP in newer Microsoft 365 environments) profile keys. If an employee leaves and their Active Directory or Exchange profile is deleted, this authentication token is permanently destroyed.
A disconnected or orphaned OST file cannot be imported directly because Microsoft Outlook relies on active MAPI authentication and matching profile data to access it. Without these credentials, Outlook cannot read the file. To recover the data, you need a specialized tool that can bypass authentication checks, extract the raw OST data, and convert it into an accessible format such as PST.
Methods to Import OST File into Outlook
If you want to add your OST file to Outlook, you can use any of the following four solutions.
- Professional Software (Ideal for Orphaned and Corrupted OST file)
- Using Outlook’s built-in Import/Export wizard
- Using the Outlook Archive feature
#1: Professional Software to Make OST file Importable in Outlook
The Shoviv OST to PST Converter tool is examined by experts in many challenging scenarios, and it has become a data savior every time. Due to its convenient GUI and user-oriented nature, the tool is recommended for everyone, from tech-savvy to novice users.
- This software recovers data from orphaned/inaccessible or corrupted OST files.
- It works with no restrictions on the size and number of OST files.
- Users can save recovered data from OST to various formats, including PST, EML, MSG, vCard, etc.
- Also, users can move OST files to Office 365 and On-Premises Exchange Server.
- This tool offers a simple user interface; no users need any technical knowledge to handle the OST to Outlook importing task.
- Once you have done importing OST file data to Outlook PST, users can easily access or open OST file data to any Outlook version.
- The incremental export option is also available to avoid duplicate items in the target.
Steps to import OST files into Outlook Classic any version
- Install and launch the Sottware.
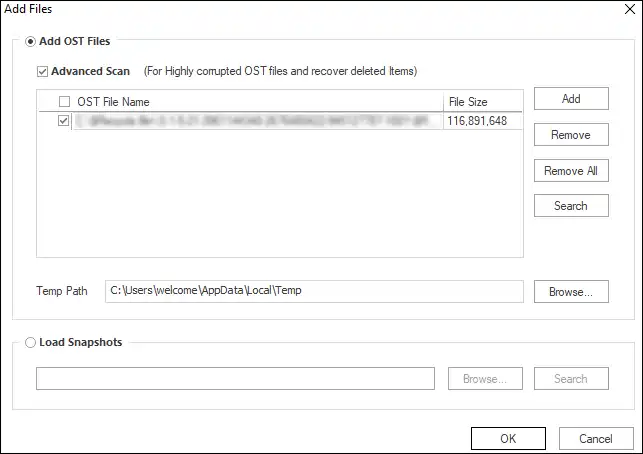
- Click on the Add OST file option from the ribbon bar and Add OST files. (Check the box adjacent to Advance Scan to repair severely corrupt OST files).
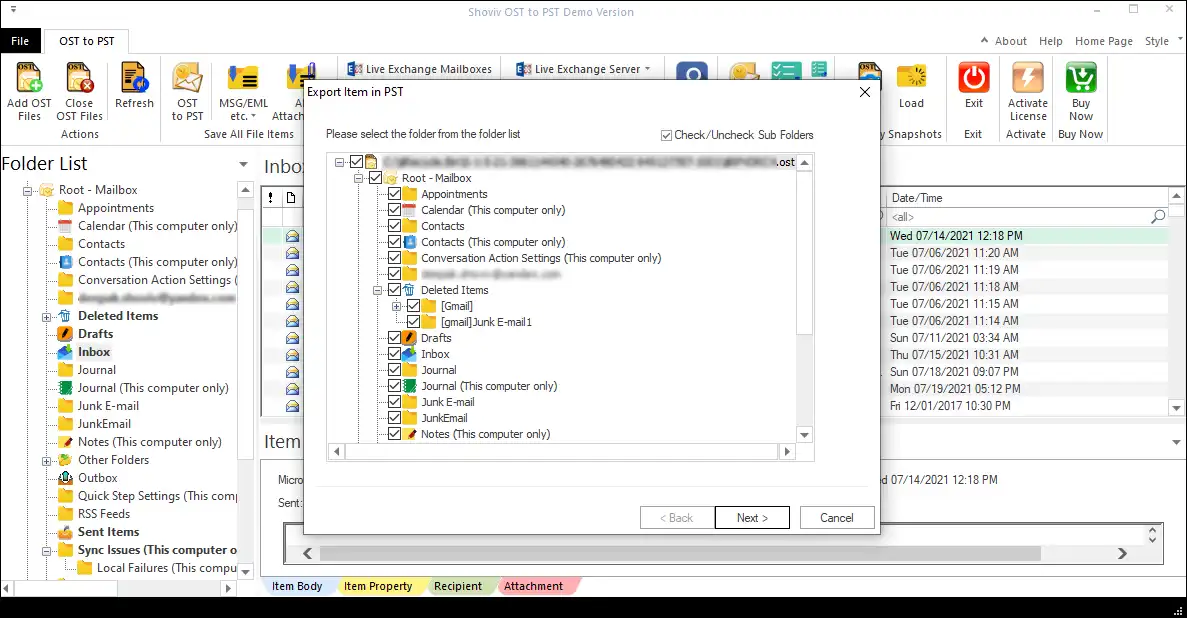
- Next, click the Export to PST option from the ribbon bar and check/uncheck OST items in the following wizard. Select Outlook folders to Export.
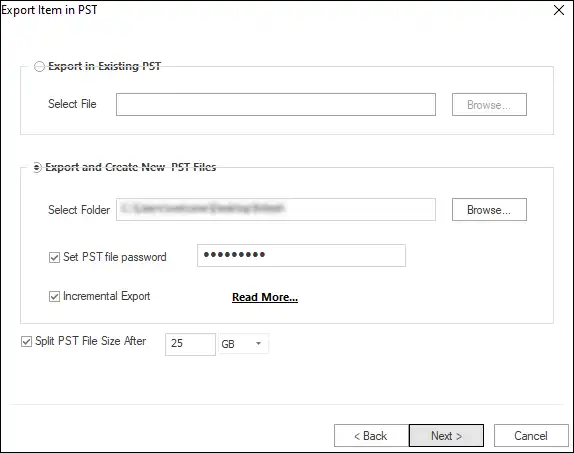
- Now browse the location to store the resultant PST file. You can also set a specific size and password for the resultant PST file.
- Apply Settings such as Password for PST and incremental Export, splitting PST.
- At last, the filter wizard pops up. You can filter out unwanted items; for other options, click the Advance option. Apply filter if needed.
- Once the process is complete, click on the Finish.

- After converting the OST file to PST, the next step is to add the PST file to Microsoft Outlook.
- Launch Microsoft Outlook on your computer. Click the File tab located in the top-left corner of the Outlook window.
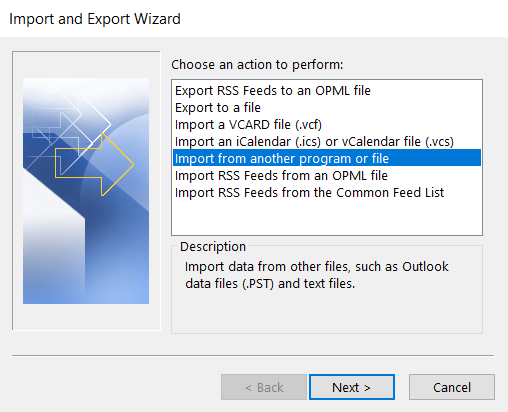
- In the File menu, select Open & Export from the left sidebar. Then click Import/Export to open the Import and Export Wizard.

- In the Import and Export Wizard, select Import from another program or file and click Next.
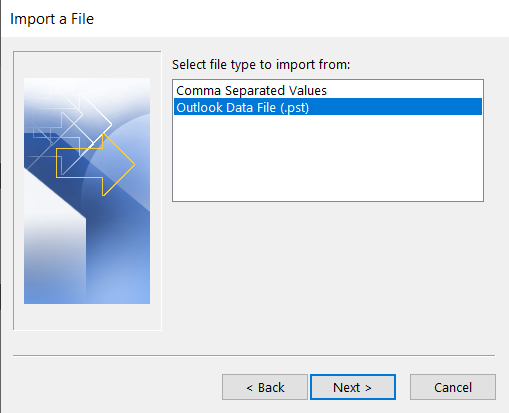
- Choose Outlook Data File (.pst) from the list of file types and click Next to continue.
- Click Browse, locate your PST file, and select it. Choose the required import options and click Finish to start importing the PST file into Outlook.
#2: Using Outlook Import/Export Wizard
- Open Outlook and navigate to the File tab.
- Now click on the Open & Export option and hit Import/Export.
- Then, select the Export to a file option in the following wizard.
- Following that, choose Outlook Data File (PST) and click.
- Select the Outlook profile or folder you want to import into PST format.
- At last, browse the folder to save the converted Exchange OST file.
Limitations: Both manual methods can help you import an OST file into Outlook. However, before using either method, ensure that your OST file is active and still connected to the Exchange Server.
#3: Using Outlook Archive Feature
It is an Outlook feature that allows you to archive old emails from OST files into PST format regularly. Pursue the following steps:
- Open Outlook and go to the File Tab.
- Click on the Options from the left pane.
- Next, select the Advanced option and click on the Auto Archive Settings…
- The following steps are to set up the auto-archive as per your need. You have to set the day count to run auto-archive. Also, you can set a count to clear old emails.
- Once done, click OK, and Outlook will automatically create an archive of your OST emails at the specified time.
- You can ensure the Archive utility’s working by navigating the location that you pick to save the PST files.
Final Verdict
Successfully importing an OST file into Outlook ultimately comes down to database accessibility. If your OST remains actively bound to its original Exchange or Microsoft 365 server, native features like the Import/Export wizard will adequately handle the extraction.
However, the vast majority of import scenarios involve an orphaned file where the original RPC over HTTP profile key is lost. Attempting to force manual methods on these encrypted caches will only result in MAPI errors and wasted time. To securely bypass the authentication check and restructure the binary data into a usable format, a dedicated extraction utility is mandatory.
For these disconnected databases, running the free evaluation version of the recommended software is the safest next step. It allows you to scan the orphaned database, verify the integrity of the internal hierarchy and attachments, and safely export a clean PST file ready for immediate Outlook integration without risking local data corruption.
Frequently Asked Question
Follow the below steps:
1. Install and open the Shoviv OST Converter.
2. Add OST file >> “Export to PST option”.
3. Choose the destination path and click Export.
4. Open Outlook>File>Open & Export>Import/Export.
5. Select “Import from a file” and select newly created PST.
Yes, you can access the OST file item in Outlook 2019, but for this, you first need to convert the OST to the PST file format. You can’t directly add OST to Outlook.
I’ve already mentioned above, use Shoviv OST viewer to open & view OST file without Outlook, even the corrupted ones. You can install and use the Shoviv OST viewer for free.
Manually, it is not possible to import OST file contacts. For this, you have to opt for a professional software; it imports every bit of OST files to Outlook PST.
Yes, The Shoviv OST Converter Tool recovers corrupt OST files from all Outlook versions.
Yes, The above recommended software allows users to import OST files directly into Office 365 mailboxes, public folders, and archive mailboxes.
You can find multiple tools on the internet to import OST files into Outlook. However, Shoviv is the recommended option for a seamless process.