Convert DBX to PST using Manual or Professional way
By
Stuart | Approved By: Vivek Chaube
| Updated on: July 17, 2026 | 6 minutes of reading
Microsoft is ruling the emailing niche right from its existence. It has successfully managed to dominate the market with its remarkable products and services. Microsoft has a plethora of products but Microsoft 365 which is a cloud-based platform gaining so much popularity among the businesses. There are two more famous email clients provided by Microsoft are Outlook Express and Microsoft Outlook. Both are email clients, but with different features, functions, and even file formats.
Outlook Express, a discontinued service, now uses the DBX file format where Microsoft Outlook is a popular email client among desktop users and uses the PST file format. However, many users still use the Outlook Express and their data stored in DBX file format.
If you are one of them and looking to convert DBX to PST, Read the blog to the end. We have described the apt solution for troubled users.
There are several reasons that few of them are listed below:
Several advanced features like calendar, journal, task, etc. are accessible in the MS Outlook which Outlook Express failed to provide.
DBX file is not supported by Outlook that the reason you need to convert DBX to PST format to make it accessible
In MS Outlook you can filter both incoming/outgoing email messages where Outlook Express can only filter the incoming messages.
Outlook express is used on an individual level while Outlook is used on a global scale.
How to Convert DBX to PST Manually?
Two methods are available to convert DBX to PST. Though, it relies on which email clients are installed on the system. Hence there are two scenarios; we will discuss both of them in this post.
Outlook Express & Outlook installed on the same Windows Device
Follow the underneath steps to implement:
Open the MS Outlook application
Now go to the File option there you will see several options available including Import and Export
Press the ‘Import and Export’ tab
Now the Import and Export Wizard window will open
In the ‘Import and Export Wizard’, choose the Import Internet Mail and address option and hit on the Next
Next, select Outlook Express to accomplish the steps. Now, open the Outlook Import Tool
From the Outlook Import Tool screen, pick the ‘Outlook Express 4.x, 5.x, 6.x or Windows Mail’ Check the Import-Mailbox, and hit the Next tab
When the emails in Outlook Express are moved to MS Outlook for Windows, a message will pop up displaying the completion of the conversion process
The Outlook Express DBX file data are now moved to Microsoft Outlook PST file
After completing the process, you can access your Outlook Express data in the Windows Outlook.
Outlook Express & Outlook installed on different Windows Device
This process can be divided into two sections:
Import Outlook DBX file into Windows Live Mail
Export from Windows Live Mail to Outlook PST
Follow the underneath section carefully:
Important Note: This process required two programs that are Windows Live Mail and Office Outlook. Similarly, this method works properly if the DBX files hold matching Folders.dbx files.
Install Windows Live Mail on your device.
Instead, you can press the Alt and F keys instantaneously to open the File menu
Hit on the Import Messages tab existing in the File menu
Now, the Windows Live Mail Import window will come up. You need to pick a program and then browse.
Pick Microsoft Outlook Express and tap on the Next tab
look for the folder that holds the DBX file and hit on the Next tab
The DBX file of Outlook Express will be moved into Windows Live Mail
After the DBX file is imported in WLM, it can be simply converted to Outlook PST format with the use of the ‘Export Messages’ option in Windows Live Mail.
Now pick the File in WLM, head to Export email tab option and tab on Email messages
A dialogue box will pop up where you need to choose the format you want to export the emails to, like Microsoft Exchange, Microsoft Windows Live Mail, and hit on the Next tab
Now, the ‘Export Messages’ box will pop up, select the mail folders you want to export from Windows Live Mail.
Two options are available here:
All Folder – If this option is checked, all the available folders will be selected automatically
Selected Folder – If this option is checked, a list of folders will seem like Inbox, Outbox, Drafts, etc. to choose one or more folders
Pick any one of the two options and hit on the OK tab:
This will be the last step to export all or selected folders from Windows Live Mail to Outlook PST. The conversion process will start automatically after hitting OK. Lastly, a message stating that the emails have been successfully exported will appear.
As you can see the process is very lengthy and time-consuming, also you need to be technically sound to perform the conversion task manually. Hence, there is another method that makes easy way to convert DBX to PST and that is using Shoviv DBX to PST Converter tool.
Convert DBX Files to PST Using Professional Tool
There are several applications available on the internet to convert DBX to PST files. But, the Shoviv tool is recommended even by the experts. The design of this utility is user-friendly which makes the conversion task a cakewalk process. Also, it supports Outlook 2019, 2016, 2013, 2010, 2007 & 2003. Even non-technical users can run this tool to convert DBX files to PST.
Impressive Features of Professional Tool
Convert DBX emails data into several file formats. e.g. EML and MSG.
Easy to use and benign application to export DBX data to PST.
Effortlessly convert DBX to PST of any file size
Support all Windows Versions including Win 10 (32-bit & 64-bit)
Facilitates converting to both Unicode and ANSI PSTs.
Maintains Data integrity.
It provides the Demo version to evaluate the strength of the tool.
Simple Steps to Convert DBX to PST using Shoviv Software:
Install and launch the tool.
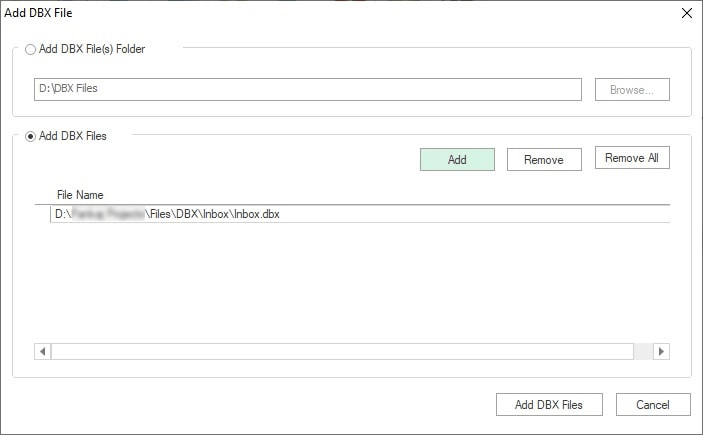
“Add DBX File” windows will open, add DBX files using Browse, Add, and Remove, Remove all buttons.
After adding .dbx files, click on “Add DBX Files” button.
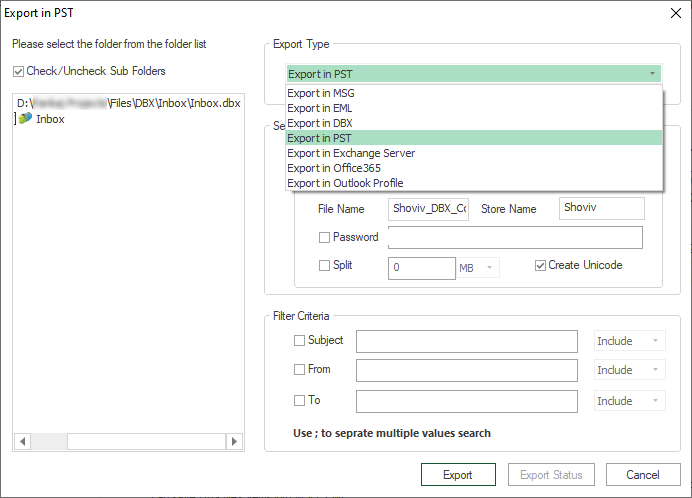
Now will be prompted to “Export in PST” page. Here check the sub folders; select “Export in PST” as Export Type.
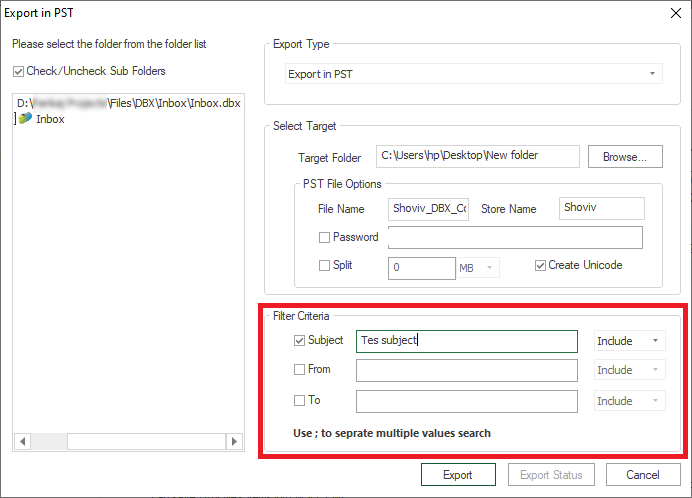
Options for resultant PSTs are also given, you can set password, size, and type of PSTs. Filter option is also given. Set the criteria as per the need and click on “Export” button.
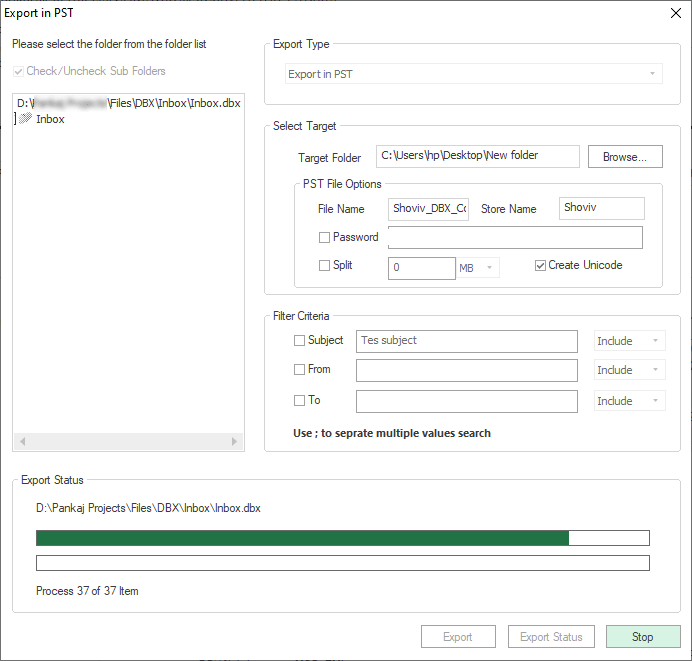
With clicking the “Export” button, DBX files will export to Outlook PST. Export Status will be displayed.
Stuart Clark is working as a technical content writer at Shoviv Software for the last 9 years. He specializes in crafting informative and engaging articles for diverse audiences. With a solid understanding of complex technologies, he explains complex concepts in a simpler manner that Leyman users can also understand easily. He has vast expertise in writing articles related to email and cloud niches. Apart from that, he likes to research newer technologies and gain knowledge to stay updated with the current trends.