G Suite or Google Workspace has numerous users all over the globe. Google Workspace services having a strong user base are Email services AKA Gmail, Calendar and Contacts, etc. With the passing time with technology, various needs arise, and users search for fulfillment.
A very common is to export Google Workspace to Outlook PST. Searching for an effortless way to export G Suite email to PST is a common trend on the web. We will know all about G suite export into Outlook PST files. Also, we will explore all the aspects related to this task in this blog.
Some Common Reasons to Export G Suite Emails to PST File:
- Being Outlook’s data storage file format, they are easily accessible. PSTs are also easy to port.
- The password protection facility of .pst files makes it a safe choice; it becomes users’ first preference.
- The decision of having a backup in the local system always favours users in unexpected bad times.
Ways to Export G Suite Email to Outlook PST:
Finding a way to export Google Workspace into Outlook PST is an obvious task. Users always search for a simple and effective method. Here, we will discuss a manual and a professional third-party tool. Firstly, let’s know about available manual methods and their effectiveness.
Export G Suite email to PST using Shoviv G Suite Backup & Restore Tool.
Manual Way: Export G Suite Email to PST File Using Outlook
In this way, firstly, we have to enable IMAP in the G Suite account, and after enabling the G Suite account, you have to add IMAP enabled account to Outlook. In the end, execute the export of G Suite emails to PST.
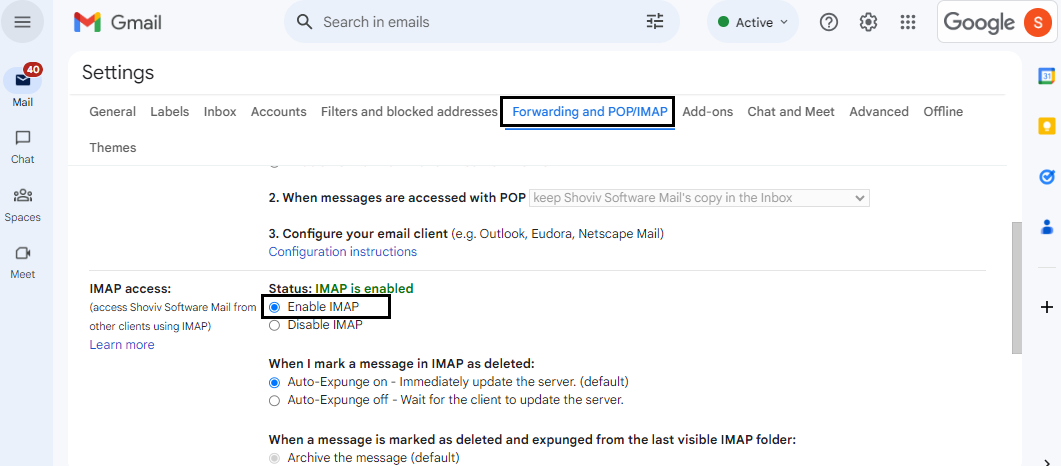
Phase 1: Enable IMAP in Google Workspace /G Suite
- First, search the Google Admin Console.
- Login using the G Suite account user id and password.
- You will be prompted to the Google Admin Console’s home page.
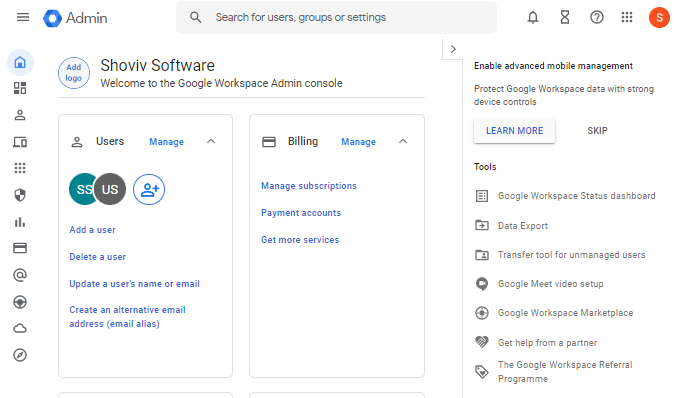
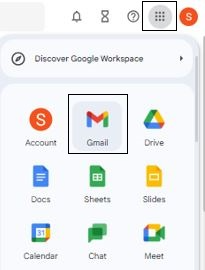
- Here, click on the Google Apps icon and go with Gmail.
- Now, click on Settings and then click on See all Settings.
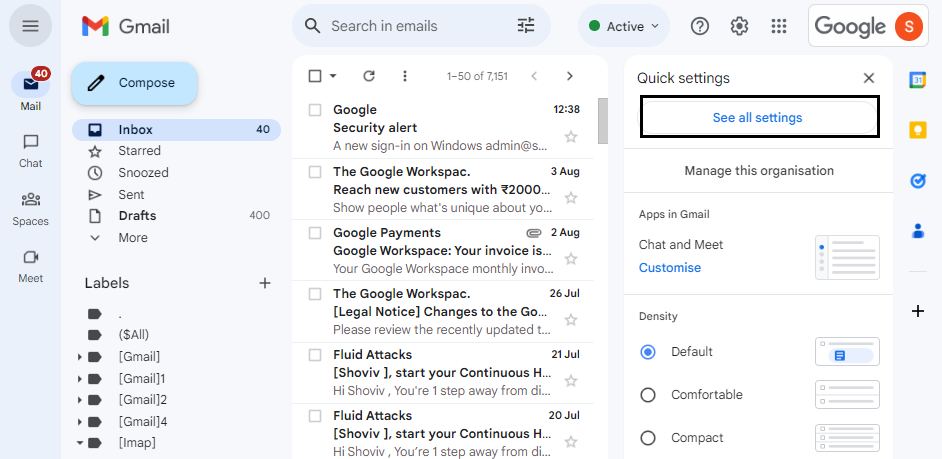
- Click the Enable IMAP radio button under the Forwarding and POP/IMAP.
- Finally, click on Save Changes.
Phase2: Add G Suite Account to Microsoft Account
- Firstly, open your Outlook and then click on the File button.
- Click on the Add Account button from the Info tab.
- Now, enter the G Suite user account IMAP enabled) and configure the account to Outlook.
Phase 3: Export Using Import/Export Feature of Outlook
- Open MS Outlook.
- Click on File > Open & Export and then Import/Export.
- Select the Export to a file option from the Import and Export Wizard. Click on the Next.
- Now go with the Outlook Data File ( .pst) and click Next.
- Make a selection of mailbox folders you want to export into .pst format.
- Finally, click on the Finish button after selecting the desired output folder.
Why Professionals Not Prefer Manual Method?
- Very tedious and time-consuming process yet has no assurance of gaining desired output.
- The chances of human error with manual methods are very high.
- Manual methods ask for technical expertise.
- While using the data export tool, you have to fulfill several pre-requisites. Domain should be at least 30 days old; it requires the permission of the super administrator.
- Users can not export specific data with the data export tool of Google Workspace; no filter facility.
Alternative Way: Professional Third-Party Tool
As manual way does not provide a satisfactory result for the need of professionals; hence a professional third-party tool becomes a necessity. Shoviv G Suite Backup and Restore comes here as a picture-perfect professional tool. It has all the features and options a user can think of. Let’s explore Shoviv G Suite Backup and Restore tool:
Prominent Features of Shoviv G Suite Backup and Restore:
- It allows exporting G Suite email to PST without restriction on the number and size.
- Along with backup, the software also offers a restore option. Users can restore emails from .pst files to G Suite.
- The graphical user interface of the software is very user-friendly. It does not ask for any technical expertise in executing the task.
- An advanced feature called incremental backup is also present within the software. This feature comes very handy if the backup or restoring process interrupts due to a network issue or some other issue; it resumes.
- Users also get rid of duplicity. The software prevents the export of duplicate items.
- Users can also set the size limit for the resultant .pst files.
- The software also facilitates scheduling. Users can schedule the backup simply as we schedule an alarm in the clock.
- The software runs on a job-based backup process; no need to make connections time and again.
- A filter option is also present that allows processing the only required items.
- A free trial version of the software is also available. The free trial version allows evaluating the software before making any purchase.
Steps to Export Mailboxes from G suite to PST are:
- Install & Run G Suite Backup & Restore tool.
- Connect with G Suite and Create Backup Directory.
- Select Backup type as PST & Apply filter if needed.
- Use the Thread count and PST Split option.
- Check Run Job Instantly box and Process will start.
Details Process to Export G Suite Mailbox into PST
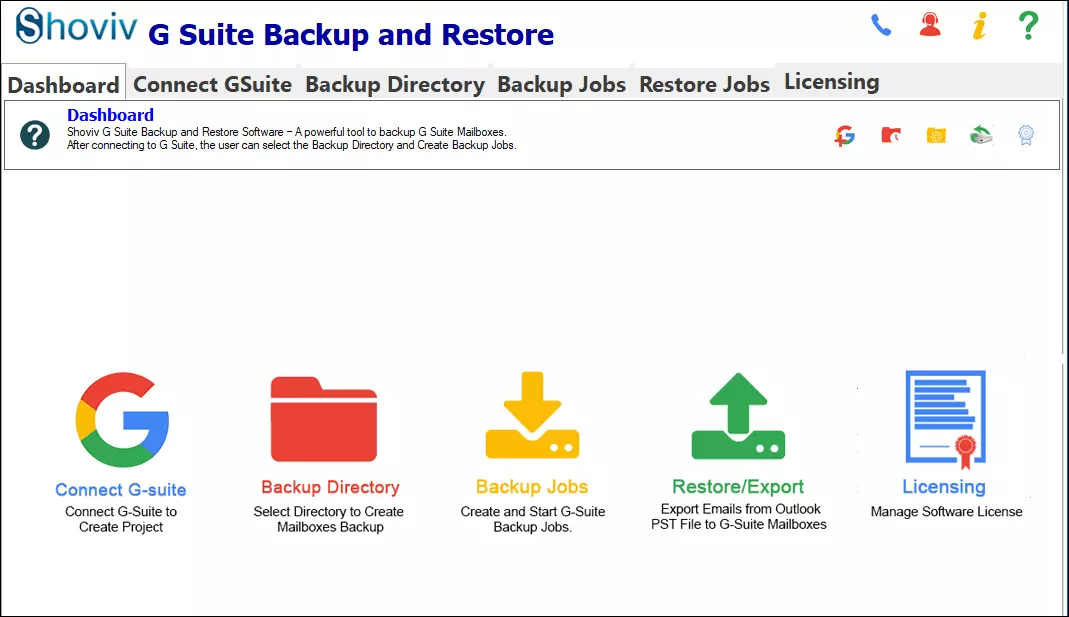
- Install and open the Shoviv G Suite Backup and Restore tool.
- On the dashboard, click on the Connect G Suite to create a connection between the software and G Suite’s mailboxes.

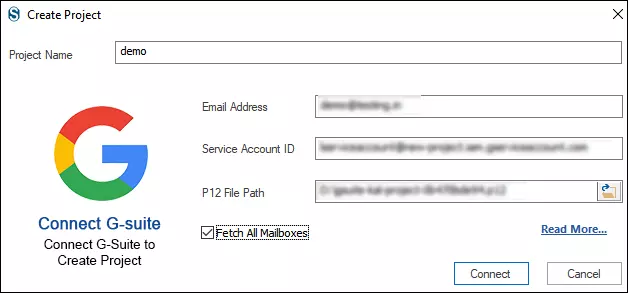
- Provide the asked details: Project Name, email address, and the service account Id and path to the P12 file. Enter the administrator email address to backup all mailboxes by checking the Get All Mailboxes. Now click on Connect.

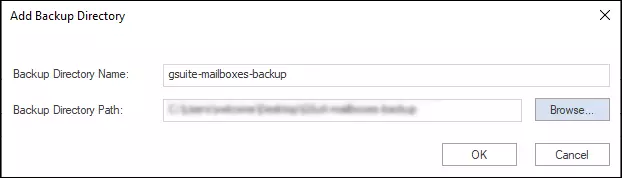
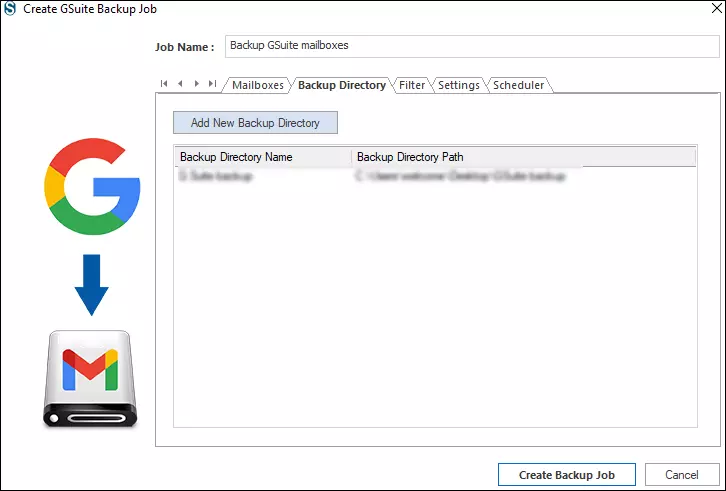
- Now click on the Backup Directory and provide Backup Directory Name and Backup Directory Path to add a backup directory. Click on the Ok. Your exported data will get saved in the backup directory.

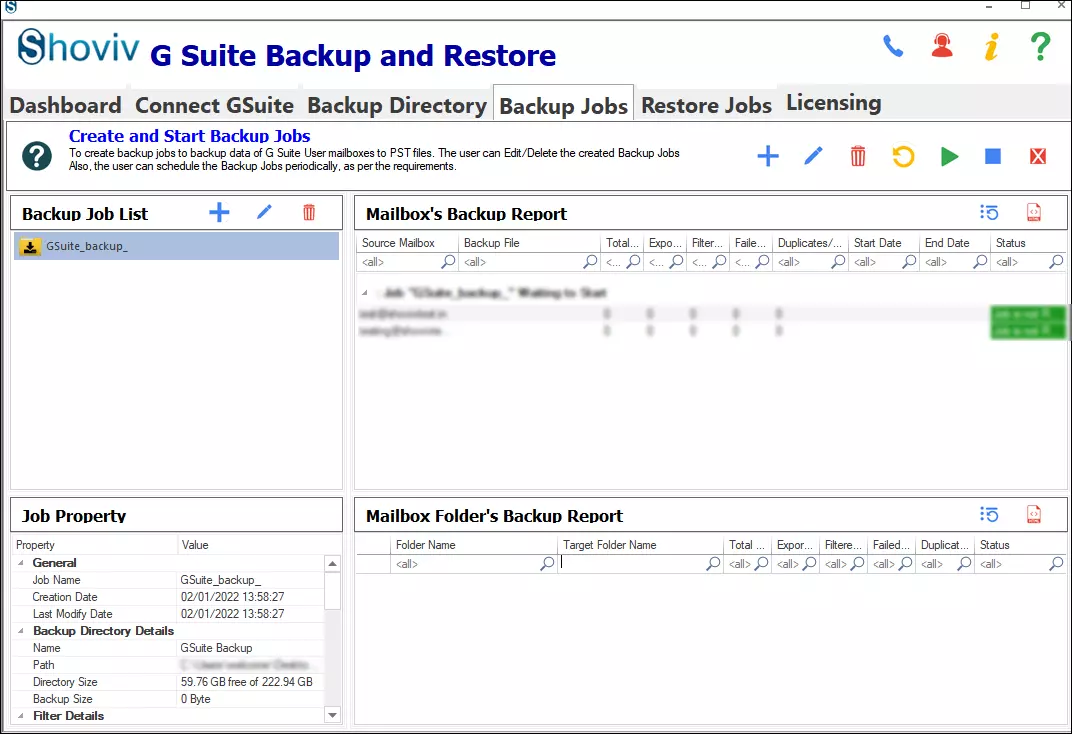
- Select the Backup Jobs tab option from the ribbon bar or the dashboard. Click on the create job option. Give a Job Name, Add the G Suite Project and check the mailboxes you want to export.

- Now, by clicking on the Backup Directory, you can either add a new backup directory or continue with the already added one.


Look for Features to Enhance the Process:
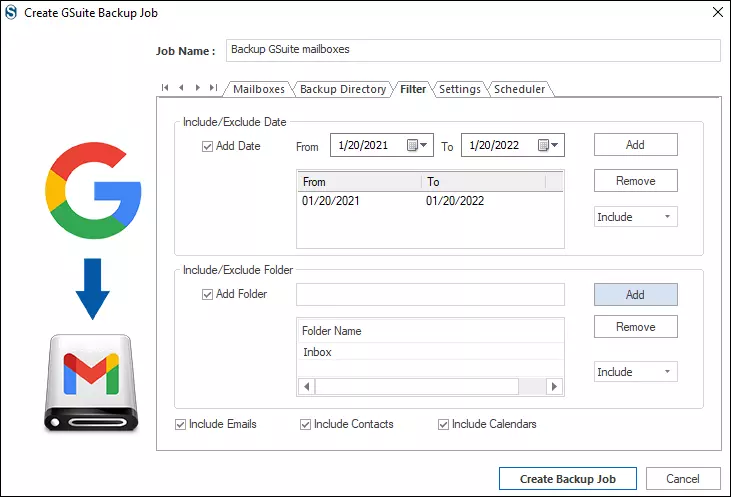
- By clicking on the Filter tab, you can apply the filter using the three given options. Here, you can either include/exclude a date range; folder and emails, contacts, and calendars. Apply filter as per your requirement.

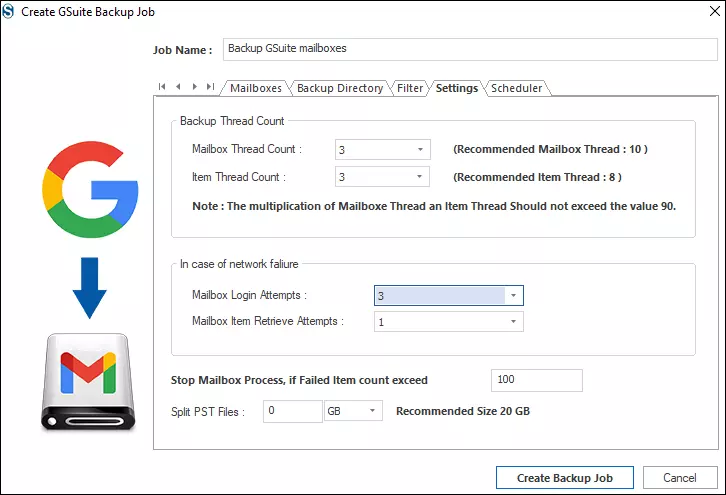
- By exploring the Settings tab, you can easily set the settings for your task. You can set mailbox and item thread count, mailbox login, and item retrieve attempts in case of network failure. Also, you can set an upper limit for failed item count, after which the process will stop. By providing a size limit next to Split PST Files option, you can set the size for the resultant .pst files.

- Now you will encounter two options: Run Job Manually and Job Schedule. With Run Job Manually, you can execute backup tasks any time from the dashboard and check Start Immediately After Creating Job will run the job just after creating a backup job.

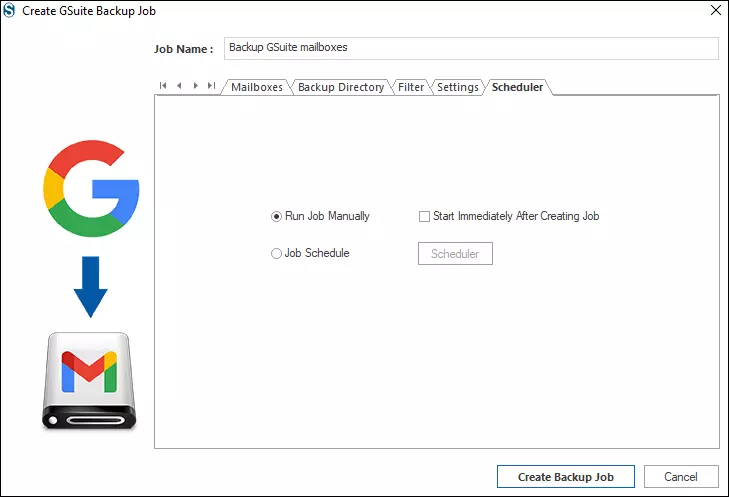
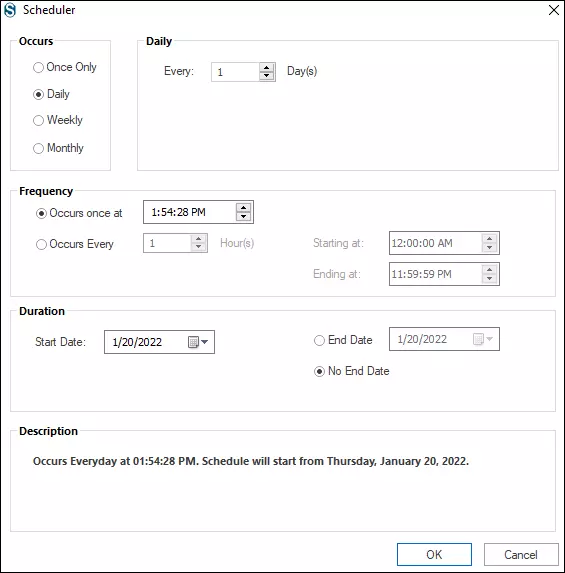
- With Scheduler, you can schedule the backup process using the Once Only, Daily, Weekly, Monthly options. You can also control the frequency and duration for this.

- Finally, click on the Create Backup Job button, and the actual G Suite emails to PST export will start now. You will get a complete report of the process.

Wrapping up:
There are two choices to export G Suite email to PST: going with a manual method or choosing a professional third-party tool. Manual methods come free of cost but are not free from restrictions and demerits. They are very time-consuming and technically complicated.
On the other hand, the professional Shoviv G Suite Backup and Restore tool offers a simple and effective process. It offers various user-centric features and delivers perfect results without any effort. A free demo version of the software is also available to download.


Frequently Asked Questions
A. Yes, G Suite Backup and Restore tool is also an expert in exporting calendars and contacts from G Suite to PST.
A. To experience the working of the tool, you can easily download the tool from Shoviv’s website and use it after installing. The free trial allows processing only the first fifty items per folder.
A. Yes, it is possible. You can set the size for the resultant .pst files, and the software will automatically split them on reaching the size limit.
A. Yes, this tool exports Google Workspace mailbox to EML, MBOX, MSG, and other file formats.
A. Yes, you will get lifetime technical support with Shoviv G Suite Backup and Restore. You can reach our technical support team via the live chat option or by writing an email at support@www.shoviv.com. A toll-free number is also given on the website for telephonic assistance.