If you are planning to Migrate Exchange Server to Office 365, then it is good to know some pre-migration tasks. These steps will help you smoothly migrate the Exchange server to Office 365 without trouble. Let’s know about the Office 365 migration steps:
Office 365 Migration Steps: Know Your Current Environment:
To migrate safely, have accurate information about your current environment. You must have the information on the given points:
- Details of exchange user accounts (user name and email address).
- Details of Exchange mailboxes and their sizes (Shared mailboxes, Archive Mailboxes, etc.)
- Be aware of Intranet sites, instant messaging systems, file storage locations, and online meetings.
- You must have information about your existing network settings.
- You should be aware of the client machine versions and configurations (Browser, OS, MS Office application)
Check Potential Blockers:
- Many factors such as Active directory parameters, network settings, hardware requirements, etcetera features of Exchange Server infrastructure can play an important role during Migration. So, it is good to manage them efficiently.
- Prepare active directory accounts, directory objects, attribute values, have the UPN name of the accounts at Office 365. Equate the Active directory DS UPN with the Office 365 UPN.
- Try to estimate your network’s bandwidth and check the possibilities if it can carry extensive data to Office 365.
Set up Office 365 Account:
Before commencing the Migration process, you must have an active Office 365 account. Below are the basic steps to create an Office 365 account:
Sign up and go for the Premium Pack:
- Go to the Microsoft product site and select the Office 365 plan that per your needs.
- Follow the given steps and add a domain and a new user.
Install MS Office:
- Go to the Admin Portal of Office 365 and click on “Go to Setup.”
- Go with “Get Started” under “Install your Office apps.”
- Now, choose “Install now” under “Microsoft Office Professional Plus.”
- Click Install.
Set up Outlook:
- Set up the Outlook account by following File>Info>Add Account.
- Provide the Office 365 credentials and click
Go with the Recommended Office 365 Migration Methods:
After managing all the Pre-migration tasks, now you are ready for the Migration. There are many methods to migrate Exchange Server to Office 365. We have the Cutover Migration method for small migrations. For the older versions like Exchange 2003, we have Staged Migration and the Hybrid Migration when you wish to keep both Exchange and Office 365. As well as there are professional and multi-tasking Office 365 migration services and automated tools for the ease of the process.
Recommended for Everyone (Tech-savvy to Beginners)
Many vendors on the internet provide Office 365 migration services, but they charge a lot and take time. We suggest you choose Shoviv Exchange Server Suite to fully control the migration process.
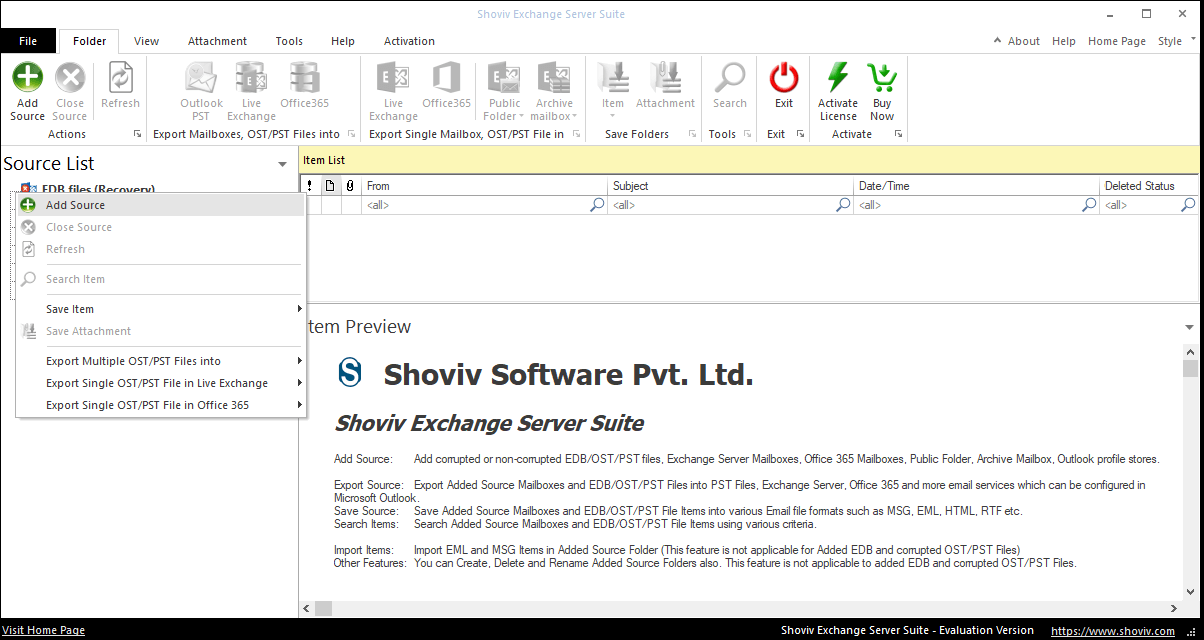
Shoviv Exchange Server Suite is an automated tool developed by professionals. The main motto of coding this tool is to automate and ease the Exchange Server to Office 365 migration process. The tool is embedded with multiple advanced features that effectively enhance the migration process and enable users to get desired results. We’ll talk about the features later; first, I’ll show you its simple process.
How to migrate Office 365 from Exchange Server?
Install and open this professional suggested tool, add Exchange Server mailboxes as a source, and click the Office 365 option for Office 365 migration. Then map the source and target mailboxes to continue the process. Next, use the filter and other advanced options.
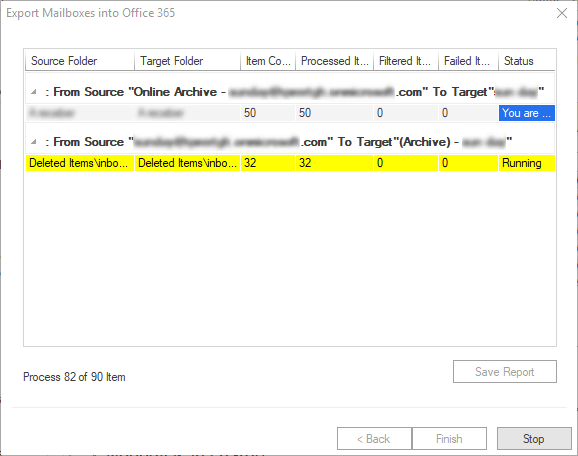
That’s it, and the software will start Exchange to Office 365 migration and displays a live log report. Let me make it simpler for you.
Exchange to Office 365 steps described
- Start with installing and launching this professional suggested software in your system.

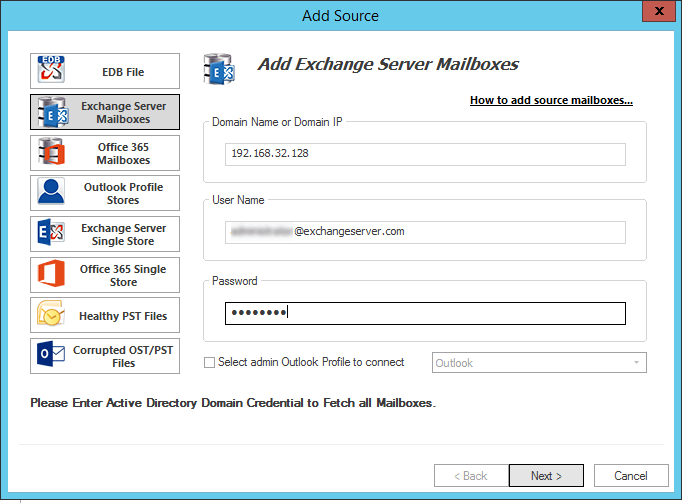
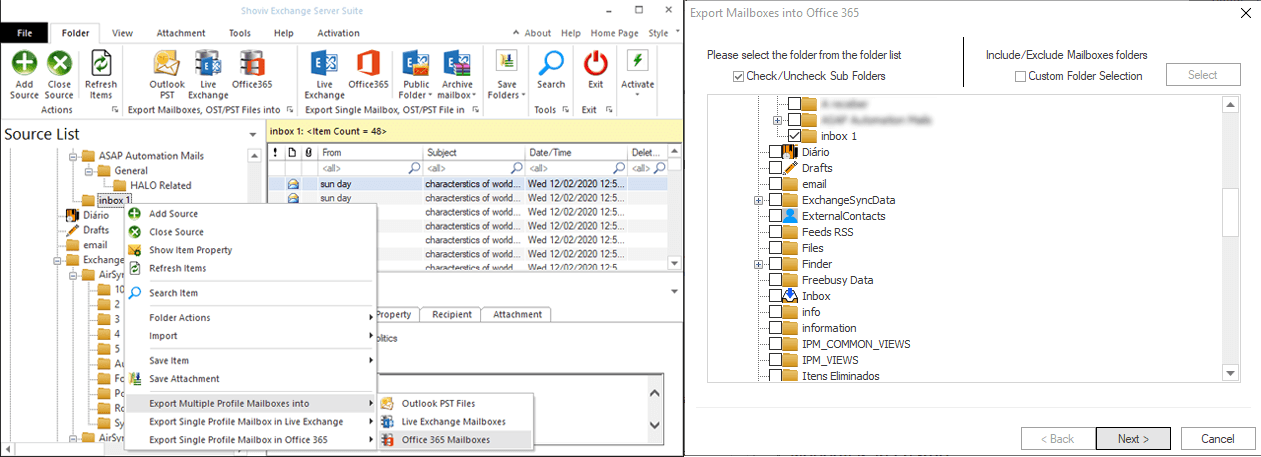
- Secondly, click on the Add Source option from the ribbon bar and choose Exchange Server mailboxes as a source. Then, provide the Exchange Server admin credentials.

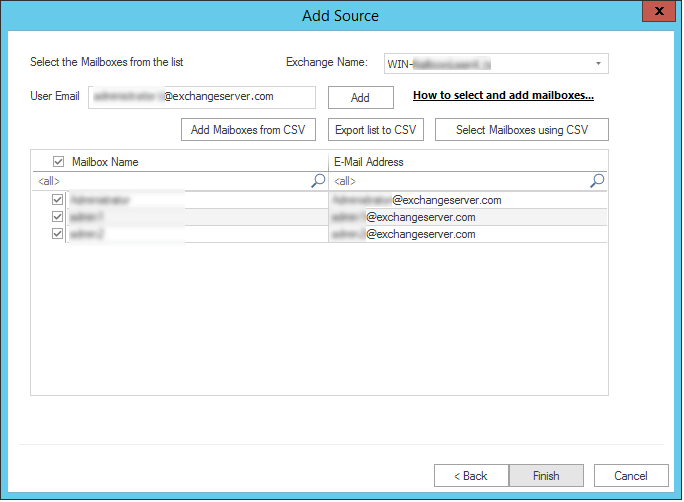
- Next, select the Exchange Server mailboxes you want to migrate into Office 365 and click on the Next button.

- Now click on the Office 365 option from the ribbon bar, check/uncheck Exchange mailboxes’ folders/subfolders, and click Next.

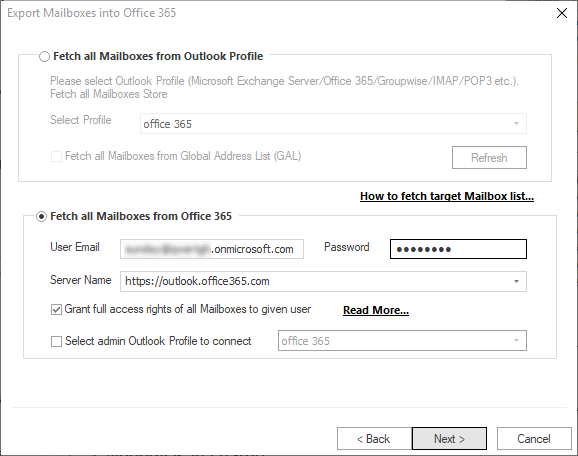
- In the next wizard, provide Office 365 administrator credentials who have delegate rights of other mailboxes.

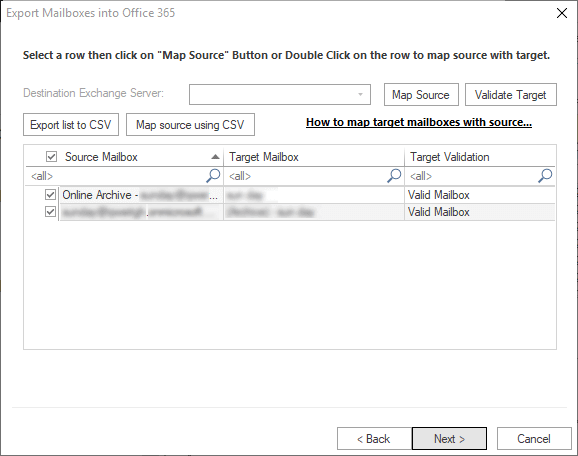
- Now the software will fetch all your Office 365 mailboxes, and you can map them with Exchange Server mailboxes, respectively. One can also check whether the source and target mailboxes are valid or not.
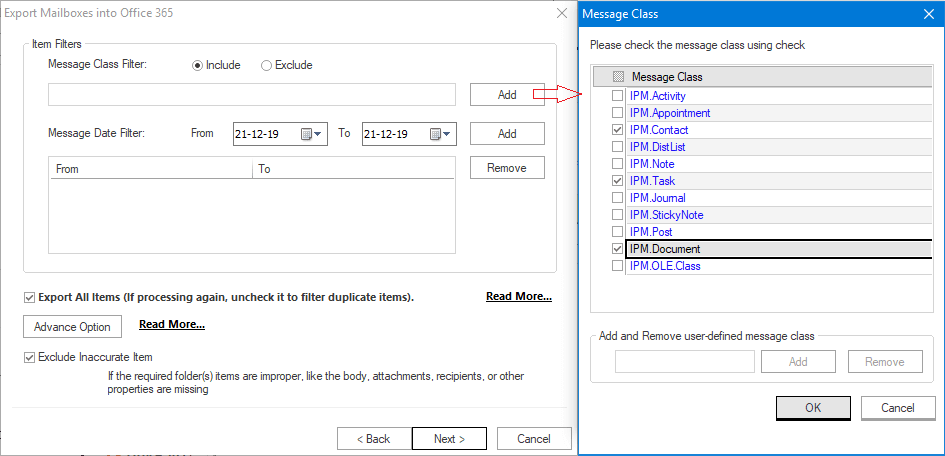
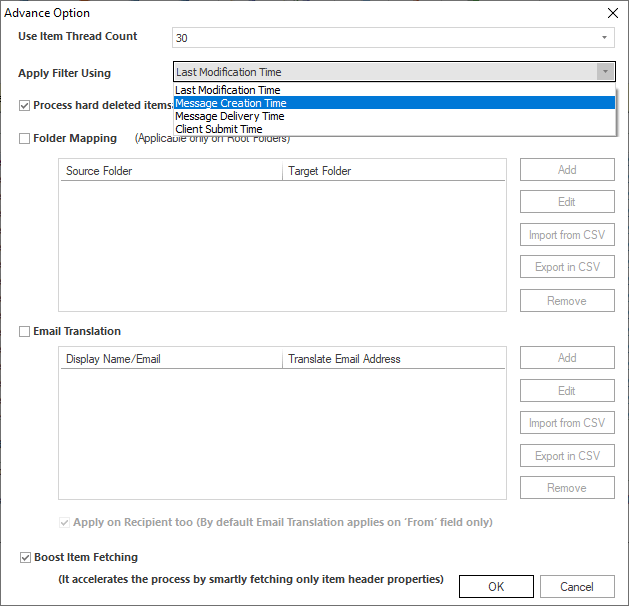
- Following will be the filter wizard. You can use the filter option to get rid of unwanted items on the date range and message class basis.

- Advanced options such as email translation and folder mapping features are also available. You can use them to replace canonical email addresses and export data across folders.

- Once you are done with all steps, click OK and click Next. The software will start the Exchange to Office 365 migration process and display a live log report.
Why Shoviv Exchange Server Suite is a secure and professional recommendation?
- Shoviv Exchange Server Suite is an automated tool that can effectively work in the background, making users multi-task during the migration process.
- With this tool, you remove 90% of the manual process and 100% risk of data loss. Also, Shoviv Exchange Server Suite will be installed in your environment, and you do not need to share your credentials with anyone.
- You can buy the perpetual license of the tool and utilize it whenever you need it in the future. The best thing is you’ll not be charged to upgrade the software to the latest version.
- It is a multi-tasking tool, and you can also utilize it to migrate Office 365 cloud data into PST file format to store them on a local drive. You may need this in the future as Office 365 doesn’t store data in a local drive.
The Bottom Line:
By performing all the Office 365 migration steps, you may be quite ready for the Office 365 migration. But going with the manual method will be a lengthy and time-consuming process. Any minor mistake can lead to failure. To migrate Exchange to Office 365 professionally and safely, a handy tool, Shoviv Exchange Server Suite, is the best solution. It has many user-centric features and provides numerous benefits to users, such as adding multiple mailboxes as a source, Filter options, mailbox mapping options, etcetera.