Microsoft Outlook does not natively support the MBOX file format. To import MBOX files into Outlook, you must first convert the MBOX data into a Personal Storage Table (PST) file format, which is the native file format for Outlook. After converting mbox file you can easily import it into your Outlook Mail.
To successfully import your emails data into Outlook, you can choose between two primary methods:
- Manual Method: Involves using intermediary email clients (like Thunderbird or Gmail) to export the data. This is often time-consuming, requires high technical expertise, and carries a significant risk of data loss or folder structure corruption.
- Automated Method: The most reliable way to import MBOX files is by using a professional MBOX to PST Converter tool. This method ensures the integrity of your email properties, folder hierarchy, and attachments are preserved while saving time.
#1: Import MBOX to Outlook Via Gmail and Thunderbird
To import MBOX files into Outlook using the IMAP Method, you will use Mozilla Thunderbird (a free email client that natively reads MBOX files) and a Gmail account (or any other IMAP-enabled mail service) as a digital bridge.
Because Microsoft Outlook does not support the MBOX format, the emails are uploaded from Thunderbird to your IMAP server, which then automatically syncs them down into Outlook.
Follow this complete, step-by-step blueprint to execute the migration safely without losing data.
Phase 1: Enable IMAP in Your Gmail Account
Before starting, you must ensure your bridge account allows IMAP connections.
- Log into your Gmail account via your web browser.
- Click the Gear icon (Settings) in the top right corner and select See all settings.
- Navigate to the Forwarding and POP/IMAP tab.
- Scroll down to the IMAP access section and select Enable IMAP.
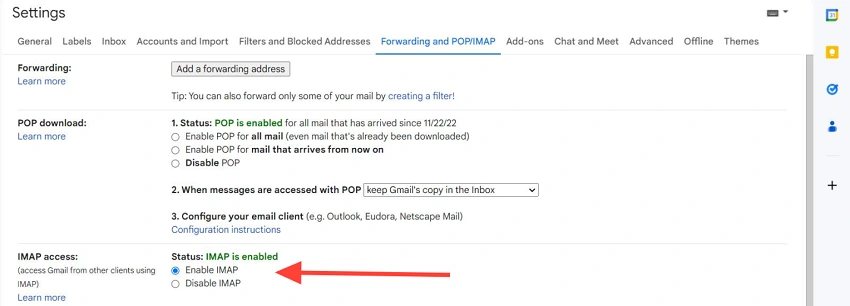
- Click Save Changes at the bottom of the page.
Note: If you have 2-Step Verification enabled on Google (highly recommended), you will need to generate an App Password from your Google Account Security settings to log into Thunderbird and Outlook later.
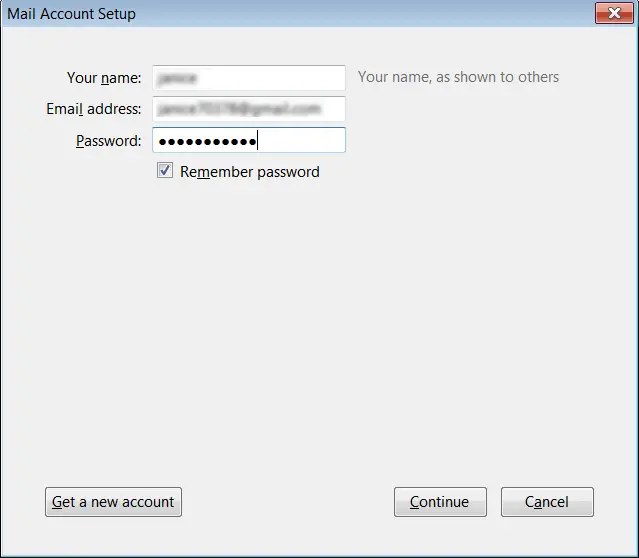
Phase 2: Install and Configure Thunderbird
- Download, install, and open Mozilla Thunderbird on your computer.
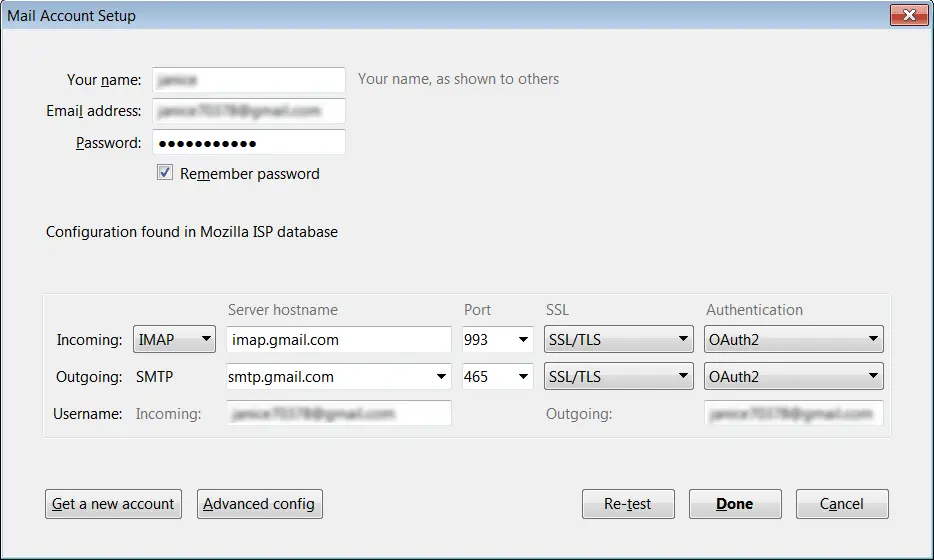
- Upon opening, you will be prompted to set up an account. Enter your name, your Gmail address, and your password (or App Password).
- Thunderbird will automatically detect the IMAP settings. Click Done to log in. Your Gmail mailboxes will now sync to the left panel.
Phase 3: Import MBOX Files into Thunderbird
Because modern versions of Thunderbird store mail differently, you will need a reliable free extension to handle raw MBOX files.
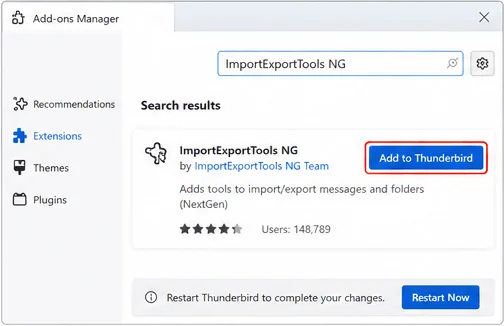
- In Thunderbird, click the Menu button (three horizontal lines) in the top right and select Add-ons and Themes.
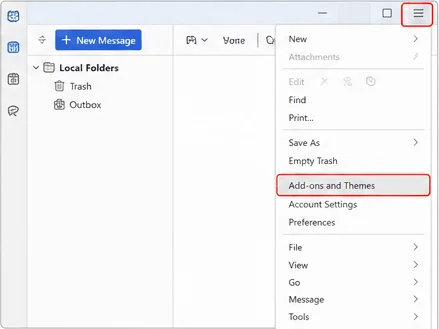
- In the search bar, look for ImportExportTools NG and click Add to Thunderbird. Restart Thunderbird when prompted.
- In the left-hand folder pane of Thunderbird, right-click on Local Folders.
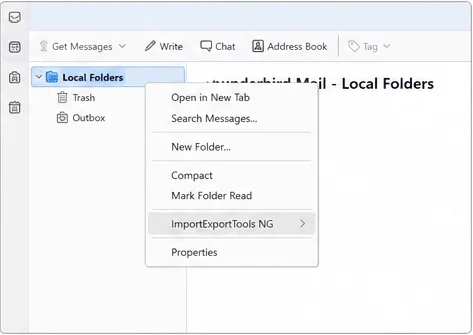
- Hover over ImportExportTools NG >> select Import MBOX file.
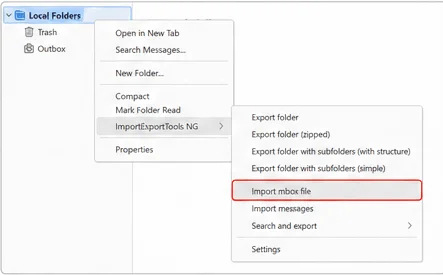
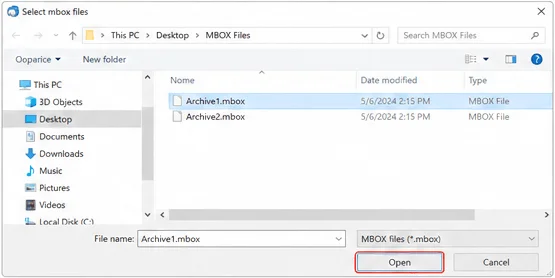
- A dialog box will appear. Select Import one or more mbox files directly and click OK.
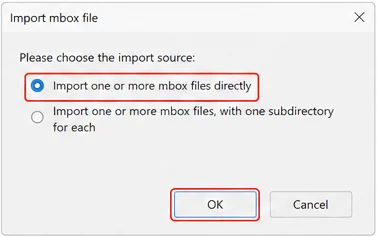
- Browse your computer, select the MBOX file(s) you wish to import, and click Open.
- An exact copy of your MBOX folder will now appear underneath your Local Folders tab in Thunderbird. You can open it to verify that your emails and attachments are readable.

Phase 4: Sync MBOX Emails to the IMAP Server
Now you will bridge the gap by moving local data up to the cloud server.
- Under Local Folders, open the newly imported MBOX folder.
- Select the emails you want to transfer. (Press
Ctrl + Aon Windows orCmd + Aon Mac to select all emails inside that folder). - Right-click on the highlighted emails, hover over Copy To, select your Gmail Account, and choose a target folder (such as Inbox or a custom folder you created).
- Wait for the upload to finish. Look at the bottom status bar in Thunderbird. It will show a progress bar syncing the messages. Do not close Thunderbird until this process hits 100%.
Phase 5: Connect and Sync the IMAP Account to Outlook
With your emails now sitting securely on the IMAP server, your final step is to fetch them using Microsoft Outlook.
- Launch Microsoft Outlook on your desktop.
- Go to the File menu in the top left corner >> click Add Account.
- Type in the exact same Gmail email address you used in Phase 2 and click Connect.
- Enter your password (or your App Password) and click Sign In.
- Outlook will automatically configure the server settings and add your email profile. Click Done.
- In your Outlook folder tree on the left, expand your Gmail mailbox. Outlook will begin communicating with the server. Give it a few minutes to complete the send/receive loop, and your imported MBOX emails will populate perfectly within your Outlook client.
Critical Disadvantages & Risks of the IMAP Method
While this method is completely free, professional IT migrators usually avoid it due to several technical bottlenecks:
- The 2GB Bandwidth Cap (Server Lockouts) – Google IMAP servers enforce strict daily upload bandwidth limits (usually around 2GB to 2.5GB per day). If your MBOX file is large (e.g., 10GB), Google will trigger a
"Bandwidth limit exceeded"or"IMAP server temporary lockout"error. Your migration will pause for up to 24 hours, and half-synced data can corruption-loop. - Loss of Metadata and Read/Unread States – Bulk-copying data across an IMAP bridge frequently resets the original email metadata. “Unread” statuses may shift to “Read,” and the “Date Modified” fields sometimes overwrite to the current time of upload, entirely ruining your chronological archive searchability.
- Attachment Failures – Email servers generally reject attachments larger than 25MB over IMAP. If your MBOX file has old, large corporate attachments, those specific emails will silently fail to sync, leaving you with incomplete mail boxes.
- Folder Hierarchy Flattening – If your MBOX backup has multiple layers of nested folders, IMAP often fails to map them correctly, collapsing them into flat labels or a single disorganized folder.
#2: Import MBOX to Outlook Via Dra and Drop method
The Drag and Drop Method is another free workaround used to move messages from an MBOX-supported client (like Thunderbird) into Microsoft Outlook.
Instead of routing data through a cloud server like the IMAP method, this approach converts the emails locally on your computer into individual .eml files, which are then dragged directly into your Outlook folders.
Follow this complete step-by-step procedure to execute the process, along with the critical structural warnings you need to know before starting.
Phase 1: Convert MBOX Emails to EML Format
Microsoft Outlook cannot read raw MBOX data, but it can open individual .eml files. This phase extracts the emails into that format.
- On your computer’s desktop (or in your Documents folder), right-click in an empty space, select New >> Folder, and name it “Converted Mail”.
- Go back to Thunderbird and click on your imported MBOX folder to open it.
- Select all the emails you wish to export. (Press
Ctrl + Aon Windows orCmd + Aon Mac). - Drag and Drop Execution: Click and hold your left mouse button on the highlighted emails inside Thunderbird, drag your cursor out of the Thunderbird window, and drop them directly into your newly created “Converted Mail” folder on your desktop.
- Alternative method if dragging fails: Right-click the selected emails >> select Save As… >> browse to your desktop folder $\rightarrow$ click Select Folder.
- Open the desktop folder to verify that your emails now exist as hundreds or thousands of individual
.emlfiles.
Phase 2: Drag and Drop EML Files into Microsoft Outlook
The final step is moving these independent files into your actual Outlook database.
- Launch Microsoft Outlook on your desktop.
- In the left-hand folder pane, go to the email account where you want these messages stored.
- Right-click the account name (or your Inbox), select New Folder, and name it something recognizable, like “Imported Archive”. Click on this folder to open it (it will be empty).
- Resize your desktop windows so that you can see your “Converted Mail” desktop folder and your Outlook window side by side on your screen.
- Open the “Converted Mail” folder, press
Ctrl + A(orCmd + A) to select all the.emlfiles. - Click and hold the selected files, drag them over into the blank center pane of your Outlook “Imported Archive” folder, and release the mouse button.
- Outlook will immediately begin converting and importing the items into its local database profile (
.pstor.ost).
Why the Drag and Drop Method Fails in Modern Outlook
While this method seems incredibly straightforward, it contains a massive technical flaw that routinely catches users off guard.
Missing Attachments:
When you drag .eml files directly into modern versions of Microsoft Outlook, Outlook often treats those files as unresolved file attachments rather than actual email communication.
If this error triggers on your version of Outlook, you will experience the following issues:
- Unreadable Messages – Instead of seeing the sender, subject line, and date in your Outlook list, you will see a list of generic icons. Clicking an email will just open a blank message box containing the
.emlfile stuck inside it as an attachment. You have to double-click the attachment just to read the text. - Destroyed Header Metadata – The “Date Received” column will overwrite entirely. Outlook will stamp every single imported email with the exact time and date you performed the drag-and-drop action, completely erasing the historical timeline of your old mail.
- Search Blindness – Because Outlook categorizes these as attached documents rather than actual mail items, Outlook’s built-in Search bar will be unable to index the sender names or bodies of these emails, rendering your archive unsearchable.
Recommendation: Only use this method if you are moving a very small batch of messages (fewer than 50 emails) where timeline data doesn’t matter, or if you are running older legacy versions of Outlook (like 2010 or 2013) which handled direct EML parsing slightly better than modern versions.
#3: Professional Software to Import MBOX to Outlook
Therefore, this article provides a simplified automated solution to Import MBOX to Outlook known as “Shoviv MBOX to PST Converter”. This Software provides an instant solution to its users to import MBOX to Outlook 2024, 2021, 2019 and below versions within a couple of minutes.
MBOX to PST Converter is a professional tool, which holds the capacity to import MBOX mailboxes into many other formats like MSG, EML, etc. Both technical and non-technical users can easily use this software. There is no restriction in using any size of MBOX files.
Also, this converter permits users to work with all Outlook versions. Shoviv Software provides a cost-free demo version of the MBOX to PST converter so that one can easily first test the tool by importing and save the first 50 items / folders.
Steps to Importing MBOX File into Outlook
- Step 1: Run MBOX to PST Converter tool on system.
- Step 2: Browse & Add MBOX files or MBOX folder.
- Step 3: Select ‘Export in PST” from Export Option.
- Step 4: Browse & select the target path to save PST.
- Step 5: Click on Export button to start the process.
Note: Still have questions about your MBOX to Outlook migration? Our support team is available to assist you, or you can schedule a free demo to see the conversion process in action. Alternatively, follow our step-by-step guide below to import MBOX files of any size into Outlook 2024, 2021, 2019, 2016, and earlier versions.
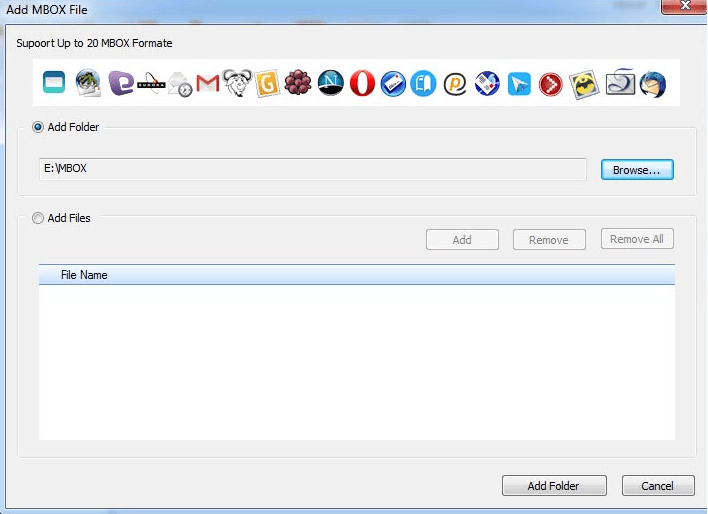
- Install and Launch the Shoviv MBOX to Outlook Converter.
- Click on the File tab. Then select add option.


Note:- One can add multiple numbers of MBOX files. Either after selecting the folder from the folder list.
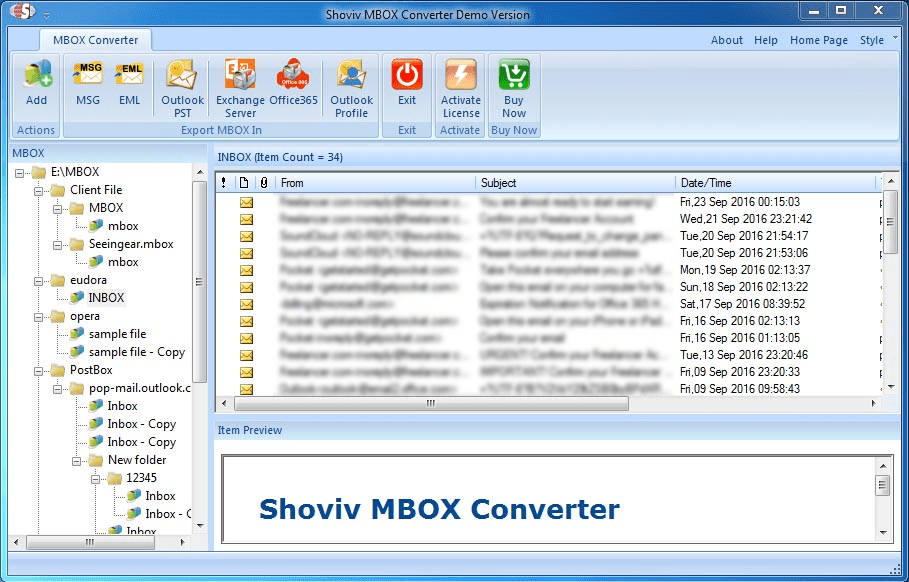
- Now, one can easily see all the information contained by the selected MBOX file/folder and then click on Outlook PST present at the ribbon bar.

- Select the Export type export in PST and to browse for the target location. Then, the users have a filter option to split the resultant PST into small PST files or either use another filter criteria to filter by including/excluding from Subject, From, To, etc. Click “Export”.

Note:-One can also set the size limit on resultant PST and additionally it provides the facility to set the password to the resultant PST.
- Here, the process gets completed successfully.

Once the MBOX file is converted to the native Outlook PST format, you can easily import it using the Import/Export feature available in both the New and Classic Outlook desktop applications.
Import PST file into Outlook
Importing a .pst file (Personal Storage Table) is a native feature in Microsoft Outlook. Because it uses Microsoft’s own file format, it does not require any third-party add-ons or workarounds.
- Use these steps if your Outlook ribbon has traditional menus like File, Home, Send / Receive.
- Launch Microsoft Outlook. In the top-left corner, click File >> select Open & Export >> click Import/Export.
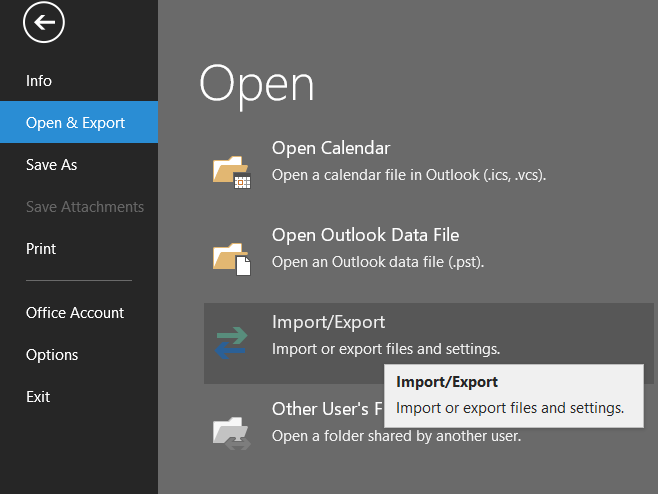
- In the wizard box that appears, select Import from another program or file from the list and click Next.
- Select Outlook Data File (.pst) and click Next.

- Click Browse and locate the
.pstfile stored on your computer. - Before clicking next, choose how you want to handle duplicate emails:
- Replace duplicates with items imported (Updates existing emails)
- Allow duplicates to be created (Safest option; captures everything)
- Do not import duplicates (Skips identical items) Click Next.
- Select the specific folder or the entire data file you want to import.
- Check the box for Include subfolders.
- Choose Import items into the current folder (or select a specific email account from the dropdown if you have multiple profiles configured). Click Finish.
Professional Use-Cases for MBOX to Outlook Migration
- Centralize Company Data – Move scattered MBOX files from Mac Mail or Eudora into one Microsoft 365 environment. This makes it much easier for your team to manage and audit all company emails in one place.
- Meet Legal & Compliance Rules – Since PST is the industry standard for legal discovery, converting your MBOX files ensures your old data is searchable in tools like Microsoft Purview for legal holds.
- Improve Database Stability – Large MBOX files can become slow or unstable as they grow. Switching to Outlook’s 64-bit architecture allows you to handle massive 50GB+ files with faster searching and better indexing.
- Better Team Workflow – Moving to Outlook lets your team use advanced features like shared calendars, task tracking, and Teams integration alongside their old emails for a smoother daily workflow.
Manual IMAP/Thunderbird vs. Professional MBOX Converter (Comparison)
| Technical Factor | Manual (IMAP / Thunderbird) Method | Professional (Shoviv MBOX to PST Converter) |
| Data Integrity | High risk of losing “Read/Unread” status and internal metadata. | 100% preservation of Email Headers, CC, BCC, and Metadata. |
| Attachment Handling | Large attachments (25MB+) often fail to sync via IMAP. | Bit-for-bit extraction of all attachments, regardless of size. |
| Folder Hierarchy | Often flattens folders or creates “Labels” instead of true folders. | Maintains original folder structure (Inbox, Sent, Custom Folders). |
| Encryption Support | Cannot handle encrypted MBOX items without manual decryption. | Automatically processes and migrates encrypted data blocks. |
| Bulk Processing | Must be done one mailbox at a time (Slow). | Supports “Batch Conversion” of multiple 50GB+ MBOX files at once. |
| Duplicate Control | No built-in way to stop duplicate emails during the move. | Advanced data-deduplication filters to keep your PST clean. |
| Technical Skill | Requires high knowledge of IMAP, SMTP, and Port settings. | “Point-and-Click” interface designed for all user levels. |
Wrapping up:
Here, from the above discussion, it is clear that lengthy, tedious, and risky manual method can not be a preferred choice of a professional. For Converting MBOX to PST, in an advanced and effortless way, Shoviv MBOX to PST Converter is a mastered utility. A free trial version of this software is also available to download that allows us to migrate the first 50 items per folder; check the working efficiency of the software.
Frequently Asked Questions:
A. No, if want to open an MBOX file directly into Outlook then, first you need to convert it into PST format. Only PST files can open in Outlook.
A. There are lots of ways to import your MBOX files into Outlook 365, some of the genuine methods include:
– Using an automated MBOX to Microsoft 365 Migrator tool.
– Or, By enabling and configuring IMAP between email clients.
A. The best Mbox to Outlook converter depends on your own choice which allows you to smoothly convert your MBOX emails into Outlook. However, comparing every tool is such a real hassle for you. We recommend trying Shoviv MBOX to PST Converter and deciding for yourself.
A. Yes, with this tool, you can preview your MBOX email data before performing the actual conversion. The free trial version allows you to test the conversion process on a small sample of emails to see the outcome before committing to the full purchase.
A. Shoviv email converter efficiently works with all Windows and Outlook versions including Windows 11 and Outlook 2024.
A. Undoubtedly Yes, Shoviv claims to maintain the original folder structure during the conversion process from MBOX to PST or other supported formats.


![How to Move Thunderbird to new computer [Emails & Profile]](https://www.shoviv.com/blog/wp-content/uploads/2021/09/How-to-Move-Thunderbird-to-a-new-computer-Emails-Profile-300x158.png)
