Export Multiple GroupWise Mailboxes in Live Exchange Mailboxes
- There are two ways to export multiple GroupWise mailboxes into Live Exchange.
- First Option : Go to the Ribbon Bar and click on the Live Exchange option under Export Multiple GroupWise Mailbox group.
- Second Option : Make a right-click on folder list >> go to Export In Live Exchange option and click on multiple GroupWise mailboxes option.

- After clicking on the Live Exchange option, a select subfolder wizard will open.
2.1 Select Sub Folder - When you check this option, clicking on any mailbox's check box will automatically select/unselect all subfolders of that particular mailbox.

2.2 Exclude Folders - This option allows to Exclude unwanted folders from the process. To exclude the desired folder, click on the Add button and select/type the folder in the Skip folder dialog box.

Once you done with Exclude folder click on the OK button.
- Now click on the Next button, and the target selection wizard will open.
3.1 Fetch all Mailboxes from Outlook Profile : Using this option, you can select configured Outlook profile to migrate GroupWise mailboxes to Live Exchange.
- Retrieve all mailboxes from Global Address List: This option will retrieve all mailboxes from address list of selected Outlook profile. (Profile must be online)

3.2 Fetch all Mailboxes from Active Directory : This option allows you to fetch mailboxes from Live Exchange account usually. For this, insert credential of admin profile of Live Exchange or the profile in which have delegate rights of other mailboxes.
- Domain: Enter the Server Name or IP address of Domain Server where your Active Directory (AD) is installed.
- User Name: Enter the Username of the user with administrative rights.
- Password: Enter the Password of the respective AD administrative user.
- Select admin outlook profile to connect: By checking this option, users can select an existing Outlook profile to fetch target mailboxes.
- Now click on the Next button, and a wizard will open with the list of GroupWise mailboxes
GroupWise Mailbox Mapping : Using this option, you can map the source mailbox with the target mailbox. For this, choose GroupWise mailbox and map it with Live Exchange mailbox by clicking on the Map source button. You can also validate the target mailbox to find out whether it exists or not.

- Map Source: To map the source mailbox with the target mailbox. Select one source from the list and click on the map button and choose the respective target.
- Validate Target: Using this button, you can validate the target to ensure whether it exists or not.
- Export list to CSV: Use this button to export the mailbox mapping list into the CSV file for later use.
- Map Source using CSV: Using this option, users can Map multiple sources with target mailboxes using CSV files. For this, create a CSV file containing the source name in one column and respective target on another column and upload it using Map source using CSV option.Demo CSV file
- Now click on the Next button, and a Filter wizard will open. There are four options in Filter Wizard.
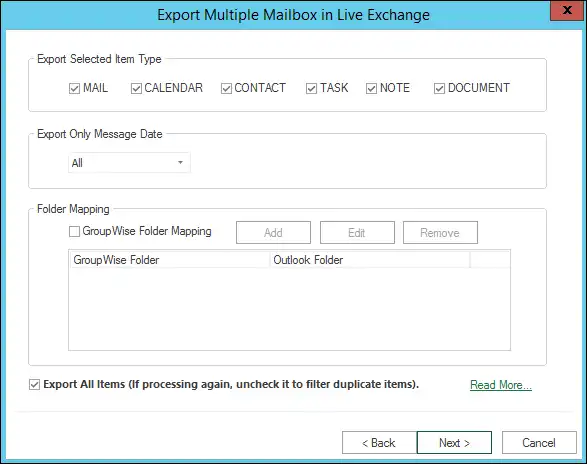
5.1 Export selected item type - Select the message class which you want to export in Outlook PST. By default, all the item types are selected
5.2 Export only message date - If you want to Message Filter according to date then select Date Filter. There are six ways to Filter date as mention below:
- Export All
- Last 7 days
- Last 30 days
- Date Equal
- Date Before
- Date After
- Date Between
5.3 GroupWise Folder Mapping - Using the folder mapping option, you can export items from one folder to another folder such as: Inbox to Outlook, Sent items to received emails.

GroupWise Folder Mapping has three buttons: Add, Edit, and Remove.
- Add : Using the Add button, you can add the folder names for mapping. For this, click on the Add button >> select the source folder from the drop-down menu, and provide the target folder name.
- Edit : By clicking the edit button, you can modify the folder's name. For this, select a row that you want to edit and click on the Edit button
- Remove : By clicking on the remove button, users can remove the folders from the mapping dialog. Select a row you want to remove and then click on the remove button.
5.4 Export All Items: This option comes in handy to prevent duplicity and resume the process; if it gets interrupted. In case you choose a different target folder or perform folder mapping differently, the software will not be able to prevent duplicity and export all items again. Read More..
- Now click on the Next button, and a Status wizard will open.
The Status wizard shows a live log report keeping Target Folder, Item Count, Filtered Items, Process Item, and status in this report.

6.1 Cancel - Clicking on the cancel button will stop the process.
6.2 Save Report - This option allows you to save the log report into HTML format for later use.
Export Single GroupWise Mailbox in Live Exchange
Note: Same steps will be applicable to export GroupWise mailbox to Public Folder and Archive mailbox of Live Exchange.
- There are two ways to export Single GroupWise mailbox into Live Exchange
- First Option : Go to the Ribbon Bar and click on the Live Exchange option under Export Single GroupWise Mailbox group.
- Second Option : Make a right-click on folder list >> go to Export In Live Exchange and then click Single GroupWise mailbox option.

- After clicking on the Live Exchange option, a select subfolder wizard will be open.
2.1 Select Sub Folder - When you check this option, clicking on any mailbox's check box will automatically select/unselect all subfolders of that particular mailbox.

2.2 Exclude Folders - This option allows to exclude unwanted folders from the process. To exclude the desired folder, click on the Add button and select/type the folder in the Skip folder dialog box

- Now click on the Next button, and there will be options for selecting a Live Exchange profile.
3.1 Migrate in Exchnage mailbox: Using this option, you can Select an already configured profile to migrate GroupWise mailbox into Live Exchange.

3.2 Migrate in selected Live Exchnage mailbox: - In this option, you have to provide your login detail to perform desired migration from GroupWise to Live Exchange.
Exchnage Name : Enter the Server Name or IP address of domain server where your Active Directory (AD) is installed.
User Email: Enter the Username of the user.
Password: Enter the Password of the respective user.
- 3.3 Export In: Using this option, one can select the Office 365 Public Folder and Archive Mailbox as a target to export GroupWise mailbox.
- Now click on the Next button, and a Status wizard will open.
The Status wizard shows a live log report keeping Target Folder, Item Count, Filtered Items, Process Item, and status in this report.

4.1 Cancel - Clicking on the cancel button will stop the process.
4.2 Save Report - This option allows you to save the log report into HTML format for later use.

